Unlike other Office
2010 programs, Outlook doesn't function for a single purpose or create a
single category of files. You use it to create, organize, and track
several types of information that are critical to keeping your daily
life functioning smoothly. To minimize the work of dealing with such
diverse items of information as e-mail messages, contacts, appointments,
tasks, and notes, Outlook provides a module for each type and presents
each module in a similar interface, allowing you to work with different
items of information in consistent ways.
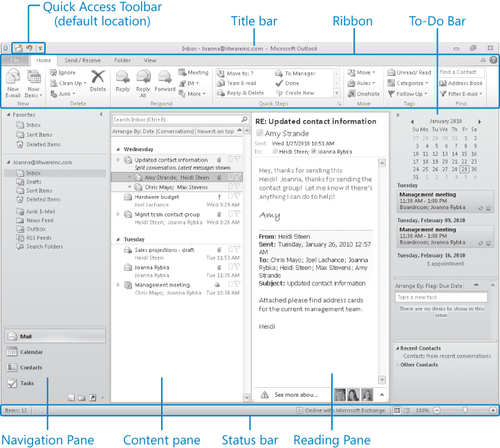
1. The Program Window
The Outlook program window includes eight areas in which you work with Outlook and your Outlook items.
The Outlook program window.
Note:
Troubleshooting
The appearance of buttons and groups on the ribbon changes depending on
the width of the program or item window.
Title bar The title bar displays the name of the active account. At the left end of the title bar is the Outlook icon. Clicking the icon displays a menu of commands for moving, sizing, and closing the program
window. The three buttons at the right end of the title bar serve the
same functions in all Windows programs: You can temporarily hide the program window by clicking the Minimize button, adjust the size of the window by clicking the Restore Down/Maximize button, and close the active document or exit Outlook by clicking the Close button.
Quick Access Toolbar By default, the Quick Access Toolbar appears to the right of the Outlook icon at the left end of the title bar. It displays the Send/Receive All Folders button and the Undo/Redo
button. You can change the location of the Quick Access Toolbar and
customize it to include any commands to which you want to have one-click
access.
The program window
and the windows in which you work with each type of Outlook item have
individually configurable Quick Access Toolbars. So, for example, you
can display commands specific to creating and formatting message content
only in message item windows and commands specific to creating and
managing tasks only in task item windows.
Tip:
If you create and work with
complicated Outlook items, you might increase your efficiency if you add
all the commands you use frequently to the Quick Access Toolbar and
display it below the ribbon, directly above the workspace.
Ribbon
Below the title bar is the ribbon. Commands for working with Outlook
items and item content are available from this central location so that
you can work efficiently with the program.
The program window and each of the Outlook item windows have individually configurable ribbons.
Navigation Pane This collapsible pane appears on the left side of the Outlook window. Its contents change depending on the module you're viewing—it might display links to folders, links to external content or Help topics, view options, and so on.
Note:
See Also For information about the available Outlook modules, see Section 2.1.2 later in this topic.
Content pane
This pane appears in the center of the window. It displays the content
of the selected module—your e-mail messages, calendar, contacts, and so
on.
Reading Pane
When this pane is displayed, you can preview the content of a selected
item or attachment (including fully formatted Microsoft Word documents,
Microsoft Excel worksheets, and Microsoft PowerPoint presentations) in
this pane.
The Reading Pane can be displayed in any Outlook module but is displayed by default only in the Mail and Tasks modules.
To-Do Bar
On the right side of the Outlook window, this collapsible pane displays
a monthly calendar, your upcoming appointments, and your task list.
The
To-Do Bar can be displayed in any Outlook module but is displayed by
default only in the Mail, Contacts, Tasks, and Notes modules.
Note:
Keyboard Shortcut Press Alt+F2 to display or hide the To-Do Bar.
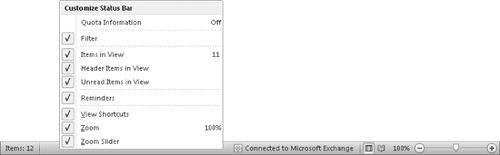
Status bar
Across the bottom of the program window, the status bar displays
information about the current document and provides access to certain
program features. You can control the contents of the status bar by
right-clicking it to display the Customize Status Bar menu, on which you
can click any item to display or hide it.
You can specify which items you want to display on the status bar.
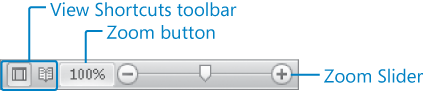
At the right end of the status bar are the View Shortcuts toolbar, the Zoom button, and the Zoom Slider. These tools provide you with convenient methods for adjusting the display of information in the content pane, the Reading Pane, item windows, and so on.
The buttons on the View Shortcuts toolbar change to reflect the available views of the active module.
Tip:
You might find that the
default Outlook window layout isn't perfectly suited for the way you
work on a day-to-day basis. Or perhaps you'd just like to try a
different layout. There are many ways in which you can personalize the
way Outlook appears and functions.
2. Outlook Modules
Outlook functionality is
divided among several modules that are specific to the content you work
with in them, including Mail, Calendar, Contacts, Tasks, and Notes.
You display and work with one module at a time in the program window.
The program window elements of each module present content-specific
functionality.
Tip:
When you first start Outlook, the program window displays the Mail module.
You can display any of the
primary modules—Mail, Calendar, Contacts, Tasks, or Notes—by clicking
the corresponding button at the bottom of the Navigation Pane. Or you
can hold down the Ctrl key and then press the function key representing
the module you want to display.
| Module | Keyboard shortcut |
|---|
| Mail | Ctrl+1 |
| Calendar | Ctrl+2 |
| Contacts | Ctrl+3 |
| Tasks | Ctrl+4 |
| Notes | Ctrl+5 |
Module buttons may be large, medium, or small, depending on the size and arrangement of
the Navigation Pane at that specific point in time. Each module button
is labeled with an icon that represents the type of content you manage
in that module.
The module button area at the bottom of the Navigation Pane.
