Introduction
Microsoft
PowerPoint provides many tools to help you coordinate your slide show
as a complete multimedia production. After all your effort to create
your presentation, the final details could be the lasting memory of
your slide show.
Before you can deliver a slide show, you need to
select the type of show you want. Will your show be presented by a
speaker, or be self running? Will your show include narration or
animation? These are some of the details you will need to set up for
your slide show. Some presentations include slides that are appropriate
for one audience but not for another. PowerPoint lets you create custom
slide shows that include only a selection of slides, in whatever order
you want, intended for a given audience.
After setting up your slide show requirements, you
can add other special features to customize your show. Elements such as
creating transitions between slides, adding special visual, sound, and
animation effects. Using animations—effects that animate your slide
elements, such as text flying in from the right or fading text after
it’s been shown, can increase the interest in your slide show.
PowerPoint includes tools that let you time
your presentation to make sure that it is neither too long nor too
short. You can set the timing of your slides as you rehearse your slide
show. To make sure each slide has enough time on the screen. You might
want to add a narration to your slide show or a music clip to play
during a planned coffee break in your presentation. You can also create
a self-running presentation to package for off-site clients or to run
at a trade show.
Creating Slide Transitions
If
you want to give your presentation more visual interest, you can add
transitions between slides. For example, you can create a fading out
effect so that one slide fades out as it is replaced by a new slide, or
you can have one slide appear to push another slide out of the way. If
you like a more excite or dynamic effect, you can use transitions with
3-D motion effects, such as 3D rotation or orbit (New!).
You can also add sound effects to your transitions, though you need a
sound card and speakers to play them. To quickly see if you like a
transition, point to one in the Transition Quick Style gallery to
display a live preview of it. When you add a transition effect to a
slide, the effect takes place between the previous slide and the
selected slide.
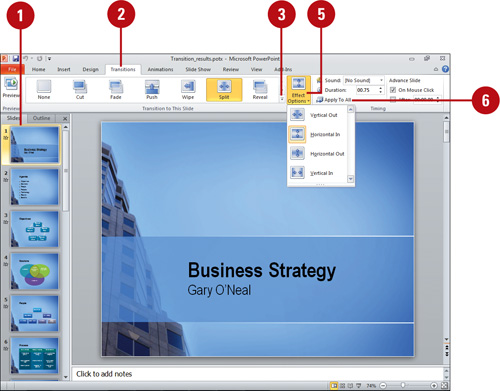
Apply a Transition to an Individual or All Slides
- 1. Click the slide(s) to which you want to add a transition effect.
- 2. Click the Transitions tab.
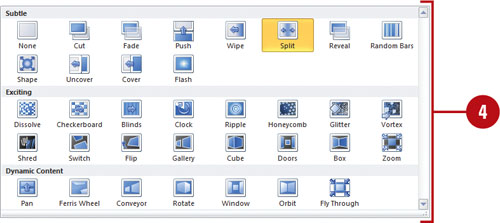
- 3. Click the scroll up or down arrow, or click the More list arrow in the Transition To This Slide group.
- 4. Point to a transition to view a live preview, and then click the transition effect you want.
- To remove a slide transition, click None.
- 5. Click the Effects Options button, and then an option for the selected effect, such as direction.
- 6. To apply the current transition to all slides in the presentation, click the Apply To All button.
Did You Know?
You can quickly view a slide’s transition quickly in Slide Sorter view. In Slide Sorter view, click a slide’s transition icon to view the transition effect.
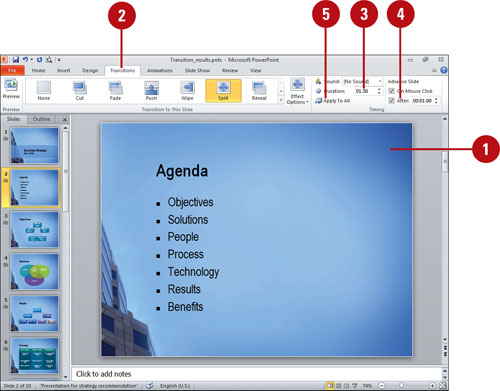
Set Transition Timing
- 1. In Normal or Slide Sorter view, click or display the slide whose transition effect you want to edit.
- 2. Click the Transitions tab.
- 3. Specify a duration for the selected transition.
- 4. To have the slide advance in a slide show after a certain time, select the After check box, and then specify a duration.
- 5. To apply the settings to all slides, click the Apply To All button.
Add Sound to a Transition
- 1. In Normal or Slide Sorter view, click or display the slide to which you want to add a transition sound.
- 2. Click the Transitions tab.
- 3. Click the Transition Sound list arrow, and then click a sound you want, or choose an option:
- Click [No Sound] or [Stop Previous Sound] to specify the command.
- Click Other Sound to select a sound file.
- Click Loop Until Next Sound to toggle the sound loop option.
- 4. To apply the settings to all slides, click the Apply To All button.
