Your WBS may not have started
out in Project. Maybe you scribbled it on a whiteboard, scrawled it on
sticky notes pasted to flip charts, or it's just rattling around noisily
in your head. Regardless of where your ideas are, you can make short
work of getting them into Project. Once you get familiar with the
techniques for outlining tasks described on the next few pages, you'll
develop a rhythm to your data entry. If you already have an outline, you
can quickly type or copy it into Project from the top down. Or if work
packages are bubbling up in your brain, you can enter them without
worrying about the order of the tasks or the overall structure. You can
rearrange and add summary tasks and work packages later.1. Creating a WBS in Project from the Top DownOne of the more efficient data entry methods is to start at the top of a WBS and complete each level of
tasks before dropping to the next level. Because Project creates a new
task at the same outline level as the previous task, this approach keeps
indenting and outdenting to a minimum. For
maximum efficiency, when you flesh out a lowest-level summary task,
insert as many rows as there are work packages for that summary task,
and then type the names of the work packages in the Task Name cells. The
following steps show you exactly how to work your way down a WBS one
level at a time: Click the File tab, and then choose New. Project selects "Blank project" in the Available Templates pane. On the right side of the window, click Create to create a new blank project file. The
Gantt Chart view appears with the Entry table on the left and the Gantt
Chart timescale on the right. If you don't see the Gantt Chart view,
click the Task tab, and then choose Gantt Chart in the View section. If
the WBS column doesn't appear in the Entry table, right-click the Task
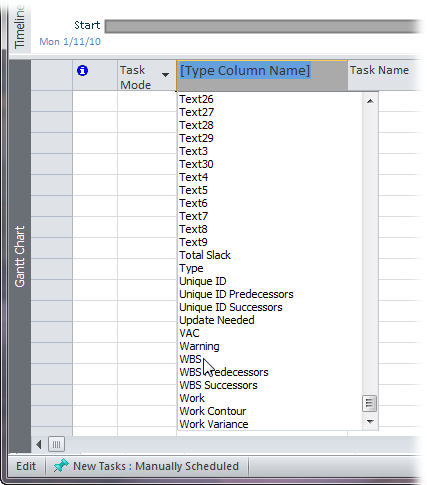
Name heading and, from the shortcut menu, choose Insert Column. Project inserts a new column to the left of the Task Name column with "[Type Column Name]" in the heading cell. Type WBS, and then press Enter. You could also scroll in the drop-down list, as shown in Figure 1 and then click WBS, but, in this case, typing is quicker.
Note: The WBS code
format that Project uses out of the box is a number at each level, with
levels separated by periods. If your organization has a custom WBS
format, you can set up your own WBS code .
In the Entry table, click the first Task Name cell, and then type the name of the first top-level summary task. Press Enter to save this task, and then move down to the Task Name cell in the next row, as shown in Figure 2.
Note: You don't have to create a top-level task for the overall project. Project has a project summary task,
which sits in an exalted position of Row 0 and rolls up the values for
all the other tasks in the schedule. If you want to see the Project
Summary task, choose Format Show/Hide Project Summary Task. To always
show the project summary tasks, click the File tab and choose Options.
In the Project Options dialog box, click Advanced. Finally, scroll to
the "Display options for this project" section, and then turn on the
"Show project summary task" checkbox.
Repeat step 5 for each top-level task in the WBS. Creating
the tasks at the top-level is as easy as it gets: You type a task's
name, press Enter, and repeat until all your top-level tasks are there.
Now you're ready to add tasks at the next level of the WBS. 
To
add subtasks to a summary task, click the Task Name cell immediately
below the summary task you're fleshing out, and then press Insert as
many times as there are subtasks, as demonstrated in Figure 3. This
step is the secret to speedy outlining because it works in the same way
at every level of the WBS: second-level, third-level, or lowest-level
summary task. When you insert rows for the lowest-level summary task,
insert as many rows as there are work packages for that summary task.
Then you can type away and fill them all in quickly. 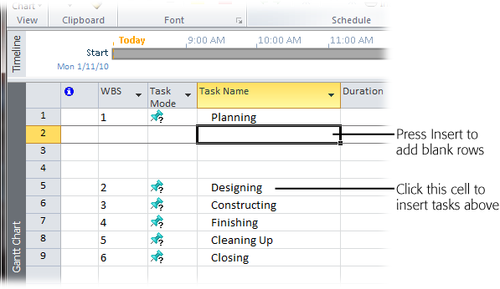
With
the blinking insertion point in the blank Task Name cell beckoning you,
type the name of the subtask, and then press Enter to create the task. Pressing
Enter moves the active cell to the next Task Name cell. However, the
first subtask isn't at the right level—it's still at the same level as
the summary task. To
indent the task, press the up arrow key, and then press Alt+Shift+right
arrow. Or, on the Task tab, click Indent Task (the green,
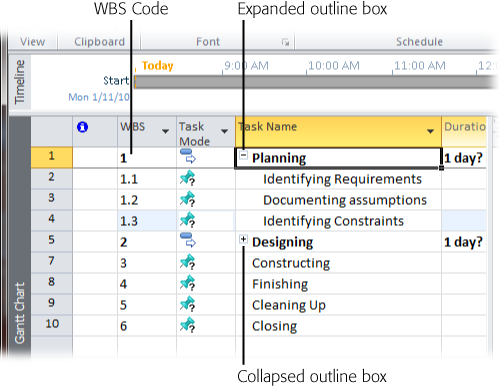
right-pointing arrow in the Schedule section). Project indents the subtask and indicates its subordinate position in two ways: with the WBS number and the outline box—both shown in Figure 4. Press the down arrow key to move to the next Task Name cell, type the name, and then press Enter. Because
the first subtask is at the correct level, the remaining subtasks come
to life at the right level for their summary task. Repeat steps 7 through 10 for every summary task in the WBS, ultimately filling in each level of the WBS. Your initial draft of the WBS is complete.
2. Creating and Modifying a WBS on the FlyIf
you're in high gear churning out project tasks, you can gleefully
insert, delete, and rearrange the WBS outline as you go. The resulting
WBS looks exactly the same as one methodically typed from the top down.
Also, the methods for adding, moving, and changing outline levels for
tasks are the same whether you're creating or modifying a WBS. You can
use the following techniques to develop a WBS in any order: Insert a new summary task without subtasks.
In the row below the new summary task, click the Task Name cell, and
then press Insert. Type the task name and press Enter. Select the new
summary task, and then either press Alt+Shift+left arrow or, on the Task
tab, click Outdent Task (the green, left-pointing arrow in the Schedule
section) until the summary task is at the level you want. Insert a new summary task for selected subtasks. If you want to summarize several existing tasks, you can use the Insert
Summary Task command (new in Project 2010). First, select the subtasks.
Then, on the Task tab, click Insert Summary Task in the Insert section.
(The icon looks like a summary task bar with a yellow asterisk.)
Project selects the Task Name cell, which contains the text "<New
Summary Task>", so you can simply start typing to name the new
summary task. Insert a new subtask.
In the row below an existing subtask, click the Task Name cell, and
then press Insert. The task appears at the same outline level as the
task you clicked. Make a summary task into a subtask.
Select the first subtask for the summary task, and then either press
Alt+Shift+left arrow or, on the Task tab, click Outdent Task (the green,
left-pointing arrow). When you outdent the subtask, the summary task's
outline box disappears. Move a subtask to the next lower level.
Select the task, and then press Alt+Shift+right arrow or, on the Task
tab, click Indent Task (the green, right-pointing arrow). The task drops
to the next lower level while the task above it turns into a summary
task.
Tip: If
you want to move, indent, outdent, or delete several tasks at once,
select them all, and then use the techniques in this section. To select
adjoining tasks in the outline, drag across the adjacent tasks. To
select several separate tasks, Ctrl-click each task.
Elevate a subtask to the next higher level. Click the task. Then, on the Task tab, click Outdent Task (the green, left-pointing arrow) or press Alt+Shift+left arrow. Move a subtask to another summary task.
Click the ID cell (the first column of the view table) for the task you
want to move. After the pointer turns into a four-headed arrow, drag
the task to its new home in the outline. Then change its outline level,
if necessary. Delete a subtask. Select the subtask, and then press Delete. Delete a summary task.
To delete a summary task and all of its subtasks, select the summary
task, and then press Delete, or right-click the summary task and choose
Delete Task from the shortcut menu. (And if you want to delete a summary
task and keep all its subtasks, see the box on Sparing the Subtasks.)
Note: To
use the Delete key to get rid of a task, you have to select the entire
task row by clicking the row's ID number. If you select only the Task
Name cell and then press Delete, Project deletes the text in the cell.
Alternatively, if you click the Smart Tag with an X, which appears to
the left of the Task Name cell, you can choose "Only clear the contents
of the Task Name Cell" or "Delete the entire task".
How do I delete a summary task without deleting its subtasks? It
depends on what you want to do with the subtasks. If you want to shift
the subtasks to a different summary task, it's easiest to first relocate
the subtasks to their new home. Then you can delete the empty summary
task by selecting it and pressing Delete. But
if you're not sure where you want the orphaned subtasks to end up,
simply change them to the same outline level as the summary task before
deleting the summary task. Here's how: Select the subtasks by dragging across their Task Name cells. Press
Alt+Shift+left arrow to change the tasks to the same outline level as
their summary task. You can tell that the summary task is devoid of
subtasks because the outline box with the + or – sign disappears. Select the summary task demoted to a regular task, and then press Delete.
|