You can use the sort function
to better communicate and report project information. Project also
makes it easy to filter, group, and sort by taking advantage of the
auto-filter function.
1. Sorts
Sorts act similarly to sort
functions in other applications such as Excel. In Project, by default,
line items are organized and sorted by ID number (the numbers at far
left in the Gantt Chart view in the Entry table). The ID numbers are
another field; every line item, whether it's a summary, task, or
milestone, has its own ID number.
You can change the sort by
using the sort function for other criteria. For example, you can sort by
start date or finish date to see a cascading left-to-right view of your
tasks.
As with filters and groups, Project comes equipped with predefined sorts. As shown in Figure 1, you can access the sort function by following these steps:
Go to View tab => Data group, and click Sort.
From the drop-down list, choose the desired sort criteria. Note that the default sort is based on ID number.
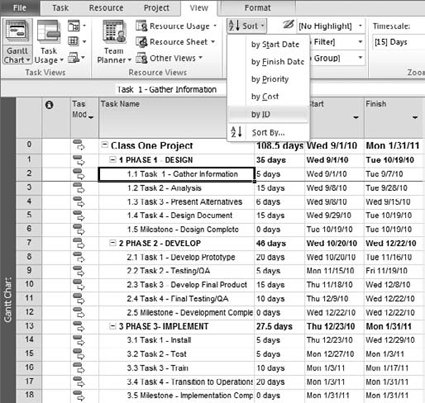
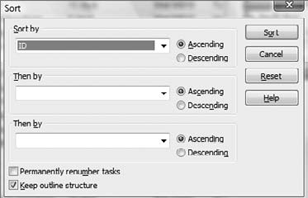
To undo a sort or revert to the original sort, you must apply the By ID sort. You can also create a custom sort, as shown in Figure 2, by following these steps:
Select View tab => Data group => Sort drop-down list => Sort By.
In the Sort dialog box, from the Sort By drop-down list, select the field you want to sort by.
If you wish, you can add up to two more sorts using the Then By options.
Choose Ascending or Descending.
Optionally, you can permanently renumber the tasks based on the order that results from the sort.
2. Auto-Filters
The auto-filter tool is
activated by default for each column in each table you have running in a
specific view. This function is indicated in the column headings by the
appearance of a drop-down arrow. Every column has its own drop-down
arrow, giving you access to the auto-filter for that column in each
table.
Although this function is based on the auto-filter command, as shown in Figure 3,
you can also run sorts and groups. This is a practical way to get at
information in the way you want. It may replace the need to use group,
sort, and filter commands directly.
The example shown in Figure 3
uses the auto-filter to create a view that displays only the tasks in
the coming month (October). To create this view, follow these steps:
In the Start column, click the drop-down arrow to open the auto-filter list.
Under Filters, deselect the months you don't want to include. In this case, only select the October options.
Alternatively, click Filters => Next Month.
To remove the filter, select Clear Filter from Start from the same drop-down list.

This example is useful for
team meetings when you need to review upcoming activities for the next
period. You'll also find this useful with other columns, such as
resource names, finish dates, and costs, and even to find specific tasks
in the Task Name column.
Although the default is to
have the auto-filter drop-down arrow appear in each column heading in
each table, you can turn it off. To turn off the auto-filter, follow
these steps:
Go to View tab => Data group, and click the [No Filter] drop-down list.
From the list, select Display AutoFilter to turn off (or on) the auto-filter function.