Adjusting Resource Calendars
An individual resource within your project may use a
different calendar from the rest of the organization. For example, one
of your project’s resources might be out on vacation for two weeks in
the middle of July, or a specific piece of equipment might be available
for reservation only on Mondays, Tuesdays, and Wednesdays each week.
You can set a resource-specific calendar to accurately represent when
that resource is able to work on your project.
To set a separate calendar for a resource, follow these steps:
1. | On the Project tab of the ribbon, in the Properties group, click Change Working Time.
|
2. | Click Create New Calendar.
|
3. | Choose how you want to create the resource’s calendar:
- Create new base calendar—
Click this option to create a new calendar for the resource, from
scratch. Working times will be set to the calendar options from the Project Options dialog box, by default.
- Make a copy of [existing base] calendar— Click
this to use an existing base calendar as a starting point for the
resource’s calendar. Use the drop-down list to choose which base
calendar you want to copy.
|
4. | Type a name for the resource’s calendar in the Name
box. You may want to use a name that helps to identify this as a
calendar that is intended for use by a specific resource. This helps
differentiate it from the base and task calendars for your project.
|
5. | Click OK to create the resource’s calendar.
|
6. | Similar
to creating a base or task calendar, set the working days, nonworking
days, default working times, and working times for specific time
periods in the resource’s calendar.
|
7. | With the resource’s calendar set up and saved, on the View tab, in the Resource Views group, click Resource Sheet.
|
8. | Choose the calendar you just created in the Base Calendar column for the corresponding resource.
|
Assigning Resources to Tasks
After you add resources to your project, the next step is to assign them to tasks within your project.
Assigning a Resource Using the Task Information Dialog Box
You have a few different ways to assign work,
material, and cost resources to tasks in your project. The Task
Information dialog box provides a convenient location to identify
details about the resource assignment, including the assignment owner
and what percentage of the resource will be used for the task.
To assign a resource to a task in your project, follow these steps:
1. | In the Gantt Chart view, double-click the row for a task.
|
2. | Click the Resources tab on the Task Information dialog box.
|
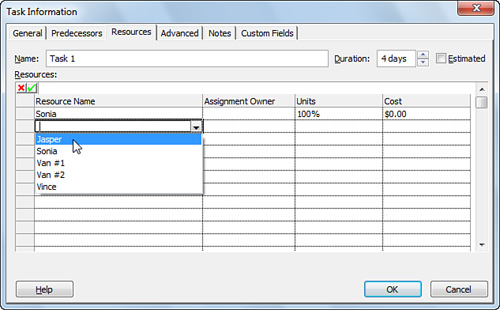
3. | Click once in the first available row in the Resource Name column and use the drop-down list to select the resource you’re assigning to the task, as shown in Figure 1. This list is populated by the resources you have added to your project.
|
If your organization has assignment owners who are
separate from the project managers (for example, if your organization
has a central resource manager for projects), type the resource’s
assignment owner in the Assignment Owner column. This is a rare, advanced situation.
|
|
4. | Type a percentage in the Units
column that represents how much of the resource’s time (or, if you’re
assigning a material resource, units as identified in the Material Label column of the Resource Sheet
view) will be spent on this task. For example, if a single resource is
working half-time on this task and half-time on other tasks, type 50% in the Units column.
|
The Cost column is automatically populated using the information you entered for the resource in the Resource Sheet view. To view the populated Cost column, click OK on the Task Information dialog box and then double-click the task again to reopen it and see the calculated cost.
|
|
5. | Click OK to assign the resource to the task.
|
Assigning a Work Resource Using the Team Planner View
For work resources in your project, you can use the Team Planner view to assign tasks to specific people.
Here are the steps to follow to assign a task to a work resource using the Team Planner view:
1. | On the View tab, in the Resource Views group, click Team Planner.
|
2. | Click and drag a task listed under Unassigned Tasks up to a row in the time-scaled portion of the view for one of the work resources listed in the Resource Name
column. When dragging the task, note that you can also adjust where the
task falls horizontally in the time-scaled portion of the view. This
will adjust the start and finish dates for the task and may result in a
change in the constraint for the task.
|
3. | If you want to add another resource to a task that is already assigned to a work resource in the Team Planner view, double-click the task bar to open the Task Information dialog box.
|