One of the most useful and powerful features in Visio
for sharing diagrams is its ability to create a website from a Visio
document. The Visio-generated website includes all foreground pages,
preserves both page-to-page and external hyperlinks, and includes the
following bonus features:
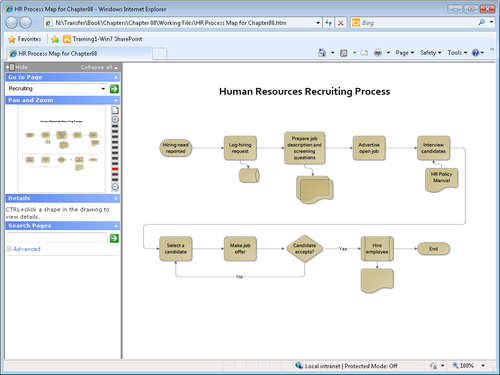
A table of contents that allows you to jump to any page A pan-and-zoom pane that lets you click and drag to zoom and navigate around any page A details window to present shape data for any shape Full-text search for all text in the entire drawing
If
you haven’t explored the Save As Web Page option in Visio, you owe it to
yourself to do so. Whether you want to share drawings on your intranet
site with colleagues who don’t have Visio, or publish diagrams on the
public World Wide Web, this Visio feature can make your diagrams more
accessible.
In this exercise, you will create and explore a website generated with default Visio web publishing settings.
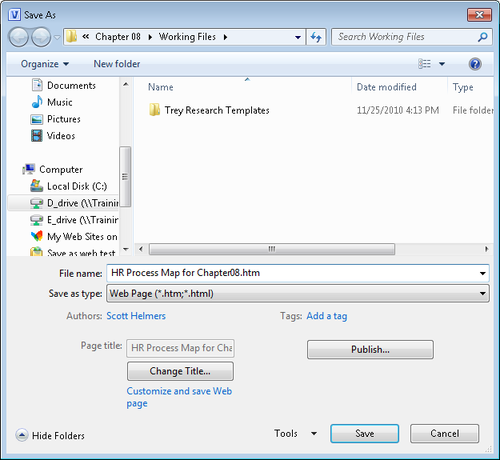
Save As

On the File tab, click Save As. In the Save as type list, click Web Page.
After
you select Web Page, the bottom of the Save As dialog box changes to
offer additional choices related to creating a website. For this
exercise, you will accept the default settings that lie behind the
Change Title and Publish buttons.
Warning:
Important
The Change Title and Publish buttons do not exist in the Standard edition of Visio 2010.
Click Save. One or more progress indicators appears. Your
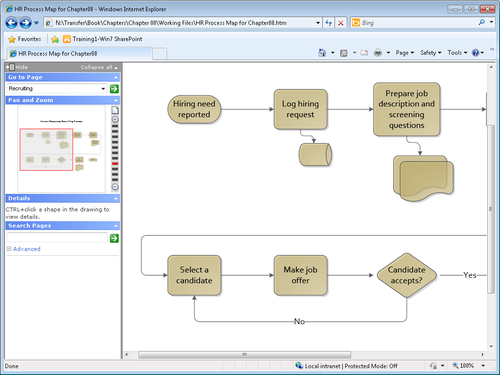
Visio-generated website appears automatically in Internet Explorer. In
addition to a viewing pane, notice the four-part navigation pane on the
left side of the browser window.
Warning:
Important
The website produced by Visio
uses software that does not work well in browsers other than Internet
Explorer. In Firefox, for example, you will see the image of each page,
but the additional capabilities described in the remaining steps of this
exercise will probably not be available. Consequently, even if you use
Firefox or other software as your primary web browser, you will want to
view your Visio-created websites in Internet Explorer.
Note:
For the best browser viewing
experience, you need to install Microsoft Silverlight. Information about
Silverlight is available at www.microsoft.com/silverlight/. If you do not install Silverlight, you will have fewer viewing options.
Point to the Hire employee subprocess shape. Because this shape contains a hyperlink, Internet Explorer displays a pop-up that contains up to three entries:
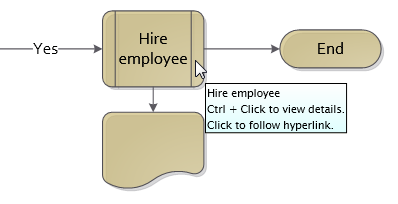
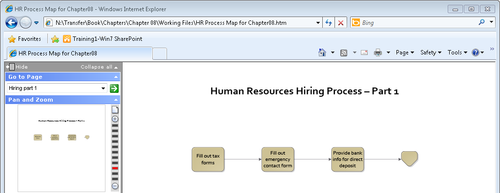
Click the Hire employee shape. Internet Explorer follows the hyperlink to the subprocess page.
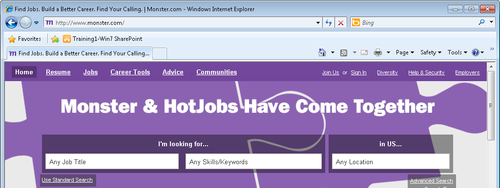
Click the browser’s Back button to return to the first page. Click the Advertise open job shape. This shape contains a hyperlink to monster.com, so that webpage appears.
Click the browser’s Back button to return to the first page. In the Go to Page section of the navigation pane, click the down arrow, and then click Hiring part 2. Finally, click the green button containing the white arrow to go to the page you’ve selected. The viewing pane displays the selected page. Click the browser’s Back button to return to the first page. In the Pan and Zoom section of the navigation pane, drag from the upper-left edge of the Hiring need reported shape to the upper right of the Prepare job descriptions and screening questions
shape. As you drag the cursor, you’ll see a blue box appear; it will
follow your cursor to the right and will also expand downward. When you
let go of the mouse, the box you’ve drawn turns from blue to red and the
viewing pane shows just that portion of the drawing page.
Warning:
Important
You can’t control the shape of
the box you draw in the Pan And Zoom pane. It will maintain the same
aspect ratio as the viewing pane to the right. With Internet Explorer
opened to full screen on a system with resolution of 1024×768, the
result looks like the following diagram.
After
you’ve drawn a zoom box, you can drag it left, right, up, and down
within the Pan And Zoom pane to move the image in the viewing pane. You
can also click the buttons and bars at the right edge of the Pan And
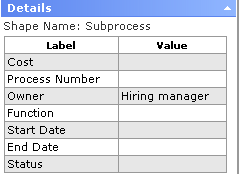
Zoom pane to zoom in or out. In the upper-right corner of the Pan and Zoom pane, click the icon that looks like a piece of paper to return the viewing pane to full page view. Hold down Ctrl and click the Hire employee shape. The shape data for this shape appears in the Details pane, which is located just below the Pan And Zoom pane.
In the Search Pages pane, type candidate, and then click the arrow in the green square to execute the search. A list of all shapes that contain any form of the word candidate appears below the search box. What
is particularly impressive about the full text search is that it
presents more than just a list; it creates a hyperlinked list of search
results, as you will discover in the next step. Click the Select a candidate link in the Search Pages
pane. Notice that an orange arrow appears over that shape for several
seconds to show you exactly where on the page your search result is
located.
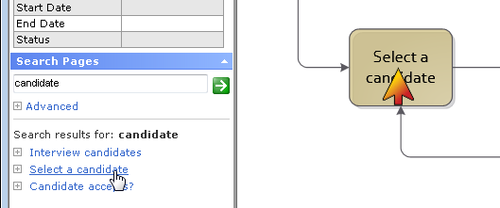
Try clicking the other entries in the search results list to see that the arrow points to each of them. In the Search Pages pane, type manager, and then press Enter to execute the search.
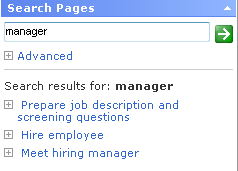
At first glance, the search results look incorrect because two of the three listed items don’t contain the word manager.
However, it’s important to understand that the search function is
looking at the shape data inside the shapes as well as the text on the
shapes. Consequently, if you click the first or second entry and then
hold down Ctrl and click on the designated shape, you’ll see that the
shape data in the Details pane does, indeed, include the word manager.
Tip:
You can also see the shape data associated with a search result by clicking the plus sign to the left of the search result.
Click Meet hiring manager
in the search results list. Even though the designated shape is located
on another page, the target page will first appear in the viewing pane
and then the orange arrow will appear.
Important
There is a known
issue in the interaction between the network and computer shapes in
several Visio stencils and the Save As Web Page function in Visio 2010.
If you save a drawing containing those shapes to the web, the text in
those shapes will not be found by the full-text search function, even
though it should be.
|