Although Exchange Server 2010 allows up to
100 mailbox databases, the examples here will be limited to a single
mailbox database. As discussed earlier, some Exchange deployments may
only require a single mailbox database, since the recommended maximum
size is now 2 TB for mailbox databases that have multiple copies.
1. Viewing Mailbox Databases
You can view the current mailbox database for each server using the EMC, or you can use the Get-MailboxDatabase cmdlet to list all the mailbox databases stored on an Exchange Server:
Get-MailboxDatabase -server MTLEXC01

Name                 Server          Recovery         ReplicationType
----                 ------          ---------       ----------------
Mailbox Database 1   MTLEXC01        False              None
Mailbox Database 2   MTLEXC01        False              None
A new parameter for the Get-MailboxDatabase cmdlet is -includePreExchange2010.
This parameter instructs the cmdlet to return information for all
mailbox databases in the organization, including those on servers that
run previous versions of Exchange Server. For example, the following
command will return all mailbox databases in a mixed organization:
Get-MailboxDatabase -IncludePreExchange2010
Of course, you can narrow the scope of this output to just a specific server or a specific storage group using the Where-Object cmdlet (well, just the Where alias). Here are some examples:
Get-MailboxDatabase -IncludePreExchange2010 | Where {$_.Server -eq "HNLEX03"}
Get-MailboxDatabase -IncludePreExchange2010 | Where {$_.StorageGroupName -eq
"Executives SG"}
2. Creating Mailbox Databases
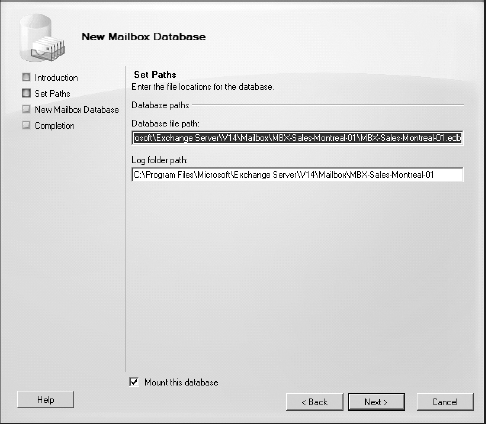
To create a new mailbox database, right-click on the
Mailbox role in the Organization pane and select New Mailbox Database
(or New Public Folder Database, if you plan to store public folders on
your server). This launches the New Mailbox Database wizard, shown in Figure 1.
To create a new mailbox database, provide a name for the database and
then enter the name of the server that will store the database; the
path will automatically be completed and the database's EDB file will
be put in the same path as the transaction logs.

When creating a new mailbox database, name the
database something that is standardized and descriptive, but unique in
the entire organization. Note that a mailbox database can be activated
and then mounted on any Mailbox server in your organization, given that
it is part of the same DAG. This new functionality introduced in
Exchange Server 2010 created the requirement for unique mailbox
database names within an organization. Also, making sure the filename
matches the display name of the database will ensure that it is easier
to manage. For example, a database name of MBX-Sales -Montreal-01
can adequately describe the mailboxes stored in the database, as well
as include a numerical trailer to allow for growth in the Sales
department.
Normally, you would modify the database file and
transaction log paths and select a correct location for the mailbox
database now, but we will show you how to move the mailbox database in
the next section.
The wizard creates the configuration for the
database and then mounts the database. This will initialize a new empty
database file. The resulting commands are as follows; the New-MailboxDatabase cmdlet is used in the command to create the database and the Mount-Database cmdlet is used in the command to mount the database:
New-MailboxDatabase -Name 'Executives' -EdbFilePath
'F:\executiveslogs\Executives.edb'

Mount-Database -Identity Executives
Notice that when the database was created,
the distinguished name of the database was not used. This is because we
know that the database name is unique, and therefore the location does
not need to be specified. All databases are always created in the same
location under the Exchange organization.
3. Moving the Mailbox Database EDB File
We created the database in the default path (see Figure 1)
so we could illustrate the process of moving it. Using the EMC, you can
move the database by choosing the Move Database Path task in the
Actions pane. The only thing that needs to be provided in the Move
Database Path wizard is the new location of the database file.
When you specify that you are about to move the
database, you are warned that the database will be dismounted while the
files are being copied and that it will be inaccessible.
The amount of time that it takes to move the
database file will depend both on the size of the database file and the
speed of the disk subsystem. Once the file is moved, the Completion
page of the Move Database Path wizard will show the EMS command that
was used to move the database file. Here is an example:
Move-DatabasePath -Identity Executives -EdbFilePath
'F:\ExecutivesDB\Executives.edb'
4. Moving the Mailbox Database Log Files
The same method using the EMC outlined in the
previous section can be used to move the Transaction Log folder
location for a mailbox database. Administrators of previous versions of
Exchange Server remember that the Transaction Log folder location was
tied to a storage group. By using the EMC in Exchange Server 2010 and
selecting the Move Database Path option in the Actions pane, you can
also modify the Transaction Log folder path.
The resulting cmdlet that moves the Transaction Log folder has the following syntax:
Move-DatabasePath -Identity Executives -LogFolderPath F:\Databases\Logs