7. Use Your Template Part as a Control
| Scenario/Problem: | You want to use your form template part in a SharePoint form. |
|
| Solution: | Drag your template part control onto your form. |
After you have added your template part as a custom
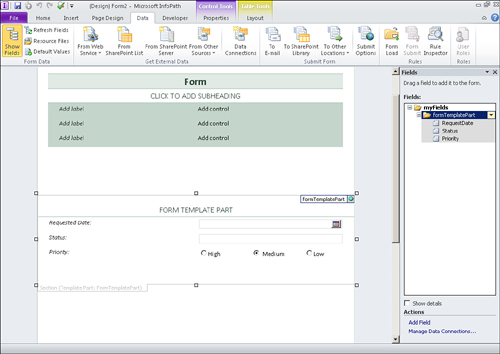
control, you may use it like any other control. Dragging the template
part onto your form adds the control to your form, as shown in Figure 8. The controls and fields from your template part are added to the form, as well.

Tip
In your template part, you should rename the
myFields main data source to the name of your template part such that
when using it in a form, the fields group is more descriptive.
8. Change the Name of Your Custom Control
| Scenario/Problem: | You want to change the name that appears in the Controls list for your form template part. |
|
| Solution: | In your form template part, modify the template part properties. |
The custom control name defaults to the filename of
your template part but often times there are no spaces and it may not
be the name you want displayed in the control box.
To modify the custom control name used for your template part, follow these steps:
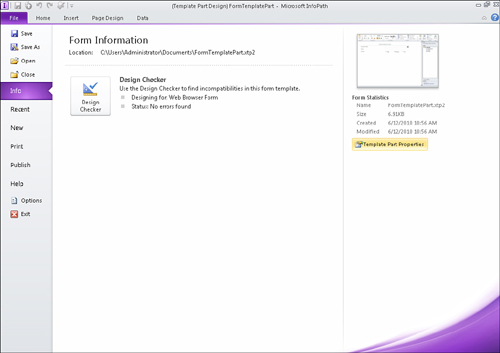
1. | With
your form template part file opened in InfoPath Designer, select File,
Info to display the Form Information screen, as shown in Figure 9.

|
2. | Click the Template Part Properties button to display the Template Part Properties dialog.
|
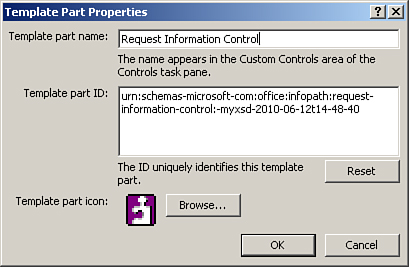
3. | Enter a new name for the form template control, as shown in Figure 10, and click OK. This determines what name appears in the controls box.

|
4. | Click File, Save to save the changes to your form template part file.
|
Tip
Use a control name that is descriptive and clear to others if you intend to share your form template part.
Note
You will need to remove the old template part custom control and add the new one to see the name changes.
9. Change the Icon of Your Custom Control
| Scenario/Problem: | You want to change the icon that appears in the Controls list for your form template part. |
|
| Solution: | In your form template part, modify the template part properties. |
The custom control icon defaults to the InfoPath
template part icon. Having several of these in the Controls list could
cause confusion (or just look boring).
To modify the custom control icon that is used for your template part, follow these steps:
1. | With your form template part file open in InfoPath Designer, select File, Info to display the Form Information screen.
|
2. | Click the Template Part Properties button to display the Template Part Properties dialog.
|
3. | Click Browse to browse for a new picture file and click Open on the file dialog.
|
4. | Click OK on the Template Part Properties dialog.
|
5. | Click File, Save to save the changes to your form template part file.
|
Note
You will need to remove the old template part custom control and add the new one to see the icon changes.