1. Sharing a Workbook
SkyDrive
doesn’t just provide you with the convenience of being able to work
with your workbooks wherever you are. It’s also set up to help you
share your workbooks with other people.
1.1 Creating a New Folder
When you create an account, SkyDrive provides two
folders for storing your documents: My Documents, a protected folder
only you can access, and Public, a folder available to anyone. You
cannot change the permissions of these two folders, but you can create
new folders and set the permissions you want for them.
Creating a New Folder
To create a folder from your SkyDrive main page, follow these steps:
1. | Select Create Folder.
|
2. | Enter the name of the folder in the Name field
|
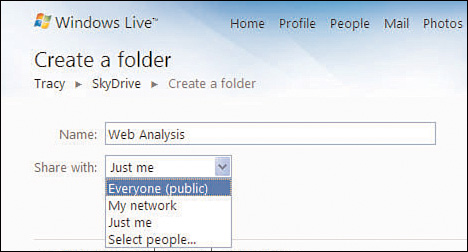
3. | Choose who you want to share the folder with: Everyone (Public), My Network, Just Me, Select People (see Figure 1).

|
4. | Click Next, and you have the option of uploading new files or clicking Cancel to add files at a later time.
|
1.2 Setting Folder Permissions
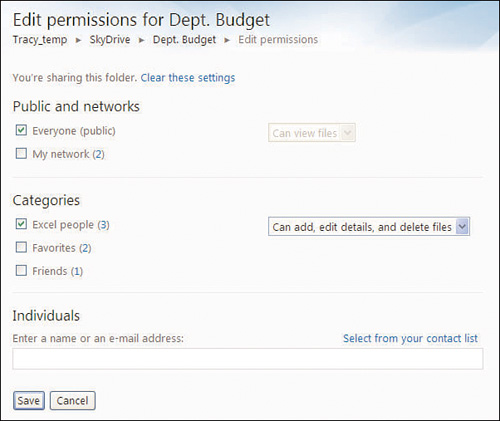
When you created the preceding folder, Windows Live provided the basic permission settings. For the additional options shown in Figure 2, choose More, Edit Permissions while viewing the contents of a folder:
Public and Networks—
Select Everyone (Public) and anyone can view the contents of the
folder. Select My Network and you can choose between Can View Files if
network members can only view your files or Can Add, Edit Details, and
Delete Files to give members full permission to modify your folder
contents. When you choose My Network, you can also select My Extended
Network, allowing networks of your networks (friends of your friends)
to View the contents of the folder.
Categories—
A listing of the available categories. Select the category and choose
Can View Files to allow members to only view files or choose Can Add,
Edit Details, and Delete Files to give members full permission to
modify your folder contents.
Individuals—
Share the folder with select individuals. For each name or email
address entered, you can choose to allow the individual to only view
files (Can View Files) or give full access to the folder (Can Add, Edit
Details, and Delete Files).

1.3 Simultaneous Editing
If
you’re allowing others to edit your workbook, eventually you will be
editing the workbook at the same time as another person. When you are
the sole person editing the workbook, the text in the lower-right
corner of your browser window reads 1 Person Editing. If other people
are editing at the same time, the text will update to reflect the
number of people.
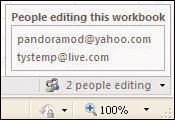
To see who else is in the workbook with you, click
the arrow and a window will open up, showing everyone in the workbook,
including you, as shown in Figure 3.

Because
changes to workbooks are automatically saved, you can see what the
other person is doing almost right away. There is no hierarchy of
permissions or way to verify changes, so another user can change your
changes as quickly as you can make them.
2. Interacting with a Sheet Online
Even though the page in your browser looks a lot
like the desktop version of Excel, it’s not. It’s still just a web
page, and the navigation methods you’re used to from desktop Excel
won’t work.
The following navigation methods do not work in the Excel Web App:
There’s no right-click context menu.
There’s no fill handle, so you can’t drag to fill in a series or copy formulas.
You can’t double-click to autofit rows or columns.
You can’t double-click a cell to edit it. You’ll have to make changes directly in the formula bar.
If
you have data/text in one cell bleeding into the one next to it, you
can’t select the other cell until you make the first column wide enough
so it doesn’t overlap into the other column.
You can’t click and drag to move cells, rows, or columns.
The following methods still work in the Excel Web App:
Keyboard shortcuts
Adjusting the row and column widths manually
Dragging to select a range
Clicking row and column headings to select the entire row or column