The first step in configuring the three
advanced Enterprise Voice features of Call Admission Control, Media
Bypass, and Enhanced 911 is to define the network configuration. Each
of these features relies on the network configuration to work
correctly. The following section explains how to create the necessary
network objects before configuring any of the advanced features.
Network Regions
A network region in Lync Server 2010 is generally a
large area that encompasses a number of network sites. These are the
hubs or backbones of the network. Each region is associated with a
central site where a Lync Server 2010 Front End pool exists.
Use the following steps to create a new network region.
1. | Open the Lync Server 2010 Control Panel.
|
2. | Click Network Configuration.
|
3. | Click Region.
|
4. | Click the New button.
|
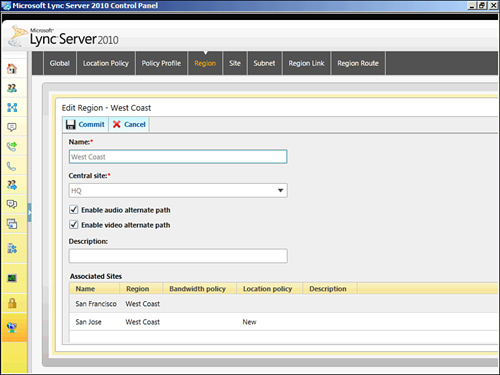
5. | Enter a Name for the region.
|
6. | Select a Central Site for the region. This is a site in the topology containing Lync Servers.
|
7. | Select Enable audio alternate path if this region allows audio traffic to use alternative routes.
|
8. | Select Enable video alternate path if this region allows video traffic to use alternative routes.
|
9. | Click Commit. Network sites can be associated at a later time. A sample Network Region definition is displayed in Figure 1.
|
Alternatively, a new network region can be created with the Lync Server Management Shell:
New-CSNetworkRegion –Identity <Network Region Name> -CentralSite <Lync Site
Name> -Description <Region Description> -AudioAlternatePath <$True|$False>
–VideoAlternatePath <$True|$False>
Network Sites
A network site represents a particular office
location that can be a main headquarters, a branch office, or a
collection of buildings in a campus. Network sites typically have
similar bandwidth and each site is then associated with a network
region. The central site defined for the region is typically included
as a site in the region because it is not done automatically.
Use the following steps to create a new network site:
1. | Open the Lync Server 2010 Control Panel.
|
2. | Click Network Configuration.
|
3. | Click Site.
|
4. | Click the New button.
|
5. | Enter a Name for the site.
|
6. | Enter a Description for the site.
|
7. | Select a Region to associate the site with from the drop-down menu.
|
8. | Bandwidth policy, location policy, and associated subnets can be added at a later time after those objects exist.
|
9. | Press the Commit button.
|
Alternatively, a new network site can be created with the Lync Server Management Shell:
New-CSNetworkSite –NetworkSiteID <Site Name> -Description <Description of
site> -NetworkRegionID <Name of region to associate site with>
Network Subnets
Network
subnets in Lync Server 2010 are the glue that binds a client connection
to a specific network site, and region. When a Lync client performs an
action that requires network awareness, the client IP address is
examined and then used to determine the appropriate action based on the
associated policies with the endpoint subnet.
Use the following steps to create a new network site:
1. | Open the Lync Server 2010 Control Panel.
|
2. | Click Network Configuration.
|
3. | Click Subnet.
|
4. | Click the New button.
|
5. | Enter a Subnet ID that is the actual network IP address.
|
6. | Enter a Mask
for the subnet. This value is the number of bits used for the subnet
mask. For example, if the subnet uses a 255.255.255.0 mask, enter 24
for this value.
|
7. | Select a Network site ID to associate with the subnet.
|
8. | Enter a Description for the subnet.
|
9. | Click Commit.
|
Alternatively, a new network site can be created with the Lync Server Management Shell:
New-CSNetworkSubnet –SubnetID <Network Address> -MaskBits <Number of bits in
subnet mask> -NetworkSiteID <Associated network site>
After network regions, sites, and subnets
have been created in the deployment, Call Admission Control, Enhanced
911, and Media Bypass can be configured.