When making changes to voice configuration
in Lync Server 2010, the changes are not actually active to clients
until published. In other words, creating new routes or policies has no
effect on the environment unless published by an administrator.
Before publishing occurs, the pending changes can be reviewed by using the following steps:
1. | Open the Lync Server 2010 Control Panel.
|
2. | Click Voice Routing.
|
3. | From any submenu, click the Commit button, and then select Review uncommitted changes.
|
4. | Click Close after reviewing the pending changes.
|
To publish the uncommitted changes, use the following steps:
1. | Open the Lync Server 2010 Control Panel.
|
2. | Click Voice Routing.
|
3. | From any submenu, click the Commit button, and then select Commit all.
|
4. | The uncommitted changes are displayed again on this screen. Click Commit to save the changes.
|
Note
Navigating away from the Voice Routing page before committing changes is cause for pending changes to be lost.
Another option is to cancel all the uncommitted
changes if they are not working as expected. Use the follow steps to
cancel pending changes:
1. | Open the Lync Server 2010 Control Panel.
|
2. | Click Voice Routing.
|
3. | From any submenu, click the Commit button and select Cancel all uncommitted changes.
|
4. | Click OK to confirm the choice.
|
If the intent is to only cancel a single pending change, use the following steps:
1. | Open the Lync Server 2010 Control Panel.
|
2. | Click Voice Routing.
|
3. | Click the tab that has the changes you need to cancel.
|
4. | Highlight the object you are going to cancel.
|
5. | Click the Commit button and select Cancel selected changes.
|
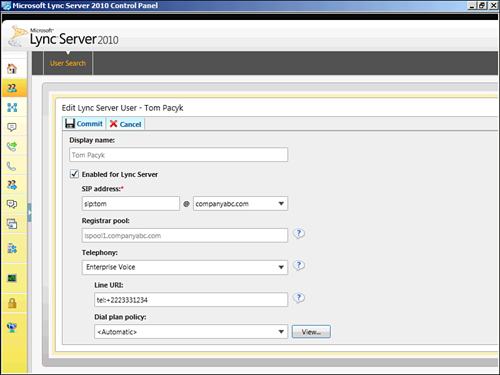
Managing Enterprise Voice Users
Before a user has the ability to make and receive
PSTN calls, he must be enabled for Enterprise Voice. After a user
account has been enabled for Lync, the account can be optionally
enabled for Enterprise Voice.
To enable an existing user for Enterprise Voice, use the following steps:
1. | Open the Lync Server 2010 Control Panel.
|
2. | Click Users.
|
3. | Enter a search for a user who has been previously enabled for Lync and click Find.
|
4. | Highlight the user to be enabled, click the Edit button, and then select Show Details.
|
5. | Click Telephony and select Enterprise Voice.
|
6. | Enter a Line URI for the user. The format for the Line URI should begin with tel:. For example, tel:+12345678901.
|
7. | Select a Dial plan policy for the user.
|
8. | Select a Voice policy for the user.
|
9. | Click Commit. Figure 1 shows a sample user being enabled for Enterprise Voice abilities.
|
A user can also be enabled for Enterprise Voice using the Lync Server Management Shell:
Set-User –Identity <User Name> -EnterpriseVoiceEnabled $true –LineURI "tel:<E.164 number>"
Voice Policies
After creating voice policies with a user scope,
they can be assigned to users through the Lync Control Panel or Lync
Server Management Shell. Use the following command to assign a dial
plan directly to a user:
Grant-CsVoicePolicy –Identity <User Name> -PolicyName <Voice Policy Name>
Dial Plans
After creating dial plans with a user scope, they
can be assigned to users through the Lync Control Panel or Lync Server
Management Shell. Use the following command to assign a dial plan
directly to a user:
Grant-CsDialPlan –Identity <User Name> -PolicyName <Dial Plan Name>
Private Lines
Private phone lines in Lync Server 2010 are a new
feature that enables an Enterprise Voice user to have a secondary phone
extension associated with his account. This number is not published in
address books, but the user can be reached through this number.
Incoming calls
indicate the call is to the private line and can have an alternative
ringing sound associated. Private lines can be associated only with a
user through the Lync Server Management Shell. Use the following
command to assign a private line:
Set-CsUser –Identity <User Name> -PrivateLine tel:<Phone number>