1. Archiving IM Conversations
IM conversations can be archived in two ways. One way is for an
administrator to implement an archiving policy on an archiving server.
The other way to archive messages is into Outlook.
In the Options area, under the Personal tab, is the option to Save
instant message conversations in my email Conversation History folder.
If this option is checked, each conversation is saved into this e-mail
folder at the time the IM window is closed. This is a useful way to
access old conversations and this folder’s contents are indexed for
easy searches.
Tip
Note that unlike most IM systems, if you send
an IM to a user that is offline, it won’t queue up and wait for the
user’s next logon. You simply receive a message saying, “This message
was not delivered to [target name] because this person is unavailable
or offline.”
The IM interface enables one person to send a file to the
other participant of the IM conversation. On the far right side of the
toolbar is a paperclip icon. Clicking this icon opens a file-browsing
session to enable the user to identify a file to send to the other
user. Files can only be sent one at a time. Trying to Ctrl-click
multiple files results in simply changing the file, not adding users to
a list. Click Open after the file is selected. The person set to
receive the file receives a notification and has the option to Accept,
Save As, or Decline the file. Accepting the file
triggers a warning window to warn the user that the file might contain
harmful malware and that she should accept files from only someone she
knows. After it is accepted, it downloads and a link displays to access
the file. The sender of the file receives a notification that the
transfer was successful.
2. Making Audio Calls
Initiating an audio call is as simple as right-clicking a contact,
choosing Call, and specifying that it should be a Lync call. Then, the
contact receives a pop-up and an audio notification and has the option
to answer, decline, or redirect. Answer and decline should be fairly
obvious in what they do. Redirect gives the option to reply through IM
or to set one’s status to Do Not Disturb. Accepting the call updates
both users’ status to In a call.
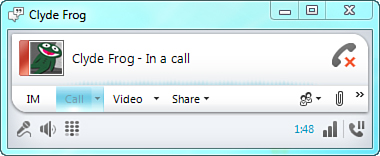
When the call connects, a new window displays that looks similar to
the IM window. In fact, it is the same window, but now it’s on the Call
tab, as shown in Figure 1.
Figure 1 The Call Window
The Call window offers several buttons, including
• Mute microphone
• Adjust volume or mute speakers
• Display dial pad
• Hold
Muting the microphone alters the icon on the client that muted his
microphone. Clicking the adjust volume or mute speakers button presents
a sliding volume level that can be modified.
Similarly, there is a speaker icon below the sliding volume that can
be clicked to mute or unmute the speakers. Clicking Display dial pad
presents a clickable dial pad that can be used for key-driven events on
the phone system. Typically this is used to navigate phone trees and
the like. The hold button places the call on hold, which notifies other
participants on the call.
Clicking Resume returns the call to an active status. Both on hold
and the call itself display the amount of time the call has been at a
particular status.
Network Connectivity Icon
One of the other icons visible in the window is a Network
Connectivity status. This indicates the quality of the network
connection and is useful in troubleshooting issues with voice quality
on a call. In the upper-right corner of the windows is a phone icon
with a red x. This button is used to end the call.
Note
Although calls are archived into the
Conversation History folder in Outlook, they contain only the list of
participants and the duration of the call. The call itself is neither
recorded nor stored here.
3. Making Video Calls
Initiating a video call is as simple as right-clicking a contact and
choosing Start a Video Call. Much as with the audio call, the recipient
has the option to accept, decline, or redirect. Redirect gives the
option to reply with an IM or to mark the recipient as Do Not Disturb.
When the call is accepted, the usual client window opens and is
located on the Video tab. The recipient initially sees the caller, but
the caller won’t see the recipient until after clicking Start My Video
in the window.
Note
By default, participants in a two-way call
see themselves in a picture-in-picture window inside the main video
window. This picture-in-picture can be moved anywhere within the video
window and does not block access to the buttons. The
picture-in-picture, also called the preview, can be modified by right-clicking it. This gives the options to hide or resize the preview.
Inside the video window are several buttons, including
• Mute microphone
• Adjust volume or mute speakers
• Display dial pad
• Hold
In addition, inside the video area itself, if the mouse enters this area, several additional buttons become available, including
• Pause My Video—Turns
off the webcam on the system of the user that clicked it. At this
point, the option changes to Start My Video, which turns the webcam
back on.
• Pop Out Video—Disconnects
the video window from the rest of the Lync client window so that it can
be repositioned elsewhere. In this configuration, as well as in the
initial configuration, the video window can be resized by simply
dragging a corner.
• View Full Screen—Expands the video windows to encompass the entire screen. The option at the upper-right corner becomes Exit full screen.
• End Video—Click to downgrade the video call to an audio call.
Additionally, the name of the other participant appears in the lower-left section of the video window.
At the default window sizes, video conferences across a LAN
connection are quite good. Factors such as latency and bandwidth might
affect video conferencing across a WAN connection.
Tip
If you expect widespread adoption of
video conferencing and calls in your environment, don’t skimp on the
video cameras. Modern webcams have rather nice lenses, and modern
processors can easily keep up with the loads of high-definition video
conferencing.