IT tutorials
 
Technology
 

Setting Up a Windows Home Server Website : Creating a New Website (part 3) - Creating a New Website Using a Host Header

9/23/2013 7:48:26 PM
- Free product key for windows 10
- Free Product Key for Microsoft office 365
- Malwarebytes Premium 3.7.1 Serial Keys (LifeTime) 2019

3. Creating a New Website Using a Host Header

When a web browser opens a TCP communications channel with a web server, the HTTP data that is passed to the server comes with a header that includes information such as the date and a string that identifies the browser. The header also includes a hostname field, which identifies the location of the resource the browser seeks. The host header is usually either a domain name (for an Internet connection) or a network name (for a LAN connection).

Interestingly, it’s also possible to make up a hostname of your own choosing: KatysBlog, FamilyWeb, or whatever. You can then create a new website and use a custom hostname as the identity of your site.

Associating the Host Header with an IP Address

Custom host headers work because you map them to an IP address. As before, you can set up the mapping yourself by editing the hosts file, and you can set up both local and remote mappings. Remember that you must edit the hosts file on Windows Home Server and on every computer that you want to give access to the site. (So, as before, this method only really works for your local computers, not for anyone outside your network.)

You modify the hosts file in the same way that I described in the earlier section. That is, you open the hosts file, start a new line at the end of the file, and then enter the mapping using the following general format:

IP   hostheader

In this case, you replace IP with the IP address of your Windows Home Server PC, and you replace hostheader with the host header name you want to use for the website. In the following example, I’ve assigned both a local name and a subdomain name to 192.168.1.254:

192.168.1.254    katysblog
192.168.1.254 katysblog.ourfamily.homeserver.com

Creating a Website Using a Host Header

Here are the steps to follow to create a website that uses a host header:

1.
In IIS Manager, open the SERVER, Web branch (where SERVER is the name of your Windows Home Server PC).

2.
In the Actions pane, click Add Web Site. IIS Manager opens the Add Web Site dialog box.
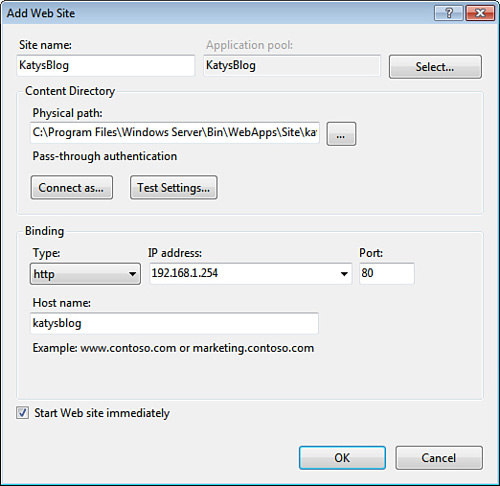
3.
Use the Site Name text box to type a name for the website. This is the name that appears in IIS Manager, within the Sites branch.

4.
Either type the full pathname (drive and folders) in the Physical Path text box, or click Browse and use the Browse for Folder dialog box to either select the folder or create a new folder.

5.
In the IP Address list, select the main IP address assigned to your Windows Home Server PC. Leave the Port value as is.

6.
Use the Host Name text box to type the host header, as shown in Figure 10.

Figure 10. Type the host header in the Host Name text box.

7.
Click OK. IIS Manager adds the new site to the Sites branch.

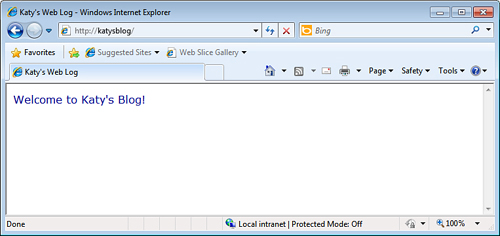
From here, add content to the folder you specified in step 4, including a file that uses one of the IIS default names. Figure 11 shows Internet Explorer displaying a new website using the host header katysblog (http://katysblog).

Figure 11. A website accessed using a host header name.
 
Others
 
- Setting Up a Windows Home Server Website : Creating a New Website (part 2) - Creating a New Website Using a Different Port
- Setting Up a Windows Home Server Website : Creating a New Website (part 1) - Creating a New Website Using a Different IP Address
- Setting Up a Windows Home Server Website : Adding Folders and Files to the Default Website
- Understanding the Windows Home Server 2011 Default Website
- System Center Configuration Manager 2007 : Patch Management - Using Wake On LAN Capability
- System Center Configuration Manager 2007 : Patch Management - SMS 2003 Clients, Native Mode and Software Updates
- System Center Configuration Manager 2007 : Patch Management - Creating and Managing Deployments (part 1) - A Recommended Approach
- Implementing Edge Services for an Exchange Server 2007 Environment : Filtering Content in a Message Attachment
- Implementing Edge Services for an Exchange Server 2007 Environment : Using Content Filtering to Allow and Reject Domain-Level Content
 
 
Top 10
 
- Microsoft Visio 2013 : Adding Structure to Your Diagrams - Finding containers and lists in Visio (part 2) - Wireframes,Legends
- Microsoft Visio 2013 : Adding Structure to Your Diagrams - Finding containers and lists in Visio (part 1) - Swimlanes
- Microsoft Visio 2013 : Adding Structure to Your Diagrams - Formatting and sizing lists
- Microsoft Visio 2013 : Adding Structure to Your Diagrams - Adding shapes to lists
- Microsoft Visio 2013 : Adding Structure to Your Diagrams - Sizing containers
- Microsoft Access 2010 : Control Properties and Why to Use Them (part 3) - The Other Properties of a Control
- Microsoft Access 2010 : Control Properties and Why to Use Them (part 2) - The Data Properties of a Control
- Microsoft Access 2010 : Control Properties and Why to Use Them (part 1) - The Format Properties of a Control
- Microsoft Access 2010 : Form Properties and Why Should You Use Them - Working with the Properties Window
- Microsoft Visio 2013 : Using the Organization Chart Wizard with new data
Technology FAQ
- Is possible to just to use a wireless router to extend wireless access to wireless access points?
- Ruby - Insert Struct to MySql
- how to find my Symantec pcAnywhere serial number
- About direct X / Open GL issue
- How to determine eclipse version?
- What SAN cert Exchange 2010 for UM, OA?
- How do I populate a SQL Express table from Excel file?
- code for express check out with Paypal.
- Problem with Templated User Control
- ShellExecute SW_HIDE
programming4us programming4us