The SharePoint 2010 query server accepts the query
from an end user from the web front-end. It then reads the index file
and servers the result back.
The index file is partitioned. As query servers are
added, the partition is broken into multiple parts so that no single
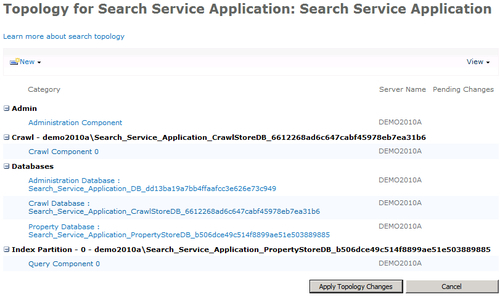
query server holds the entire index. The following screenshot is from
the Managing Search Topology page:

It illustrates how the index partition and query
server are tied to one another. The index partition is sent to the query
server by the crawl component. As can be seen from the preceding
screenshot, each partition must have an associated query server.
It enhances the performance of the topology. There is
no longer one large index file that must be traversed every time a
query is sent.
Getting ready
You must have farm-level administrative permissions
to the Central Administration site. There must also be another server on
which to host the query server.
How to do it...
Open the Central Administration site and click Application Management.
The third section is Service Applications. Under this section, click Manage service applications.
Find the Search Service Application
option and click on it (this is the name SharePoint assigns by default
if not modified when creating the Search Service). The ribbon will light
up. Click Manage.
Under the Search Application Topology section, there is a button called Modify; click on that button.
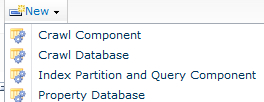
The Search Service Topology page appears. Click the drop-down list named New and then choose the Index Partition and Query Component option.
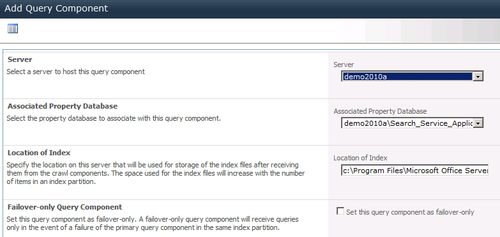
The following pop-up screen appears:

Perform the following actions:
Choose a server from the drop-down list.
Choose the property database with which it will be associated, from the Associated Property Database drop-down list.
Indicate the Location of Index.
Do not check the box associated with the Failover-only Query Component option.
The Search Service Topology Application page will again be shown. To commit the changes you have done on the previous pop-up screen, click on the Apply Topology Changes button.
How it works...
Creating a new query component is done through the
administration page, which shows the farm's search topology. This
topology can be viewed either by server or by component, using the View dropdown on the right-hand side of the screen. See the following screenshot:

The query component returns the search results. A
query server is where a query component has been created. The query
component contains only part of an index partition. If there is only one
query server, it would contain the whole partition.
An index partition can be spread across two or more
query servers. The purpose is to reduce the size of the index on a
particular query server, which translates to better performance.
Index partitions are roughly equal in size, which
lends itself to the low query latency. SharePoint achieves this with the
help of internal distribution by DocumentID. Every item is internally given a DocumentID&;, which is a unique identification marker.
It is important to note that an index partition is associated with a property database as we saw in the recipe.
Index partitions are not configured by users.
Administrators don't know which item is sitting on which query server.
Again, there is no single index (unless there is one query server).
After clicking Apply Topology Changes, some time may elapse before the update process is performed, as a timer job is used to perform the update.
There's more...
A new query server and partition can be added via PowerShell.
Using PowerShell, a new query can be added to the topology.
New-SPEnterpriseSearchQueryTopology
Using PowerShell, we can also add a new query component.
New-SPEnterpriseSearchQueryComponent
To see examples of these commands, type in get-help <command> -examples in the PowerShell management shell.
More info
A query component can be deleted from an index
partition by utilizing the search topology screen we have seen above. By
hovering over the item for the Query Component, a menu appears in the drop-down list as shown in the following screenshot. Click Delete.
