Create an Alert on a Library or List
When you set up an alert on a list or
library, SharePoint sends you an e-mail or a text message when changes
are made to the list or library (that is, when items are added,
removed, or changed).
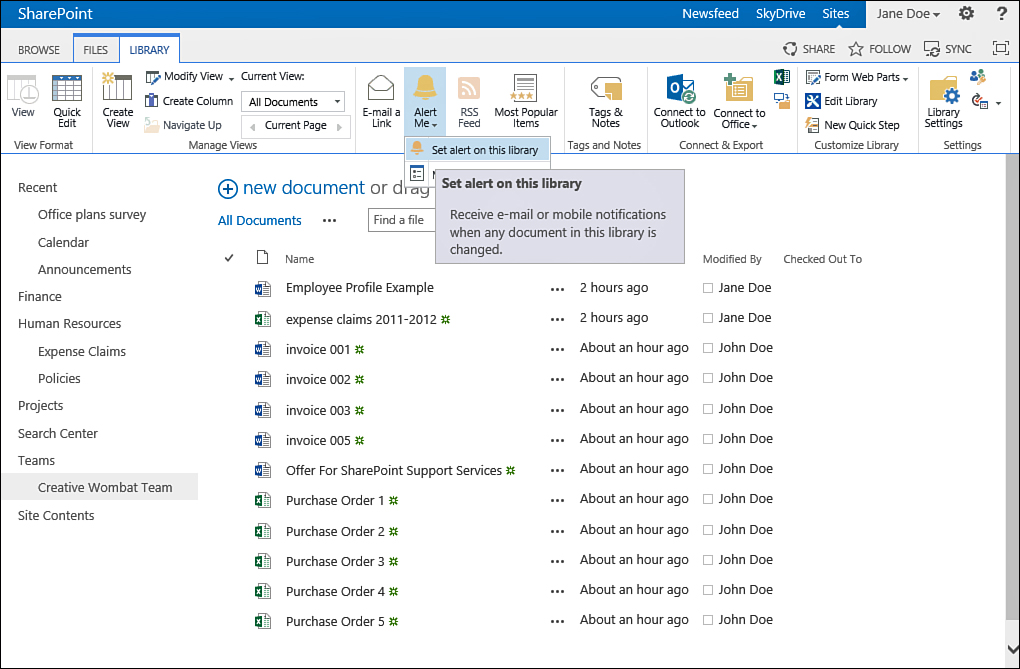
To set up this type of
alert, you switch to the List or Library ribbon, click on the Alert Me
button, and choose Set Alert on This List or Set Alert on This Library
(see Figure 4).

FIGURE 4 The Alert Me button in the Library ribbon opens a menu showing the Set Alert on This Library option.
When you select this option, the settings
dialog for the alert appears, and in it you can define what sort of
alert you want to get. If your site supports sending text messages, you
can select to have the alert sent using a text message to a phone
number in the Delivery Method section of the dialog.
In the Change Type section, you can choose
what kind of change you want to be alerted on. For example, you can
select to be alerted only when new items are added, only when items are
deleted, or when anything happens (that is, for all changes).
Similarly to setting up an alert on a list
item, you can choose when the alert will be sent—either immediately or
as a daily or weekly summary.
Note
Different list types can have different
options in the Send Alert for These Changes section. For example, a
task list has an option to send an alert when a high-priority task
changes or when someone changes a task in a specific view. This allows
you to create more complex alerts for different list types.
After you create an alert, you get a confirmation e-mail. Alert e-mails for lists look exactly the same as alerts on list items.
Tip
Don’t forget that alerts can be annoying if
you get too many e-mails. Creating an alert on a “busy” document
library and setting it to e-mail you immediately on every change can
overload your mailbox. Consider the daily or weekly e-mail options
unless you really need to know about new documents or changes as they
happen.
Modify or Remove an Alert
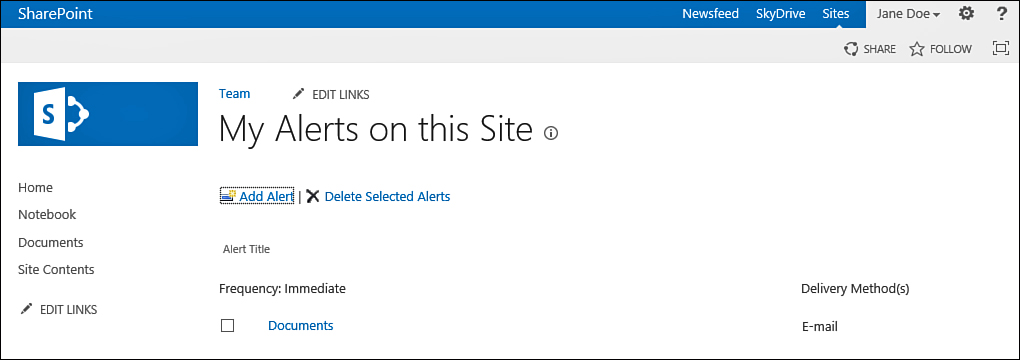
To modify or remove an alert, click on the
Modify My Alert Settings link that the alerts sends to you. Doing so
opens the site where that alert was created, in the alert management
screen. In this screen you can either click on an alert to change its
settings (for example, when it should send the e-mail, what changes it
should alert on), or you can select the alert and delete it by using
the Delete Selected Alerts button.
Alternatively, you can browse to the list or
library on which the alert is set, switch to the List or Library
ribbon, click the Alert Me button, and select Manage My Alerts. This
opens the same dialog, allowing you to edit or delete any of the alerts
you have set in that site.
Manage My Alerts in a Site
To see what alerts you have in a site and
manage them without going through a list, as you’ve done up to this
point, you can navigate to the site’s My Alerts on this Site page by
adding _layouts/mysubs.aspx to the path to the site where the alerts
are set. For example, if the site containing your alert is at http://sharepoint/sample, you type http://sharepoint/sample/_layouts/mysubs.aspx to get to the alerts page as shown in Figure 5.

FIGURE 5 The alert management page allows you to click on an alert to edit it or select an alert to delete it.