Type Each Sub-question on a Separate Line
The Type Each Sub-question on a Separate Line
setting is where you specify the sub-questions that appear to the user
to rate. You type each one in a separate line, as shown in Figure 28.
Number Range
In the Number Range setting, you specify the
range of numbers the users can choose from when rating your
sub-questions. You can choose any number from 3 to 20.
Range Text
In the Range Text setting, you specify the
text that will be displayed above the low, medium, and high rating
options. This helps the user understand what the numbers mean. For
example, in Figure 27, number 1 means Disagree, while number 3 means Somewhat Agree and number 5 is Agree.
Show N/A Option and N/A Option Text
Show N/A Option and N/A Option Text enable you
to specify whether you want to allow the user to not rate some of the
sub-questions. This is useful if the user might not have an answer for
one of the sub-questions. If you select that you want the option to be
available, you can also change the text shown for the option. For
example, in Figure 28 the text was modified to I don’t know yet. Figure 27 shows how the user sees this.
Page Separator
The Page Separator column type is unique to
surveys. It enables you to add a page break between questions, so if you
have a very long survey, a user is not presented with a single page
with all the questions on it, but instead sees a subset of the questions
and has a Next button to go to the next page.
A page separator does not have any settings that you need to set. You can’t even give it a name.
External Data
The External Data column type is available
only when you have SharePoint Server installed. You use it in a similar
fashion to the Lookup column type, but instead of allowing the user to
select a value from a list in the current site, it shows the user values
from a business application that the administrator or developer has set
up.
A common example for this is a company that
has a database with information about customers. Instead of migrating
that information into a SharePoint list, the administrator configures a
business data application integration. You can then create columns that
allow the users to choose from the list of customers who exist in that
database. By default, no external data applications are configured, so
this column type is used only after developers and administrators have
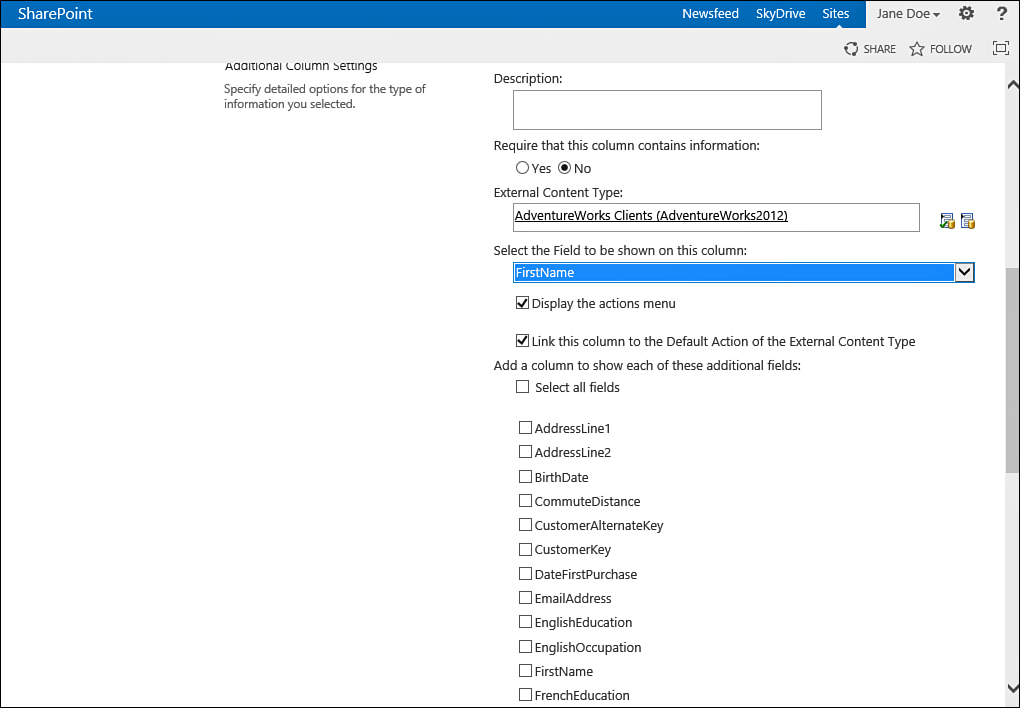
configured it. Figure 29 shows the configuration options for this column type, when an external content type and field are selected.

FIGURE 29 The configuration options for an External Data column type, with External Content Type and Field settings selected.
External Content Type
In the External Content Type selection box,
you select which external content type the column will connect to. If
you click the database icon, a dialog box appears, showing all the
content types that you can select from and to which external data source
they belong. If no application is configured in your system, the dialog
tells you so.
In the dialog you can search for the entity
you want to allow the users to select (for example, Product) and select
it. After you select an entity, more options you can set on the column
become available, the same as in a Lookup type column (refer to Figure 29).
Select the Field to Be Shown on This Column
The Select the Field to Be Shown on This
Column option enables you to select what field from the database should
be used as the title field for the selection that the user made. For
example, in the Product entity, choosing the Product Name field makes a
lot of sense. However, you might want to choose the Product Serial
Number field instead.
Display the Actions Menu
The Display the Actions Menu option enables
you to select whether an Actions menu should be displayed when a user
moves the mouse cursor over a value in the column. Some entities can
have actions that the developer has developed for them, such as Show
Product or Delete Product. To see the list of actions available for an
entity, you select this option and then see what actions show up.
Link This Column to the Default Action of the External Content Type
The Link This Column to the Default Action of
the External Content Type option determines whether the values appear as
links. When this option is selected, the user is redirected to a
profile page for the entity. For example, when showing the name of a
product, the name appears as a link that, when clicked, opens a page
with more information about the product and actions to perform on the
product.
Add a Column to Show Each of These Additional Fields
You might want to display more information
than just the name of the selected entity when users are viewing the
list item’s or file’s properties. The Add a Column to Show Each of These
Additional Fields option enables you to select more properties of the
entity that will be displayed as if they are separate columns when
viewing the properties of the list item or file, even though, when
editing the properties, the column is shown as only one. This is
displayed in the same way as the Lookup column with the same option
selected .
This option is visible only after you select a content type and a field.
Managed Metadata
The Managed Metadata column type is available
only when you have SharePoint Server installed (not SPF). It is similar
to the Lookup column type in the fact that it, too, displays options to
the user from a predefined list of options that is not part of the
column itself. However, the Managed Metadata column type is more
advanced both in the way it is displayed to the end users and in the
options administrators have to manage the items available for the users
to choose from.
Unlike with a Lookup column, the items the
users choose from in a Managed Metadata column type do not come from
another list. Instead, the values come either from an enterprise term
repository (managed by the administrator) or from a custom term set that
you can create in the site collection.
The terms in the term sets can be
hierarchical. For example, instead of having a flat list of products for
the user to choose from , the administrator of the Managed
Metadata service can create a term set that has product categories, with
products in each category. This can evolve to more levels of hierarchy
if required. For instance, you might have a category for Mobile Phones
and under it the names of the manufacturers, and under each manufacturer
the model numbers of the phones. You can also have a simpler, two-level
hierarchy with the first level called Books, and under it a list of
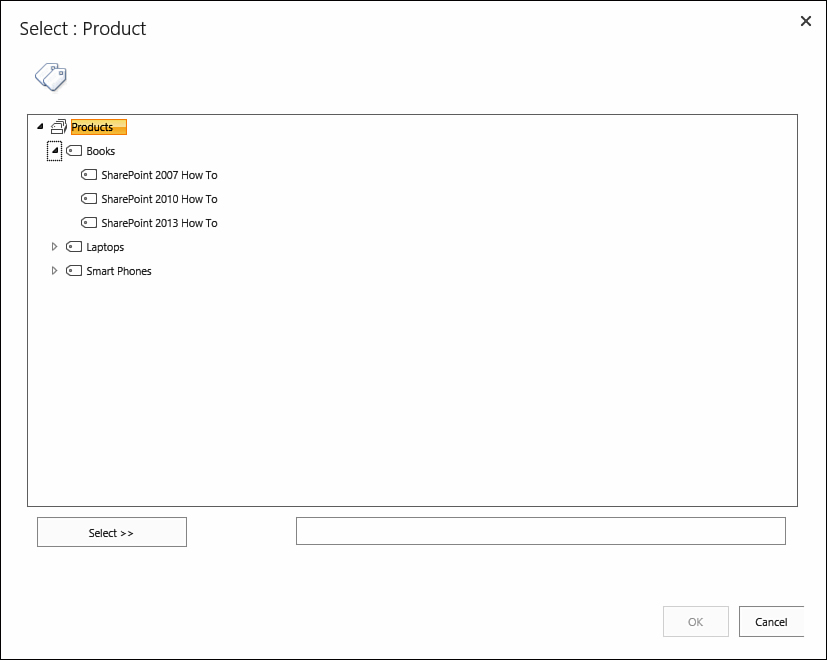
book names, as shown in Figure 30.

FIGURE 30 The user interface for selecting a value from a Managed Metadata column.
The user interface for this type of column is a
textbox with an icon next to it. The user can either write the term in
the text box or click the icon to open the dialog that shows the terms
that are available, as shown in Figure 30.
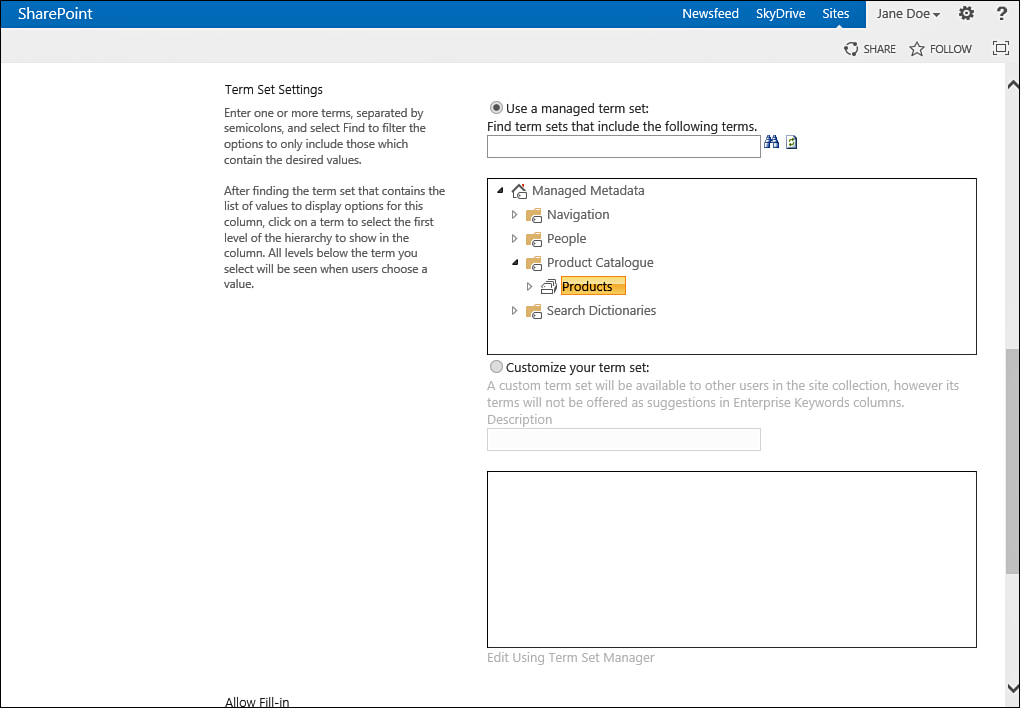
Figure 31 shows the configuration options for the Managed Metadata Column type.

FIGURE 31 The configuration options for a Managed Metadata column.