2. Modifying the SMS_Def.mof File
Figure 2
shows hardware inventory is configured by default to inventory a
significant amount of data. You may find that you need more or less
information. Use the SMS_Def.mof file to enable or disable the
inventory of specific classes as well as properties within those
classes. The SMS_Def.mof file is located in <ConfigMgrInstallPath>\inboxes\clifiles.src\hinv.
Make a backup copy of the file, and then edit the original file using a
standard text editor such as Windows Notepad.
The
following example modifies the SMS_Def.mof file to inventory ConfigMgr
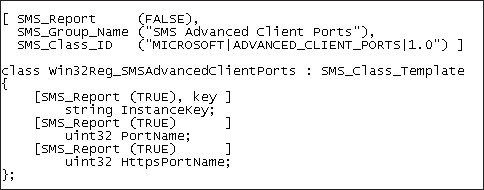
http ports configured on the client. This class is disabled by default,
as shown in Figure 5.
To change SMS_Def.mof to inventory the http ports, perform the following steps:
1. | Using Notepad, open SMS_Def.mof, located in <ConfigMgrInstallPath>\inboxes\clifiles.src\hinv.
|
2. | Notice
all the properties of the Win32Reg_AdvancedClientPorts class
(InstanceKey, PortName, and HttpsPortName) are configured to report
inventory, because SMS_Def.mof specifies the TRUE value for each.
However, notice that the class reporting is disabled (the very first
line in Figure 5 is for class reporting).
|
3. | To enable reporting, simply change FALSE in the first line of Figure 5 to TRUE, as shown in Figure 6.
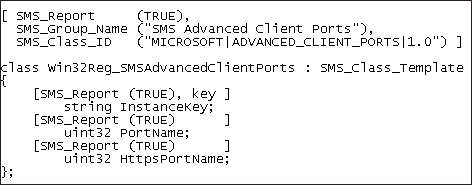
You
must enable reporting of a class to inventory any of its properties.
You can disable the inventory of properties within a class by setting
the respective TRUEFALSE.
to |
4. | Save the SMS_Def.mof file, and view Dataldr.log to see ConfigMgr compile the MOF.
|
5. | Because
the SMS_Def.mof is a sitewide setting, copy your new SMS_Def.mof file
to the proper location on all primary sites in your hierarchy to enable
the modified inventory for each site.
|
ConfigMgr
hardware inventory is very extensible. All data located in WMI or the
Windows Registry can be easily collected using ConfigMgr hardware
inventory. If the desired data does not currently exist in WMI or the
Registry, you can always use ConfigMgr’s software distribution
component to run a script or executable on each system to populate the
Registry with desired data and then collect it using hardware inventory.
3. Software Inventory
Software
inventory collects information about files and file locations. The
General tab for the Software Inventory Client Agent Properties dialog
box is very similar to the General tab for hardware inventory. Enable the software inventory agent, and select to use a simple or custom schedule . On the Inventory Collection tab, select the file type and path for files to inventory. As Figure 7 shows, ConfigMgr 2007 inventories .exe files by default.
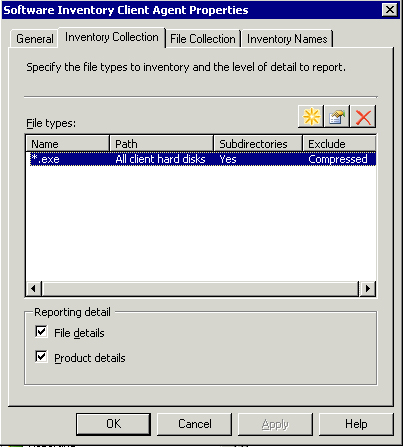
To add an additional file type, click the orange starburst in Figure 7 to open the Inventoried File Properties tab shown in Figure 8.
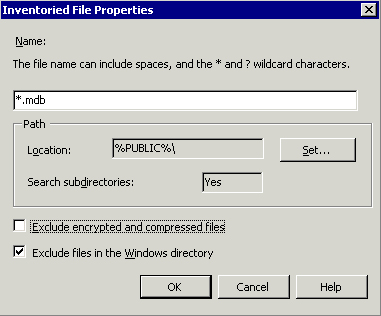
Figure 8 shows a new rule being created to inventory all pre–Access 2007 databases (*.mdb extension) located in the %PUBLIC% path environment variable. Options specified include
searching subdirectories and including compressed and encrypted files.
Although this example uses a file extension, you can also inventory for
an exact filename (budget.mdb) or partial filename (budget*.mdb). The
ConfigMgr integrated help provides additional assistance on wildcard
usage.
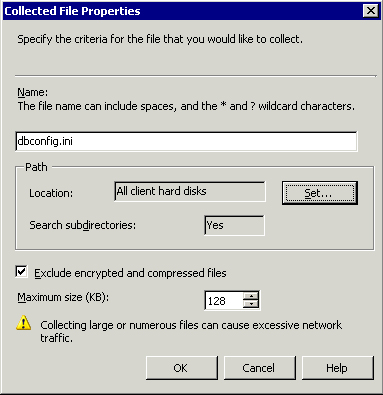
Use the File Collection tab, visible in Figure 7, to collect a file (or files) from each client. Click the orange starburst on that page to create a new file collection entry. Figure 9
shows
a sample file collection entry. Similar to software inventory, file
collection allows you to specify an exact filename or use wildcards.
You can also specify a specific path, or accept the default that
queries all local hard disks for the file. You will also notice that
there is a Maximum Size (KB) option—this specifies the maximum size of
all files this rule will collect. As an example, if you specified *.ini
as the rule, an attempt would be made to collect all .ini files, but if
the sum of the size of those files is greater than the Maximum size,
none of the files will be collected.
File
collection occurs during a scheduled software inventory cycle. Once
files are collected, you can use Resource Explorer to view the files.
The last tab of the Software Inventory Client Agent Properties dialog box (Figure 7)
is Inventory Names. You can use this to help make more sense out of
software inventory data. The header properties in files are not always
consistent, which often makes reporting of this data confusing. A name
is often listed in multiple ways; as an example, Microsoft can be
represented as Microsoft Corp., Microsoft Corporation, Microsoft, and
so on. Microsoft has already prepopulated some data for Microsoft
products to help make inventory more concise, as shown in Figure 10.
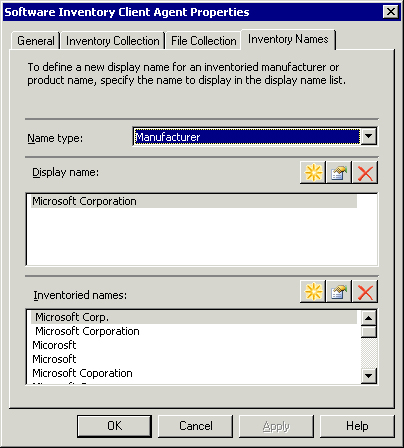
Figure 10
shows that each name specified in Inventoried Names will be grouped and
considered as the display name of Microsoft Corporation. By clicking on
the starburst by Display name, you can easily add to this list to group
other software as well.
As an example, say
you have six different programs from Acme Corporation and notice that
different names are inventoried for Manufacturer (Acme Corp., Acme,
Acme Corporation, Acme Corp. International, and so on). You can add a new display name of Acme Corporation
and then enter each inventoried name into the Inventoried Names section
in the Software Inventory Client Agent Properties dialog box. You can
perform this same grouping for the Product property by changing the
Name type option in Figure 10.