Before you can send an
e-mail message, you must add your e-mail account to the Windows Live
Mail application. This also enables you to use Windows Live Mail to
retrieve the messages that others have sent to your account.
Your e-mail account is
usually a POP (Post Office Protocol) account supplied by your Internet
service provider (ISP), which should have supplied you with the POP
account details. These details include your e-mail account login user
name and password, and possibly the names of the ISP's incoming and
outgoing mail servers.
Configure an E-mail Account
1 Start Windows Live Mail.
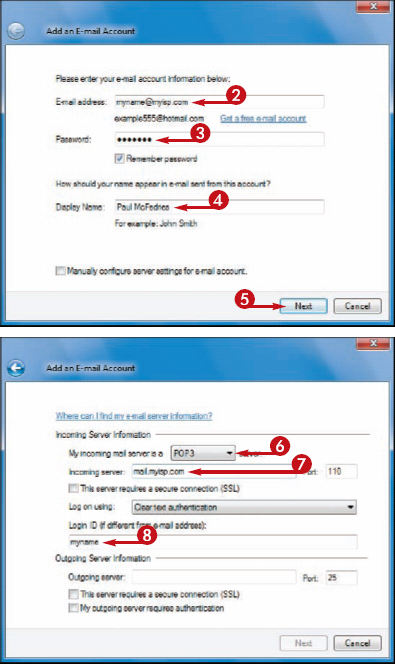
The first time you start the program, the Add an E-mail Account Wizard appears.
NOTE
If you are trying to configure a second e-mail account, click the Add e-mail account link in the Folder pane.
2 Type your e-mail address.
3 Type your e-mail password.
4 Type your name.
5 Click Next.
NOTE
If Windows Live Mail tells you it has successfully set up your account, click Finish and skip the rest of these steps.
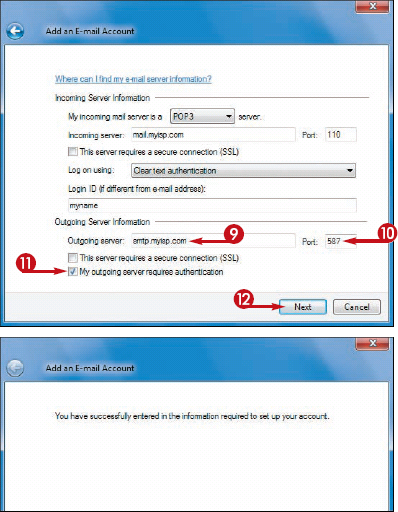
Windows Live Mail prompts you for your e-mail account's server information.
6 Click  and then click the type of e-mail account.
7 Type the name of your ISP's incoming mail server.
8 Type the e-mail account login user name.

9 Type the name of your ISP's outgoing mail server.

10 If your ISP uses a different port for outgoing mail, type the port number.
11 Click this check box if your ISP's outgoing mail server requires authentication ( changes to
  ).
).
12 Click Next.
The final wizard dialog box appears.
13 Click Finish at the bottom of dialog box (not shown).
Windows Live Mail configures your e-mail account.
How do I make changes to an e-mail account?
After you configure your e-mail account, Windows Live
Mail adds the account to the Folder pane on the left side of the
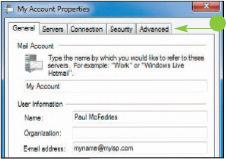
program window. To make changes to the account, right-click the account
name and then click Properties. In the Properties dialog box that appears, use the tabs to make changes to your settings (•).
