Windows Phone has several of the features of
the operating system, including accessing the address book, launching
the web browser, and using the camera. To give you access to these
features, the Windows Phone SDK supports a list of tasks you can
execute. These tasks are divided into two categories: launchers and choosers. A launcher
simply takes the user to another part of the phone experience to
accomplish some goal (for example, launch a web page, make a phone call,
and so on). A chooser takes the user to a facility on
the phone but returns to the app with some information (for instance,
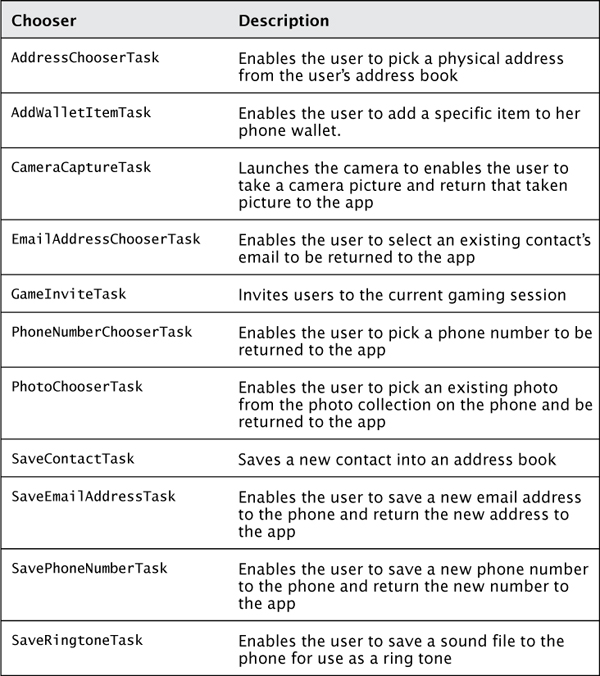
choose an email address, take a picture, and so on). Tables 1 and 2 show the launchers and choosers available for the phone.
TABLE 1 Launchers
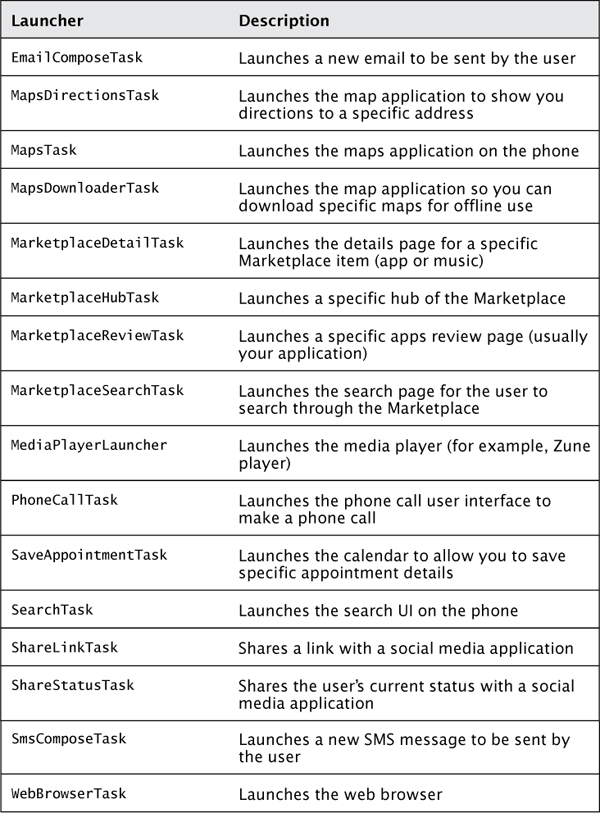
TABLE 2 Choosers
All these tasks are in the same namespace: Microsoft.Phone.Tasks.
1. Launchers
Each launcher works in a consistent manner.
They create an instance of the launcher, set optional properties that
will help the launcher, and call a Show method to take the
user to the phone’s functionality. For example, the code for showing the
Microsoft website in the web browser is as simple as this:
void webBrowserTask_Click(object sender, RoutedEventArgs e)
{
var task = new WebBrowserTask();
task.Uri = new Uri("http://microsoft.com");
task.Show();
}
Although the launchers do not use a common
interface, they do follow the same convention, so they should be easy to
work with. Let’s look at each one.
EmailComposeTask
The EmailComposeTask enables the
user to compose and send an email without necessarily sharing those
details with your app. For this task, you can set most of the
information about an outgoing email, including information in the To,
CC, Subject, and Body sections:
void composeEmailButton_Click(object sender, RoutedEventArgs e)
{
var task = new EmailComposeTask();
task.To = "[email protected]";
task.Cc = "[email protected]";
task.Subject = "Your Email";
task.Body = "This is an email";
task.Show();
}
All these properties are completely optional. If the user just wants to launch an email, you can create it and call Show. The Body
property is always plain text. There is no support for creating a body
with HTML in this release or adding attachments to emails.
MapsDirectionsTask
Inside the SDK are tasks for using the Bing
maps, but because those are there for backward-compatibility with
Windows Phone 7.5 and earlier, they’ve introduced new tasks for working
with the built-in Nokia maps. To get at these new maps, there are three
new tasks; the first of these is the MapsDirectionsTask. This task simply enables you to get directions in the Maps app (using the Nokia maps instead of the Bing maps).
This task is like the others in that you simply set default data and then call the Show method. In this case the task has a Start and Stop property. Each of these properties takes a structure called a LabeledMapLocation. The location, in turn, takes both a Label and a Location. The Label is a string that can contain a simple label or can contain a search term. The Location property takes a GeoCoordinate object that contains the latitude and longitude to use for the maps. For example
var start = new LabeledMapLocation()
{
Label = "Home",
Location = new GeoCoordinate(33.769138, -84.33596)
};
var end = new LabeledMapLocation()
{
Label = "Turner Field",
Location = new GeoCoordinate(33.735194, -84.389645)
};
var task = new MapsDirectionsTask()
{
Start = start,
End = end
};
task.Show();
When the Show method is executed,
the Maps application is launched and attempts to calculate the
directions. If your goal is to navigate from the user’s current
location, you can just omit the Start property on the MapsDirectionsTask altogether:
var end = new LabeledMapLocation()
{
Label = "Turner Field",
Location = new GeoCoordinate(33.735194, -84.389645)
};
var task = new MapsDirectionsTask()
{
End = end
};
task.Show();
By leaving off the Start property, this simply assumes that you want to start from the user’s current location. Calculating GeoCoordinates can be a pain so you can also omit the Location property to have the Label of the LabeledMapLocation act as a search phrase:
var end = new LabeledMapLocation()
{
Label = "Turner Field"
};
var task = new MapsDirectionsTask()
{
End = end
};
task.Show();
In this example, the ending location will be
marked as “Turner Field” and the map application will attempt to find
Turner Field from your location. You can also do this using any search
information like an address as the Label:
var end = new LabeledMapLocation()
{
Label = "755 Hank Aaron Drive Southeast Atlanta, GA 30315"
};
var task = new MapsDirectionsTask()
{
End = end
};
task.Show();
MapsTask
This task is specifically used to show and search in the maps app for the user. There are two ways to use the MapsTask. First, you can simply show a location and a zoom level. For this, you need a specific GeoCoordinate object. For instance:
var task = new MapsTask()
{
Center = new GeoCoordinate(33.735194, -84.389645),
ZoomLevel = 2
};
task.Show();
The Center property is the center of the map to show. The ZoomLevel is how far into the map to display. In this case, ZoomLevel of 2 is going to show most of the world. If you omit the Center property, it will simply center the map on the current location for the user.
The other way the MapsTask works is to enable you to search on the map. In this case you would just supply the SearchPhrase property with what you want to search for. If you simply want to show an address, just use the SearchPhrase with the address:
var task = new MapsTask()
{
SearchTerm = "755 Hank Aaron Drive Southeast Atlanta, GA 30315",
};
task.Show();
More commonly you would use the SearchTerm property to search the map. For instance, to find pizza restaurants, you would:
var task = new MapsTask()
{
SearchTerm = "pizza",
};
task.Show();
Note that the ZoomLevel and Center properties are ignored if you use the SearchPhrase.
MapsDownloaderTask
The last of the maps tasks is the MapsDownloaderTask.
This task simply launches the Maps app to allow the user to select
which maps to download to the device for offline use. The task has no
properties; you just call the Show method to launch that part of the
Maps app, like so:
var task = new MapDownloaderTask();
task.Show();
MarketplaceDetailTask
This task’s job is to launch the Marketplace
app to show the details of a specific application. Although the task
does allow you to show specific items using the ContentIdentifier and ContentType properties, it normally launches without specifying these properties and will launch the details page for your own application:
void marketplaceDetailButton_Click(object sender, RoutedEventArgs e)
{
// Show our Detail Page
var task = new MarketplaceDetailTask();
task.Show();
}
If you have a specific application content identifier (the GUID that represents the application), you can specify it:
void marketplaceDetailButton_Click(object sender, RoutedEventArgs e)
{
// Show our Detail Page
var task = new MarketplaceDetailTask();
task.ContentIdentifier = "a518bd6c-280e-e011-9264-00237de2db9e";
task.ContentType = MarketplaceContentType.Applications;
task.Show();
}
MarketplaceHubTask
The purpose of the MarketplaceHubTask
is to go to the Marketplace application on the phone to allow the user
to browse different items in the Marketplace. When using this task, you
need to specify whether the user needs to navigate to music or to
applications:
void marketplaceHubButton_Click(object sender, RoutedEventArgs e)
{
// Show the Marketplace Hub
var task = new MarketplaceHubTask();
task.ContentType = MarketplaceContentType.Applications; // Or Music
task.Show();
}
Note that this task does not work in the emulator because the Marketplace isn’t intended to work in emulation mode.
MarketplaceReviewTask
The MarketplaceReviewTask is used
to take the user to the current application’s review page to allow him
to review the application. There are no properties to set for this
particular task, as shown here:
void marketplaceReviewButton_Click(object sender, RoutedEventArgs e)
{
// Show the Application Review Page for this application
var task = new MarketplaceReviewTask();
task.Show();
}
Because your application is not technically in
the Marketplace during development, this task will take you to a review
page; then it will complain that it cannot find the application. This is
enough to test this task. After your application has been deployed, it
will take the user to the correct review page.
MarketplaceSearchTask
The MarketplaceSearchTask enables
you to send the user to the Search page of the Marketplace app
specifying which types of search to perform as well as any keywords with
which to prepopulate the search, as shown here:
void marketplaceSearchButton_Click(object sender, RoutedEventArgs e)
{
// Show the Marketplace Search Page
var task = new MarketplaceSearchTask();
task.ContentType = MarketplaceContentType.Applications; // Or Music
task.SearchTerms = "Shooting Games";
task.Show();
}
MediaPlayerLauncher
The purpose of the MediaPlayerLauncher
is to play media (audio and/or video) that comes from your application
(instead of media that is in the media library). The media must be
either in the application’s install directory (for example, in the .xap
file) or in isolated storage. To specify the location, you need to
supply the task’s Location property, which takes an enumeration (MediaLocationType) with which you can specify either Install (which indicates the file was in the .xap file) or Data (which indicates the media file is in isolated storage). In addition, you have to specify the Media property, which takes a relative Uri that points to the media either in the .xap file or in isolated storage, like so:
void mediaPlayerButton_Click(object sender, RoutedEventArgs e)
{
// Launch the Media Player
var task = new MediaPlayerLauncher();
task.Location = MediaLocationType.Install; // Or Data
task.Media = new Uri("bear.wmv", UriKind.Relative);
task.Controls = MediaPlaybackControls.All;
task.Show();
}
In addition, you can specify which controls are shown in the media player. When playing with the MediaPlayerTask, the media player can show three different controls, as highlighted in Figure 1.
The control on the left is the Rewind control, the one on the right is
the Fast-Forward control, and the one in the center is for toggling
between Pause and Play.
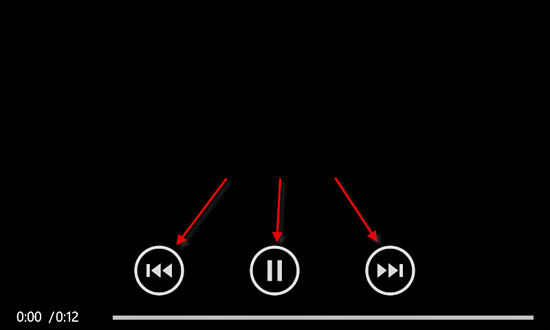
FIGURE 1 Media player controls
The MediaPlaybackControls includes a set of enumeration flags, so you can select which controls are used. Table 3 shows the MediaPlaybackControls enumeration.
TABLE 3 MediaPlaybackControls Enumeration
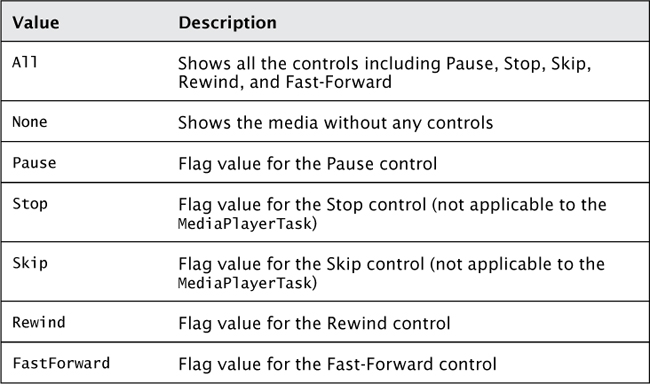
Typically, you would show all controls. However, you can decide to use specific controls by mixing the flags, like so:
void mediaPlayerButton_Click(object sender, RoutedEventArgs e)
{
// Launch the Media Player
var task = new MediaPlayerLauncher();
task.Location = MediaLocationType.Install; // Or Data
task.Media = new Uri("bear.wmv", UriKind.Relative);
task.Controls = MediaPlaybackControls.Pause |
MediaPlaybackControls.Rewind;
task.Show();
}
PhoneCallTask
As its name suggests, the PhoneCallTask
enables you to perform a phone call on the phone. All you need to do is
specify the phone number and name to display to the user, like so:
void phoneCallButton_Click(object sender, RoutedEventArgs e)
{
// Make a phone call
var task = new PhoneCallTask();
task.DisplayName = "Lottery Headquarters";
task.PhoneNumber = "(404) 555 1212";
task.Show();
}
When this task is launched, the user will be asked for permission to make the phone call, as shown in Figure 2.
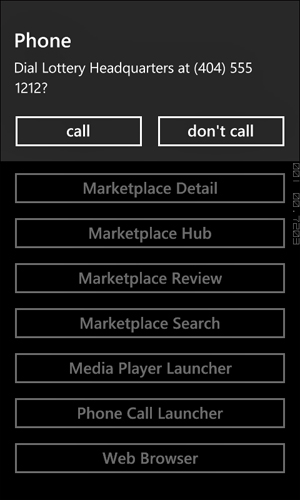
FIGURE 2 PhoneCallTask confirmation
SaveAppointmentTask
Like many of the other tasks, the SaveAppointmentTask
is straightforward in its approach. The purpose, obviously, is to let
users make a new appointment. Although not all fields of the appointment
app are available, you can set quite a number of the fields with code,
as shown here:
var task = new SaveAppointmentTask()
{
Subject = "Dentist",
StartTime = DateTime.Parse("11/11/2012 2:00pm"),
EndTime = DateTime.Parse("11/11/2012 4:00pm"),
AppointmentStatus = AppointmentStatus.Busy,
IsAllDayEvent = false,
Details = "Dr. Smith - 404-555-1212",
Location = "123 Main Street, Atlanta, GA",
Reminder = Reminder.FifteenMinutes
};
task.Show();
None of these properties
are actually required, but they can be used to fill in default details.
The user will still be prompted by the Appointment app to confirm and
possibly change the data you send in. The Reminder property is an enumeration of different Reminder values, not the Reminder
class that is used to create reminders programmatically. These values
specify how long before an appointment to create a reminder (if any).
SearchTask
The SearchTask class is used to
direct the user to the phone’s built-in search application (the one that
launches when you press the Search button on the phone). You can
specify a search query to be prefilled when the search is launched, as
shown here:
void searchButton_Click(object sender, RoutedEventArgs e)
{
// Launch the Search App
var task = new SearchTask();
task.SearchQuery = "XBox Games";
task.Show();
}
ShareLinkTask
If you want your application to be capable of
sharing a link on social networking sites for which the user has
registered the phone (for instance, Facebook or Twitter), this is the
task for you. It allows you to specify the link to share, the title of
the link (that is, what to display in the hyperlink), and a message to
include with the link:
private void ShareLink_Click(object sender, RoutedEventArgs e)
{
// Share a link
var task = new ShareLinkTask();
task.LinkUri = new Uri("http://wildermuth.com");
task.Title = "Shawn's Blog";
task.Message = "I can't believe his head is turning!";
task.Show();
}
The user must have a social networking account
registered on the phone for this launcher to succeed. If she has more
than one social networking account on the phone, it displays a list of
which services to use (similar to when you create a new email with more
than one account).
ShareStatusTask
Much like the ShareLinkTask, this
launcher enables you to share your current status via social
networking. This launcher has you specify the user’s status to share:
private void ShareStatus_Click(object sender, RoutedEventArgs e)
{
// Share a link
var task = new ShareStatusTask();
task.Status = "I'm writing a #wp7 book!";
task.Show();
}
After shown, this will take you to the share status UI for the phone.
SmsComposeTask
The SmsComposeTask enables you to
get the user to send a text message (for example, SMS message). You can
specify both whom to send the text to and the body of the message. The To property specifies a semicolon-delimited list of recipients for the text message. The Body property enables you to specify the message to be sent via SMS:
void smsButton_Click(object sender, RoutedEventArgs e)
{
// Send an SMS Message
var task = new SmsComposeTask();
task.To = "(404) 555-1212; (206) 555-1212";
task.Body = "This is a text message!";
task.Show();
}
Note
This task does not allow you to send MMS messages (SMS messages with attachments).
WebBrowserTask
The WebBrowserTask launches the built-in browser (Internet Explorer) with a specified URI, as shown here:
void webBrowserTask_Click(object sender, RoutedEventArgs e)
{
var task = new WebBrowserTask();
task.Uri = new Uri("http://microsoft.com");
task.Show();
}