Each diagnostic tool described in this
section serves to test the operation of one or more of the categories
mentioned in the preceding section. The tools are discussed in roughly
the order you should try them.
Some tools can be used to find problems in any of the many networking components. These tools quickly identify many problems.
1. The Network and Sharing Center
The
Network and Sharing Center is the first place to start diagnosing a
network problem because it can quickly take you to Windows network
troubleshooters, status displays, and network settings. It can also
display a network map that shows whether your computer can communicate
with any other computers on your LAN using the Windows file and printer
sharing client services. If at least one other computer is visible and
online, you can be pretty sure that your computer’s network card and
cabling are okay.
There are several ways to bring up the Network and Sharing Center:
- Click
the small network icon located in the right corner of the taskbar near
the time of day. At the bottom of the pop-up, click Open Network and
Sharing Center.
- Click Start, Control Panel, View Network Status and Tasks (under Network and Internet).
- Click Start, Computer. At the bottom left, click Network. Then, at the top click Network and Sharing Center.
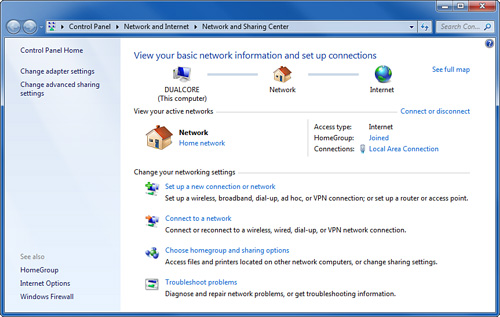
Use whichever method is convenient. This brings up the window shown in Figure 1.
The little map at the top of the window shows your current network
status. A broken line or red X indicates that you have no functioning
network or Internet connection.

Under
View Your Active Networks, Windows displays information about any
active network and/or direct Internet connections. For example, in Figure 1,
you can see that I am attached to a LAN, through the Local Area
Connection network adapter. Its network location is Home Network, which
means that file and printer sharing are allowed and that a homegroup
can be used.
|
| If you want to use the HomeGroup feature, your network location must be “Home Network. |
This window leads to several other useful tools:
- To see whether various networking features are turned on or off, click Change Advanced Sharing Settings.
- To
let Windows try to diagnose your network problem, click Troubleshoot
Problems. Then select a troubleshooter for the particular problem
you’re having .
- To check or modify the settings for one of your network adapters, click Change Adapter Settings.
- To check or change your homegroup settings, click Choose Homegroup and Sharing Options.
- To see if your computer can find other computers on your network, click See Full Map.
If you’re having problems with file and printer sharing, the first thing to check is the Network Map.
2. Network Map
To
view the Network Map, open the Network and Sharing Center as described
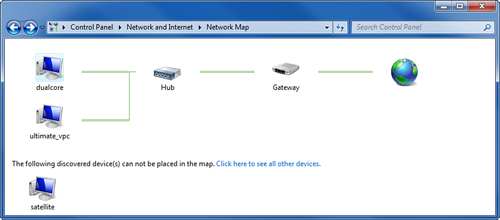
in the previous section. Then, click See Full Map. The window that
appears should look something like Figure 2,
except that the names of the computers on your network will be
different. My network also includes a router (gateway) device, which
also appears in this display because its Universal Plug and Play (UPnP)
feature has been enabled.

If
you see at least one other computer besides your own displayed here,
your computer’s network cabling, network adapter, and drivers are
working correctly. In addition, both your computer and the computers
shown are both running the Network Discovery service and/or file
sharing. (To turn on Network Discovery, go back to the Network and
Sharing Center and click Change Advanced Sharing Settings.)
Note
If
you have a computer that Windows says “cannot be placed on the map,” it
might be running a Windows version prior to Vista, running some other
OS, or connected to your OS through a more complex network. |
If
other computers don’t appear, and you know that Network Discovery is
turned on and that Windows Firewall is open, it’s possible that the
network browser function, which is a behind-the-scenes service that
Windows uses to locate other computers, is not working. This is a
common problem. To investigate it, try these procedures:
- Wait 20 minutes and press the F5 key. Other computers may appear this time.
- Check
each of the computers in your workgroup and make sure that each
computer is set to use the same workgroup name and that each computer
has the same set of network protocols installed. In particular, because
Windows 7 supports only TCP/IP, any computers running Windows 98 or Me
must be reconfigured to use only TCP/IP and not IPX/SPX or NetBEUI.
Now,
click the Back arrow to return to the Network and Sharing Center. Next,
look at the label under your network connection in the middle View Your
Active Networks section. The network type label should say Work Network
or Home Network. If it says Public Network, file and printer sharing
should not be available because this would be risky in a public setting
with other unknown computers. You can change it from Public to Home or
Work if you trust the other computers on your network.
If
you are having trouble with file and printer sharing with some or all
of your other computers, and this screen didn’t identify the problem,
click Change Advanced Sharing Settings. This displays settings that
Windows uses with Work/Home networks and Public networks, respectively.
The settings are divided into two parts:
Home/Work—
Used for network connections that lead to home or office networks. A
network can be a home or work network even if it provides Internet
access, as long as a router or firewall is placed between the network
and the Internet, and as long as you trust all the computers plugged in
to the network.
Public—
Used for network connections that lead to a public network. A public
network could be a direct Internet connection (for example, a
connection that plugged in directly to a DSL or cable modem), or a
network in a public place such as a hotel or café, where you do not
trust the other computers.
Actually,
though, this control panel is somewhat misleading. Only the first two
settings are different for Home/Work and Public networks: Network
Discovery and File and Printer Sharing. The remaining settings are
location-independent; that is, they apply to all network locations. The
default settings are listed in Tables 1 and 2.
Table 1. Location-Dependent Advanced Sharing Settings
| Setting | Default Setting Home/Work | Public | Description |
|---|
| Network Discovery | On | Off | When off, other computers will not appear on the network map and your computer will not appear on other computers’ maps. |
| File and Printer Sharing | On | Off | When off, your computer will not share its files and/or printers with other computers. You can still use files and printers shared by other computers. |
Table 2. Location-Independent Advanced Sharing Settings
| Setting | Default Setting | Description |
|---|
| Public Folder Sharing | On | When off, the Public user folder will not be shared. When On, it is shared and anyone can store or change files in it. |
| Media Streaming | On | Media Streaming settings are based on computer names rather than network location. |
| File Sharing Connections | 128-bit | By default, encrypted network connections use a strong key. |
| Password Protected Sharing | On | When
on, other users must have a user account and password to use shared
files and printers that are not accessed via a homegroup. When off,
other users who don’t have an account on your computer, or who have an
account with no password, will be granted access to shared files and
printers via the Guest account.
|
| HomeGroup Connections | Windows | By default, Windows manages the user account and password used for HomeGroup sharing.
|