Enabling roaming profiles
Now
enable roaming profiles for your users. Locate your user accounts in AD
DS and set them to use roaming profiles. Direct the profiles to local
servers for users that do not travel and direct the travelling users'
profiles to the new DFS Namespace for roaming profiles. You need
Account Operator permissions to perform this task. Also, perform this
task during off hours so that you have time to complete the entire
operation before users access their profiles. To enable roaming
profiles, use the following steps:
Open Active Directory Users and Computers and locate the user accounts.
Right-click on the account name and select Properties.
Move to the Profile tab and type in the path of the shared folder to host the profile.
The path to the profile should be in the form of \\servername\RoamingProf\%username% for non-travelling users and for travelling users, it should be \\domainname\RoamingProf\%username% where the domain name is the full DNS name of your domain.
Click Apply. The profile path should change to the account name of the user.
Verify that this is the case and click OK.
Alternatively,
you can perform this task with a script. Use the following script
structures to perform this task. The first is for non-travelling users
and the second is for travelling users.
dsmod user UserDN -profile \servername\RoamingProf\%username%
dsmod user UserDN -profile \domainname\RoamingProf\%username%
Use
the user's distinguished name in the command line. For example, user
Jane Doe in the People OU in the TandT.net domain would be "cn=Jane
Doe,OU=People,dc=tandt,dc=net". Make sure that you do not use spaces
between each section of the name and make sure that you enclose the
entire name in double quotes.
Ideally, if
you have many users to modify, you can export the user account name
list from AD and then use a text editor to build the command structure
around each user name, export it to text only, and save the file with a
.CMD extension. Run the new .CMD file you created to modify the profile
location for each user.
Enabling folder redirection
Now, you're ready to enable folder redirection. In fact, you will need to perform three tasks:
Enable folder redirection.
Exclude folders from the roaming profile to keep it small and fast to load.
Set Group Policy settings for general profile management.
Each
task is performed through the Group Policy Management Console. You need
Group Policy Editing and Creation rights to perform these tasks. Also,
make sure that you perform these tasks from a Vista PC or from a
Windows Server 2008 machine otherwise you will not have access to the
full redirection policy. Begin with Folder Redirection.
Ideally,
your users will be regrouped in OUs, so you can target the GPO more
easily. If not, you might consider regrouping users in appropriate OUs
to make it easier to manage them. Use the following procedure to assign
your Folder Redirection policy.
Launch the Group Policy Management Console. You can do this by typing gpmc.msc in the Start Search box in the Start Menu. Accept the elevation prompt.
Expand the domain until you find the OU(s) containing user accounts.
Right-click on the target OU, select Create a GPO in this domain and link it here.
Name the policy appropriately. For example, you can name it Folder Redirection. Click OK.
Now, right-click on the new policy link and select Edit.
Expand User Configuration =>
Policies =>
Windows Settings =>
Folder Redirection.
To
set a folder redirection policy, you must right-click on each folder
you want to redirect to set its properties. Begin with the first
folder, AppData (Roaming), and then move on to each of the others. Use
the following values to update the settings for each folder.
If you have travelling users, then you must use the Advanced – Specify locations for various user groups setting.
If you want to redirect all folders to the same location, then use Basic –Redirect everyone's folder to the same location.
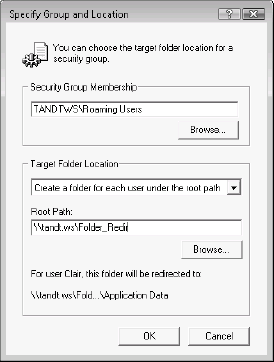
When
using the Advanced option, click Add. Then use Browse to select the
Security Group. Use the Create a folder for each user under the root
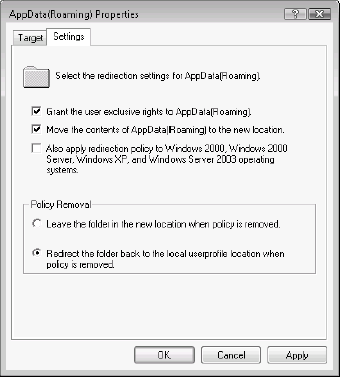
path option and type in the Root Path (see Figure 5). Click OK when done and repeat for each user group. Figure 6 shows the redirection settings.

Exclude the folders you redirected from the roaming profile. To do so, you must move to the User Configuration =>
Policies =>
Administrative Templates =>
System =>
User Profiles =>
Exclude directories in roaming profile.
Open the setting's Properties, click Enable, and type in the profile paths to exclude.
Paths are relative to the root of the profile. For example, to exclude
all of the folders you can redirect, you would exclude the following
folders:
AppData\Roaming; Desktop; Documents; Pictures; Music; Videos;
Favorites; Contacts; Downloads; Links; Searches; Saved Games
You do not need to exclude the Start Menu because it is a subfolder of the AppData (Roaming) folder.
Your policy is ready. Close the Group Policy Editor.
Review the policy settings and make sure it is enabled in the GPMC.

Now
you need to make sure your PCs manage user profiles properly. This
means either creating a new GPO to apply to PCs or editing an existing
GPO to include these settings. Use the following procedure to create a
new GPO or to edit an existing GPO.
Right-click on the target OU containing PCs and select Create a GPO in this domain, and link it here.
Name the policy appropriately and click OK. For example, you can name it User Profile Management.
Right-click the new policy link and select Edit.
Expand Computer Configuration =>
Policies =>
Administrative Templates =>
System.
Locate the Verbose vs normal status messages setting and view its Properties. Set it to Enabled and click OK.
You change this setting because Vista does not display much user
information during log on and log off. Because of this, users may
complain that log on and log off times are too long. Changing this
setting will display what Vista is doing during the log on and log off
process and users will understand why it takes longer.
Move to the Computer Configuration =>
Policies =>
Administrative Templates =>
System =>
User
Profiles location. Modify the Delete user profiles older than a
specified number of days on system restart and set it to 30 days. Doing this cleans up unused profiles from your PCs.
Close the Group Policy Editor and verify that the settings are appropriate in the new policy. Close the GPMC.
Now
test the policies by logging in and out of a PC with a user account.
Verify that the proper folders have been created in your shared storage
locations. Your basic user data protection strategy is complete.