Although the Active Directory Users And Computers MMC
is a convenient way to create and modify groups individually, it is not
the most efficient method for creating large numbers of security
principals. A tool included with Windows Server 2003, Ldifde.exe,
facilitates the importing and exporting of larger numbers of security
principals, including groups.
Using LDIFDE
The Lightweight
Directory Access Protocol (LDAP) Data Interchange Format (LDIF) is a
draft Internet standard for a file format that may be used to perform
batch operations against directories that conform to the LDAP standards.
LDIF can be used to export and import data, allowing batch operations
such as add, create, and modify to be performed against the Active
Directory. A utility program called LDIFDE is included in Windows Server
2003 to support batch operations based on the LDIF file format
standard.
LDIFDE is a command-line
utility, available on all Windows Server 2003 editions. From a command
prompt or command shell, you run the LDIFDE utility with the appropriate
command switches. Figure 1 lists the primary commands used with LDIFDE displayed by typing ldifde /? at the command prompt.
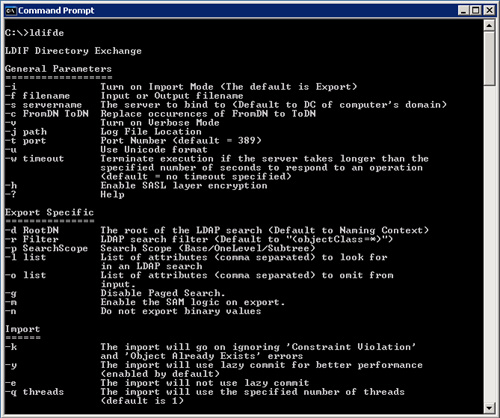
Table 1 details the primary LDIFDE commands.
Table 1. LDIFDE Commands (Primary)
| Command | Usage |
|---|
| General parameters |
| -i | Turn on Import mode (The default is Export) |
| -f filename | Input or Output filename |
| -s servername | The server to bind to |
| -c FromDN ToDN | Replace occurrences of FromDN to ToDN |
| -v | Turn on Verbose mode |
| -j path | Log File Location |
| -t port | Port Number (default = 389) |
| -? | Help |
| Export specific parameters |
| -d RootDN | The root of the LDAP search (Default to Naming Context) |
| -r Filter | LDAP search filter (Default to “(objectClass=*)”) |
| -p SearchScope | Search Scope (Base/OneLevel/Subtree) |
| -l list | List of attributes (comma-separated) to look for in an LDAP search |
| -o list | List of attributes (comma-separated) to omit from input |
| -g | Disable Paged Search |
| -m | Enable the Security Accounts Manager (SAM) logic on export |
| -n | Do not export binary values |
| Import specific parameters |
| -k | The import will ignore “Constraint Violation” and “Object Already Exists” errors |
| Credentials parameters |
| -a UserDN | Sets
the command to run using the supplied user distinguished name and
password. For example: “cn=administrator,dc=contoso,dc-com password” |
| -b UserName Domain | Sets
the command to run as username domain password. The default is to run
using the credentials of the currently logged on user. |
Note
The
LDIFDE utility is included in Windows Server 2003, and can be copied to
a computer running Windows 2000 Professional or Windows XP. It can then
be bound and used remotely to the Windows Server 2003 Active Directory. |
Often,
you will have a collection of data that already has a great deal of the
information with which you will populate your Windows Server 2003
Active Directory. The data may be in a down-level domain (Windows NT 4,
Windows 2000, Novell Directory Services (NDS), or some other type of
database (Human Resource departments are famous for compiling data). If
you have this user data available, you can use it to populate the bulk
of your Active Directory. There are many tools that are available to
facilitate the extraction of data: Addusers for Windows NT 4 and LDIFDE
for Windows 2000, for example. In addition, most database programs have
the built-in capacity to export their data into a Comma-Separated-Value
(CSV) file, which LDIFDE can import. For CSV files, however, it should
be noted that some elements in object creation are mandatory, and errors
will result during the import if elements are missing from the file.
Group creation, however, has only the required elements of a
distinguished name (CN=User) and location (DC=Domain, DC=OU), which you
are unlikely to omit. With a
little editing, you can add the OU and group data to the import file,
and use LDIFDE to build your Active Directory much more quickly. |
|
Creating Groups with DSADD
To add a group, use the syntax
dsadd group GroupDN...
The GroupDN...
parameter is one or more distinguished names for the new user objects.
If a DN includes a space, surround the entire DN with quotation marks.
The GroupDN... parameter can be entered one of the following ways:
By piping a list of DNs from another command, such as dsquery.
By typing each DN on the command line, separated by spaces.
By
leaving the DN parameter empty, at which point you can type the DNs,
one at a time, at the keyboard console of the command prompt. Press
ENTER after each DN. Press CTRL+Z and ENTER after the last DN.
The DSADD GROUP command can take the following optional parameters after the DN parameter:
-secgrp {yes | no} determines whether the group is a security group (yes) or a distribution group (no). The default value is yes.
-scope {l | g | u} determines whether the group is a domain local (l), global (g, the default), or universal (u).
-samid SAMName
desc Description
-memberof GroupDN... specifies groups to which to add the new group.
-members MemberDN... specifies members to add to the group.
You can add -s, -u, and -p parameters to specify the domain controller
against which DSADD will run, and the user name and password—the
credentials—that will be used to execute the command.
{-s Server | -d Domain}
-u UserName
-p {Password | *}
Modifying Groups with DSMOD
The DSMOD command, is used to modify objects in Active Directory. To modify a group, use the syntax
dsmod group GroupDN...
The command takes many of
the same switches as DSADD, including -samid, -desc, -secgrp, and
-scope. Typically, though, you won’t be changing those attributes of an
existing group. Rather, the most useful switches are those that let you
modify the membership of a group, specifically
where, as with
all directory service commands, the DN is the full, distinguished name
of another Active Directory object, surrounded by quotes if there are
any spaces in the DN.
Note
On any one command line, you can use only -addmbr or -rmmbr. You cannot use both in a single DSMOD GROUP command. |
Practice: Using LDIFDE to Manage Group Accounts
In
the following exercises, you list the options available for LDIFDE,
export users from the Active Directory, and create a group object in the
directory.
Exercise 1: Starting LDIFDE
In this exercise, you list the command options available with LDIFDE.
1. | Open a Command Prompt.
|
2. | For a list of commands, at the command prompt, type: ldifde /?.
|
Exercise 2: Exporting the Users from an Organizational Unit
In this exercise, you will export the entire contents of an OU named Marketing, complete with all its users, from the contoso.com domain.
1. | In the contoso.com domain (Server01 is a domain controller for contoso.com), create an OU named Marketing.
|
2. | In the Marketing OU, add two or three users. These users may be named whatever you choose.
|
3. | Open a command prompt and type the following LDIFDE command (the character : indicates continuation to the next line)
ldifde -f marketing.ldf -s server01 :
-d "ou=Marketing,dc=contoso,dc=com" :
-p subtree -r : "(objectCategory=CN=Person,CN=Schema,CN=Configuration,:
DC=contoso,DC=com)"
|
Figure 2 shows the code in action.
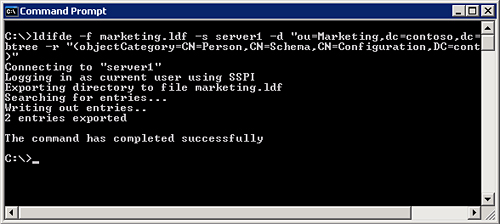
This creates a LDIF
file named Marketing.ldf by connecting to the server named Server01 and
executing a subtree search of the Marketing OU for all objects of the
category Person.
Exercise 3: Using LDIFDE to Create a Group
In this exercise, you will use LDIFDE to add a group named Management to the Marketing OU of contoso.com.
1. | Start
a text editor, such as Notepad, and create a text file named
Newgroup.ldf. (Save the file as an LDIF file, not as a text file.)
|
2. | Edit the LDIF file Newgroup.ldf, and add the following text:
dn: CN=Management,OU=Marketing,DC=contoso,DC=com
changetype: add
cn: Management
objectClass: group
samAccountName: Marketing
|
3. | Save and close the LDIF file.
|
4. | Open a Command Prompt, type the following command and then press Enter:
ldifde -i -f newgroup.ldf -s server01
Tip Watch
for extra “white space” (tabs, spaces, carriage returns, line feeds) in
the file. Extra white space in the file will cause the command to fail. |
|
5. | To confirm that the new group has been created, check the Active Directory Users And Computers snap-in.
|