9. Creating or Opening a Namespace Root
The first step in working with DFS Namespaces is to create a
namespace or open an existing namespace root. If you created a
namespace root when installing DFS Management, you can use this procedure
to open it; otherwise, follow these steps to create one:
Launch DFS Management from the Administrative Tools
folder. Navigate to DFS Management and then to the Namespaces
node.
To open an existing namespace root, right-click Namespaces
and choose Add Namespace To Display. To create a new namespace
root, right-click Namespaces and choose New Namespace. The New
Namespace Wizard appears.
On the Namespace Server page, type the name of the server
that you want to host the namespace root and then click Next. If
the DFS service is disabled, click Yes in the Warning dialog box
to start the DFS service and set its start-up setting to
Automatic.
On the Namespace Name And Settings page, type the name to
use for the namespace root. This name appears as the share name
to users—for example,
\\example.local\public. The New Namespace
Wizard creates the namespace root in the
%SYSTEMDRIVE%:\DFSRoots\name folder and
gives all users read-only permissions. To change these settings,
click Edit Settings. Click Next.
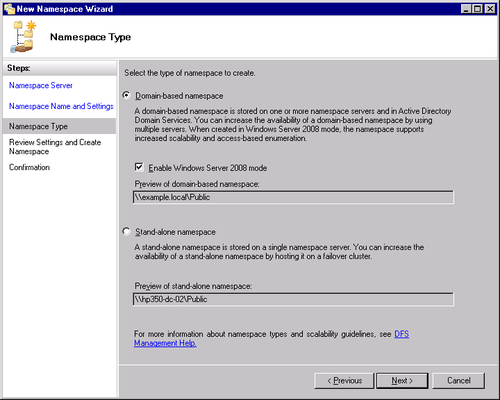
On the Namespace Type page (shown in Figure 4), choose whether to
create a domain-based namespace or a stand-alone namespace, and
then click Next.
Select Domain-Based Namespace to store the namespace
on multiple servers in Active Directory. An example of a
domain-based namespace is
\\example.local\public .
Select Stand-Alone Namespace to create the namespace
on a single server or server cluster. An example of a stand-alone
namespace is \\srv1\public.
On the Review Settings And Create Namespace page, click
Create. The New Namespace Wizard creates the namespace root. Correct any errors using the
Previous button and then click Close.
9.1. Creating a Namespace from a Command Prompt
To create a namespace from a command prompt, use the Dfsutil
/Addftroot or Dfsutil /Addstdroot c ommands. For
example, to create the same namespace shown in Figure 4, follow these
steps:
Open the Command Prompt window. Start the DFS service,
and set the start-up type to Automatic if it is not already by
typing the following commands:
Sc Start Dfs

Sc Config Dfs Start= Auto
Create a folder and file share for the namespace root by
typing the following commands:
Md E:\Public

Net Share Public=E:\Public
Create the domain-based namespace root by typing the following
command:
Dfsutil /Addftroot /Server:Srv1 /Share:Public
10. Adding Namespace Servers
The namespace root is the most important part of the
namespace. Without it, clients cannot access any DFS folders. Because of this, the first step in creating a more fault-tolerant namespace is to add
namespace servers to the namespace root. If possible, add at least
one namespace server on each site where users need access
to the DFS namespace by following these steps:
In the DFS Management console, navigate to Namespaces,
right-click the domain-based namespace root you want to
replicate, and then choose Add Namespace Server.
In the Add Namespace Server dialog box, type the path to
the namespace server and then click OK. Windows creates the
namespace root on the target server in the
%SYSTEMDRIVE%:\DFSRoots\name
folder and gives all users read-only permissions. To change
these settings, click Edit Settings.
If the DFS service is disabled, click Yes in the Warning
dialog box to start the DFS service and set its start-up setting
to Automatic.
To add a namespace server to a namespace from a command
prompt, create the appropriate shared folder, verify that the
DFS service is started and the start-up type is set to
Automatic, and then use the Dfsutil /Addftroot command. For example, open a command
prompt window and then type Dfsutil
/Addftroot /Server:Srv2/Share:Public.
11. Adding DFS Folders
DFS folders allow users to navigate from the namespace root to
other file shares on the network without leaving the DFS namespace
structure. To create a DFS folder, follow these steps:
Right-click the namespace root to which you want to add a
folder, and then choose New Folder. This displays the New Folder
dialog box, shown in Figure 5.

Type a name for the folder in the Name box. To create a
folder that contains other DFS folders, click OK without adding any target
folders. This creates a layer of structure to the
namespace.
To add target folders, click Add and then type the shared
folder’s UNC or DNS path, or click Browse to browse to the
shared folder.
Add any additional folder targets, and then click
OK.
If you added multiple folder targets, click Yes in the
Replication dialog box to create a replication group for the folder
targets or click No to set up a replication group later (or not at
all). If you click Yes, the Replicate Folder Wizard appears with
some settings already entered.
To create a DFS folder from a command prompt, create the
appropriate file shares, and then use the Dfscmd /Map command. (You cannot add DFS folders without
folder targets from a command prompt.) For example, open the Command
Prompt window and then type the following commands:
Dfscmd /Map \\Example.local\Public\Software \\Dc1\Software
Dfscmd /Add \\Example.local\Public\Software \\Srv2\Software
Note:
To publish a DFS folder or namespace root in Active
Directory so that users can find the folder or namespace when
searching Active Directory for shared folders, right-click the appropriate container in
the Active Directory Users And Computers console, choose New,
choose Shared Folder, and then type the path of the namespace or
DFS folder in the Network Path box.