|
There’s not much point to doing regular backups unless you can
recover what you need when you need it. After your first full backup
and periodically thereafter, you should test that your backups can be
restored. We’ve said it before, in a wide variety of places, but it
bears repeating: If you haven’t tested your backup by
restoring from it, you should assume you don’t have a backup at
all.
1. Recovering Your Server
The backups you’ve created with Windows Server Backup can be
used to recover your operating system, system state, volumes, application data, backup catalog, and local
files and folders. Different tools are used to recover different
objects. For example:
The Recovery Wizard in Windows Server Backup can
recover the system state, files and folders, applications, and
volumes. Windows Setup disc or a separate installation of
the Windows Recovery Environment can recover the
operating system and the full server (all volumes). The Catalog Recovery Wizard can recover the backup
catalog. This wizard is available only when the backup catalog
is corrupted.
2. Recovering Volumes
When you restore a full volume using the Recovery Wizard, all
contents of the volume are restored—you can’t select individual
files or folders to recover. To recover just certain files or
folders and not a full volume.
To recover selected volumes, follow these steps:
Open the Administrative Tools menu, and click Windows
Server Backup. In the Actions pane, under Windows Server Backup, click
Recover to start the Recovery Wizard. On the Getting Started page, specify whether the
volumes will be recovered from backups stored on this
computer or another computer. If you’re recovering files
from the local backup, select This Server
(SERVERNAME). If you are recovering volumes from backups of another
computer, specify where the files are located. The choices
are a local drive or a remote shared folder. The local drive
option supports only DVD full volume backups or backups
stored on drives that are recognized as removable. Many
eSATA drives will not be recognized as removable.
If you are recovering from this computer, on the Select
Backup Location page, select the location of the backup from the
drop-down list. If you are recovering from DVD or removable
media, you are prompted to insert the device or first DVD in the
series. Click Next. For a recovery either from the local computer or another
computer, on the Select Backup Date page, select the date from
the calendar and the time from the drop-down list of backups you
want to restore from. Click Next. On the Select Recovery Type page, click Volumes and then click Next. On the Select Volumes page, select the check boxes
associated with the volumes in the Source Volume column that you
want to recover. Then, from the associated drop-down list in the
Destination Volume column, select the location that you want to
recover the volume to. Click Next.
Warning:
IMPORTANT A message
informs you that any data on the destination volume will be
lost when you perform the recovery. Be sure the destination
volume is either empty or doesn’t contain information that
could be needed later.
On the Confirmation page, review the details and then
click Recover to restore the specified volumes. On the Recovery Progress page, you can view the status of
the recovery operation and determine whether it was completed
successfully.
3. Recovering Files and Folders from the Local Server
Occasionally, files will be corrupted or overwritten and it’s
necessary to recover them from a recent backup. To recover
individual files and folders, follow these steps:
Open the Administrative Tools menu, and click Windows
Server Backup. In the Actions pane, under Windows Server Backup, click
Recover to start the Recovery Wizard. On the Getting Started page, select This Server and click
Next. On the Select Backup Date page, select the date and time
of the backup you want to recover from. Click Next. On the Select Recovery Type page, select Files And Folders
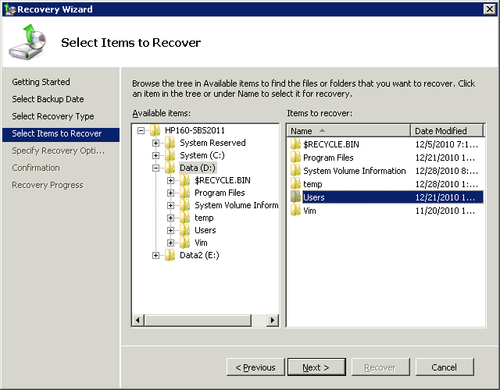
as the type of recovery. Click Next. On the Select Items To Recover page, under Available
Items, expand the list until the folder you want is visible as
shown in Figure 1.
Click a drive to see a list of folders in it, or select a folder
to see a list of files and subfolders in it. Select the files
and folders you want to restore in the Items To Recover
pane.
On the Specify Recovery Options page, under Recovery
Destination, select one of the following:
Warning:
IMPORTANT We strongly
recommend that you always recover to a different location
whenever possible. This allows the greatest flexibility and
safety in recovery and can protect you from inadvertently
overwriting files.
On the same page, in the When This Wizard Finds Items In
The Backup That Are Already In The Recovery Destination section,
choose one of the following options and then click Next: Create Copies So I Have Both Versions Of The File Or
Folder Overwrite Existing Files With Recovered Files Don’t Recover Those Files And Folders
On the same page, select whether to restore access
permissions or not and then click Next. On the Confirmation page, review the details and then
click Recover to restore the specified items. The Recovery Progress page displays the status of the
recovery operation. Click Close when the process is
finished.
4. Recovering Files and Folders from Another Server
To recover files and folders from a backup on another server,
follow these steps:
Open the Administrative Tools menu, and click Windows
Server Backup. In the Actions pane, under Windows Server Backup, click
Recover to start the Recovery Wizard. On the Getting Started page, select Another Server and
click Next. On the Specify Location Type page, select one of the
following and then click Next: Local Drives Remote Shared Folder
If you are recovering from a local drive, on the Select
Backup Location page, select the location of the backup from the
drop-down list. If you are recovering from a remote shared folder, specify
the path to the remote shared folder. Click Next. On the Select Backup Date page, select the date from the
calendar and the time from the drop-down list of backups you
want to restore from. Click Next. On the Select Recovery Type page, select Files And Folders
and then click Next. On the Select Items To Recover page, expand the list under
Available Items until the folder you want is visible. Click a
folder to display the contents in the adjacent pane, select each
item that you want to restore, and then click Next. On the Specify Recovery Options page, under Recovery
Destination, click one of the following and then click
Next: Original location (For some scenarios, this option may
be unavailable.) Another location (Type the path to the location or
click Browse to select it.)
Warning:
IMPORTANT We strongly
recommend that you always recover to a different location
whenever possible. This allows the greatest flexibility and
safety in recovery and can protect you from inadvertently
overwriting files.
On the same page, in the When This Wizard Finds Items In
The Backup That Are Already In The Recovery Destination section,
choose one of the following options and then click Next: Create Copies So I Have Both Versions Of The File Or
Folder Overwrite Existing Files With Recovered Files Don’t Recover Those Files And Folders
On the same page, select whether to restore access
permissions or not and then click Next. On the Confirmation page, review the details and then
click Recover to restore the files and folders. On the Recovery Progress page, view the status of the
recovery operation to determine whether it was completed
successfully. Click Close when the recovery is completed.
|