3. Level 3: Protecting a complete PC
The last level of protection deals with the
protection of a complete operating system configuration. For this,
Microsoft has introduced the Complete PC Backup (CPC), which is
available in the Business, Enterprise, and Ultimate editions. Complete
PC captures the entire operating system configuration and stores it in a
.VHD file, the format used for Microsoft's Virtual PC and Virtual
Server virtual machine hard drives. Complete PC is an image-based backup
tool that protects every aspect of a computer's configuration,
including the OS, all installed applications, and user data files.
Complete PC can be launched in a number of ways.
You've already seen that the Backup Status and Configuration interface
has a Complete PC Backup button; so does the Backup and Restore Center
under the Back up files or your entire computer option (refer to Figure 13.20). Complete PC is also one of the options available in WinRE, but here, you only have access to the Restore operation .
To create a backup of your entire computer, proceed as follows:
Log in with local administrator credentials.
Launch the Backup and Restore Center (Control Panel =>
System and Maintenance =>
Backup and Restore Center).
Click Back up computer.
Vista looks for appropriate backup devices and when it finds them,
display a selection of choices to store the backup (shown in Figure 8).
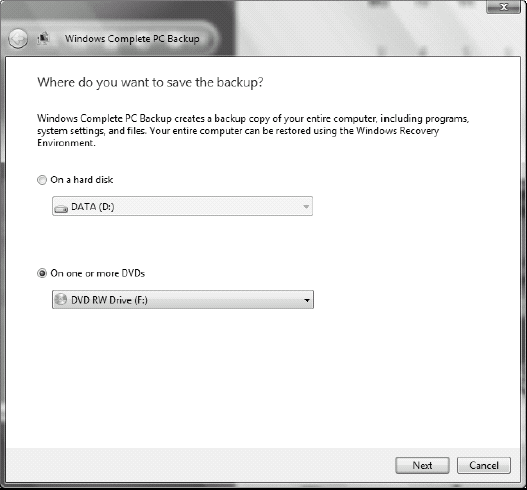
Choose the appropriate location (DVD writer or external hard drive) and click Next.
Select the drive(s) to back up and click Next.
Normally, your PCs should have only one single drive unless you are
using BitLocker. In this case, you need to back up both drives.
Review your options and click Start backup.
Close the Backup window after the operation is complete. Close the Backup and Restore Center when done.
Complete PC backups are incremental and always
target the same backup file, so the backup file grows with time.
Ideally, you would perform a defragmentation of the disk before
performing the backup. Doing this creates a leaner and meaner backup and
makes PC restoration more effective. However, CPC will continue to back
up into a storage destination until there is only 30 percent of space
left on the destination. After it reaches the 30 percent limit, it
begins discarding old data to make room for new data. There is no way to
modify this 30 percent limit.
Keep a note of the following truisms when restoring Complete PC backups:
When you restore the PC from a Complete
PC backup, you recreate an image of the entire system. If you are
restoring to a BitLocker partition, then you will need to run BitLocker
again to re-encrypt the drive.
Complete
PC backups can only be restored to hardware that has a similar CPU and
the same type of firmware (x86 and x64 systems use BIOS firmware whereas
IA64 systems use EFI firmware). Ideally, the IDE controller uses the
same driver as the source system as well.
Complete
PC backups must be restored to hard drives of the same or bigger size
than the original hard drive. Restoring to smaller hard drives — even
hard drives of the same size, but with less free space — does not work.
If
the machine is turned off or in sleep mode when a backup task is
scheduled to run, Backup will not wake the machine. Machines must be
already awake to run scheduled backup tasks.
You
cannot copy backups to multiple CD/DVDs to a hard drive and expect them
to work. To be able to reuse a multi-CD/DVD backup for a restore
operation, you must put it back on multiple CDs or DVDs.
You
can use the Microsoft VHDMount tool to locate individual files within a
Complete PC backup, but this is not an officially supported method.
VHDMount is a command line tool which makes the operation even more
difficult. Obtain VHDMount with the free download of Microsoft Virtual
Server at www.microsoft.com/technet/virtualserver/software/default.mspx.
Alternatively, you can mount a Complete PC VHD backup as a virtual
machine in Virtual Server or Virtual PC and locate specific backup
content in this manner.
Keep these caveats in mind when considering the use of Complete PC Backup.
As you can see, Complete PC Backup will protect
your entire system's data, but you won't want to run complete system
backups all the time. In fact, you might notice that Complete PC Backups
are not scheduled, but are run interactively and with administrative
credentials. Therefore, you run Complete PC Backups only at specific
intervals.
Because of this, a complete PC protections
strategy should include both regular Complete PC Backups and scheduled
Automatic Backups. This strategy will provide the best protection for
your systems.
NOTE
You might find that the default backup
features available in Vista leave a lot to be desired, especially in
business situations. For this reason, you might consider looking at
third-party backup solutions – solutions that offer centralized backup
controls, full system backup through imaging, or backup to media that is
unsupported in Vista – as a worthwhile endeavor. There is nothing more
frustrating for a user than losing data despite your best efforts, and
if this user is an executive, they will quickly approve any more
comprehensive backup solution you suggest.