Windows Media Player (WMP) is your computer’s
one-stop media shop, with support for playing digital music, audio CDs,
digital videos, DVD movies, Internet radio, and recorded TV shows;
ripping music from CDs; burning files to disc; synchronizing with
external audio devices; and much more. Vista ships with a new version of
this popular program—Windows Media Player 11—that offers a few nice
improvements over WMP 10.
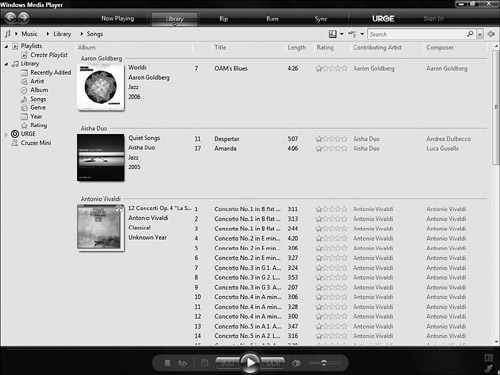
The first thing you notice when you launch WMP 11 is that the overall interface is a bit simpler than previous versions (see Figure 1).
There are still a few too many small, undecipherable icons scattered
around the window, but these are small blemishes on an otherwise clean
look.
Navigating the Library
One of the things that makes the WMP 11
interface so much simpler than older versions is that you see only one
category at a time in the Library. By default, WMP displays the Music
category at startup. However, you can change to a different category
(Music, Pictures, Video, Recorded TV, or Other Media) using either of
the following techniques:
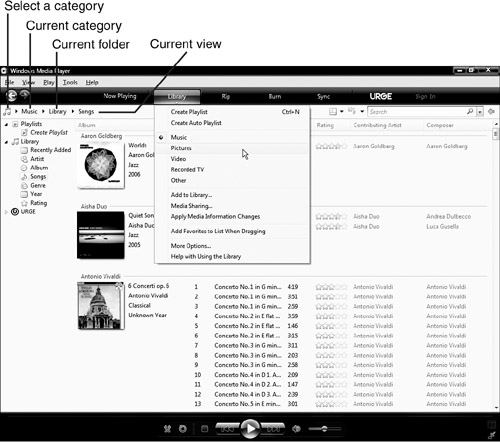
The path information beside the Select a
Category list tells you the name of the current category, folder, and
view, as pointed out in Figure 7.12.
Album Art and the WMP Interface
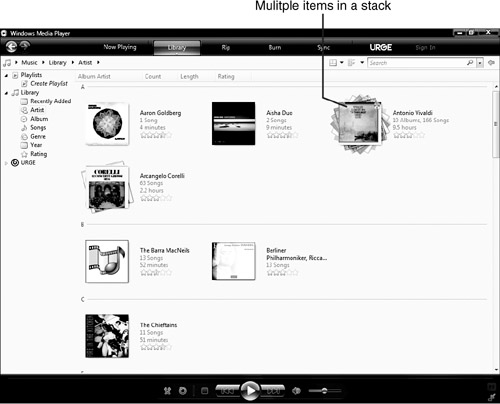
Another thing you’ll notice about the WMP 11
interface is that it features graphics much more predominantly than in
older versions of the program. If you’ve downloaded or scanned album
art, it appears throughout the WMP 11 interface. For example, if you
select the Artist view, the artist stacks use album art images, as shown
in Figure 3. Even if you switch to a less specific view, such as Genre, WMP uses album art as part of the stack icons.
Grouping and Stacking Media
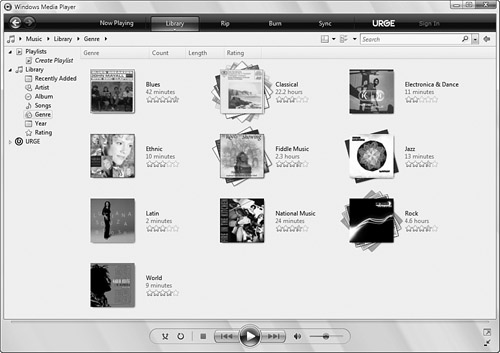
By default, WMP opens in the Music category’s Songs view, which groups songs according to the values in the Album Artist property and then by the values in the Album property. WMP also offers several other Music views based on media metadata:
Artist— Stacks the albums using the values in the Album Artist property
Album— Groups the albums alphabetically using the values in the Album property
Genre— Stacks the albums using the values in the Genre property (see Figure 4)
Year— Groups the albums by decade using the values in the Date Released property
Rating— Stacks the albums using the values in the Rating property
Of
course, you get a different set of views for each category. For
example, you can view items in the Video category by actors, genre, and
rating, and you can view items in the Recorded TV category by series,
genre, actors, and rating. In each category, you can see even more views
by clicking the Library folder (or by pulling down the Library list in
the path data), as shown in Figure 5.

Media Metadata and Tagging
Metadata in Windows Media Player is best dealt
with by downloading the relevant information from the Internet. However,
most WMP metadata is editable, and you can make whatever changes you
need by right-clicking the metadata and then clicking Edit.
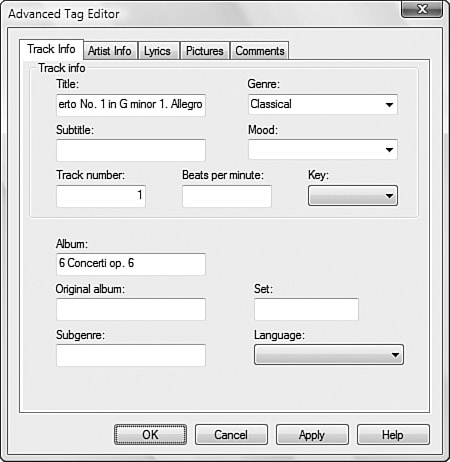
A new innovation in WMP 11 is the Advanced Tag
Editor, which gives you a front-end for much of the metadata available
for a particular media file. Right-click the file you want to tag and
then click Advanced Tag Editor to display the dialog box shown in Figure 6.
You can add metadata related to the track and to the artist, and you
can also add websites, lyrics (even lyrics synchronized to the music),
pictures, and comments.
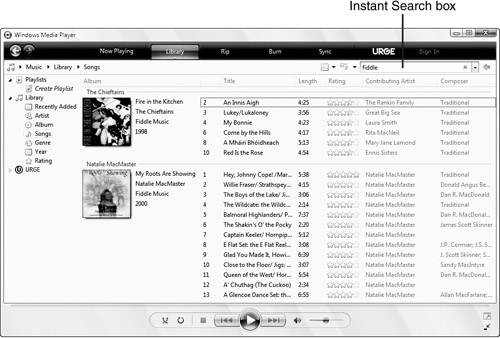
Instant Search
You won’t be surprised to learn that WMP 11
comes with an integrated Instant Search box that supports as-you-type
searches. After you type your text in the Instant Search box, WMP
searches filenames and metadata for matching media files, and then shows
the results in the WMP window. Figure 7 shows an example.
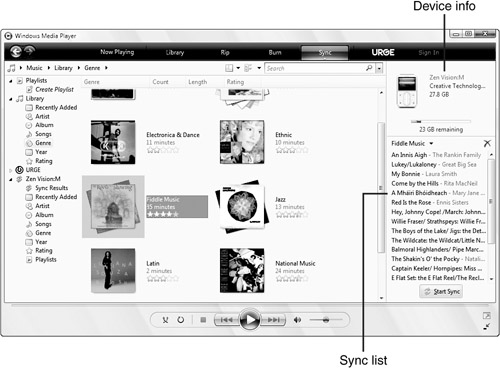
Syncing with Media Devices
Syncing
items from the Library to a media device is a bit easier in WMP 11.
When you insert a WMP-compatible media device, WMP recognizes it and
automatically displays the device, its total capacity, and its available
space in the Sync tab’s List pane, as shown in Figure 8.
To create a list of items to add to the device,
display the album, song, or whatever in the Contents pane; click and
drag the item; and then drop it inside the Sync List. WMP automatically
updates the available storage space in the device as you drop items in
the Sync List. When you’re ready to add the item, click Start Sync. WMP
switches to the device’s Sync Status folder to display the progress of
the sync.
Tip
You can “preshuffle” the media files before starting the sync. Pull down the Sync List button and click Shuffle List Now.
WMP 11 supports two-way synchronizing, which
means that not only can you sync files from your PC to a media device,
but you also can sync files from a media device to your PC. This is
handy if you’ve purchased music directly to the device or uploaded media
to the device using a different application.
To
sync from a media device to your PC, you open a view on the media
device, find the files you want to sync, and then click and drag them to
the Sync List. Alternatively, just click Start Sync to synchronize
everything on the device with WMP.
Media Sharing
It can take quite a while to set up and
customize your WMP Library just the way you like it. When you do,
however, WMP is a pleasure to use—so much so that you’ll probably be
tempted to duplicate your efforts on other computers in your home.
Unfortunately, previous versions of WMP gave you no easy way to do that.
Basically, you had to copy the media files from your original PC to the
second PC, and then build your Library from scratch on the second
machine.
WMP 11 changes all that by introducing a welcome
new feature called Media Sharing. This feature enables you to share
your WMP Library with other network users or devices, just as you’d
share a folder or a printer.
To get started with Media Sharing, WMP gives you two choices:
Pull down any tab menu and select More Options; display the Library tab; and then click Configure Media Sharing.
Right-click the Library folder in any category, and then click Media Sharing.
Either way, you see the Library Sharing dialog
box onscreen. Activate the Share My Library check box, click OK, and
then enter your credentials when prompted.
When computers or devices connect to your network, Media Player recognizes them and displays the fly-out message shown in Figure 9. Click the message and then click either Allow (if you want the computer or device to share your media) or Deny (if you don’t).

To control media sharing, display the Media Sharing dialog box again. This time, you see the configuration shown in Figure 10.
The large box in the middle lists the network computers and devices
that Media Player has detected. In each case, click an icon and then
click either Allow or Deny. If you allow an item, you can also click
Customize to specify exactly what you want to share based on three
criteria: media types, star ratings, and parental ratings. You can also
just use the default sharing settings, which you configure by clicking
the Settings button in the Media Sharing dialog box.