Windows Backup is an alternative to the
simple method for backing up files described earlier. It can back up
individual folders, all files for all user accounts, or even your
entire hard drive. Windows Backup works best if you have a second hard
drive that you can use for backups. It can be an internal disk or an
external hard drive connected through a USB port.
Very few computers sold come with multiple hard
drives. So your system most likely has only one. If you want to back up
to another hard drive, you'll either need to purchase and install one
yourself, have it installed, or use an external hard drive that you can
easily connect with a USB cable.
You can also back up to removable media like CDs and
DVDs. It's not always easy to know in advance how many disks you'll
need. It depends on how many files you back up, and whether or not you
back up just your personal files or the entire hard drive. You might
want to consider buying CDs or DVDs in spindles of 50 or 100. They're
cheaper in those quantities. It won't take that many to make backups,
but you'll probably find plenty of uses for the extras.
If you have a DVD burner, your best bet would be to
use DVDs because one DVD holds as much information as about six CDs.
Backup media (RW disks) are better than distribution media (R) disks
for backup, because RW disks are reusable.
Finally, you can back up folders and files to a
shared network folder. This option provides simplicity in that you
don't have to change removable media. However, backups to tape or other
removable media enable you to take your backups offsite to guard
against a catastrophic incident such as a fire that destroys all of the
computers on your network.
1. Starting Backup and Restore
Backup and Restore is a tool for backing up files in
all user accounts, so you need administrative privileges to run it. If
you're logged in to a standard account, log off. Then log back in to an
administrative account. Use either of the following methods to open
Backup and Restore:
Press  , type back, and click Backup and Restore.
Click the Start button and choose Control Panel => System and Security => Backup and Restore Center.
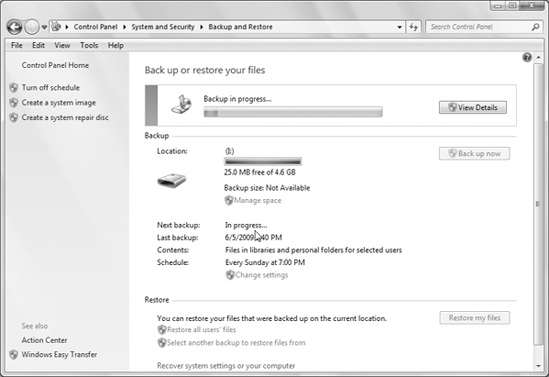
Backup and Restore opens looking something like Figure 1.
2. Backing up files and settings
The Backup and Restore Center backs up all user
files and personal settings in all user accounts by default. It does
not back up Windows or any installed programs. Its main purpose is to
make sure that you can recover documents like pictures, music, videos,
and such in case you lose the originals on your hard drive.
The first file backup you perform might take several
hours. It will run in the background so you can continue to use your
computer during the backup. But the backup will consume some resources,
slowing things down, so you may want to run the first backup overnight,
starting it at a time when you can leave the computer on and running.
Before you start a backup, you should configure
options for the backup. In Backup and Restore, click the Options
button, and then click Change Backup Settings in the resulting dialog
box. Windows 7 starts the Backup program and then displays a wizard
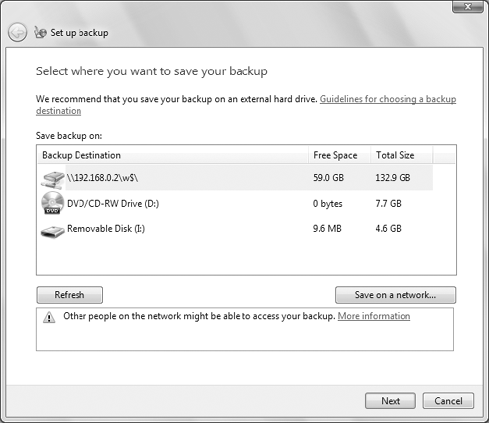
similar to the one shown in Figure 2. In the first step, choose the device on which you will place the backup. Figure 2 shows three potential targets: a network drive, a local CD-RW drive, and a removable (flash) disk.

Choose the desired target for the backup and click
Next. The wizard then presents you with two options. You can let
Windows decide what to back up, or you can choose. If you allow Windows
to choose, Windows backs up data files from your libraries, desktop,
and default Windows folders, and also creates a system image that you
can use to restore your computer should it crash. If you specify the
option to let you choose what to back up, Backup and Restore displays
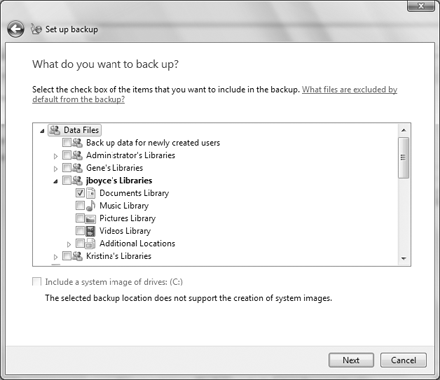
the wizard page shown in Figure 3 when you click Next.
Use the Data Files branch to select which user
libraries to include in the backup. Use the Computer branch to select
other folders as desired. Optionally, select the check box Include a
System Image of Drives to create an image that you can use to restore
the computer if it crashes. Then, click Next.
Backup and Restore at this point displays a summary
of what will be backed up and the target location. It also specifies
the backup schedule. To change the schedule, click the Change Schedule
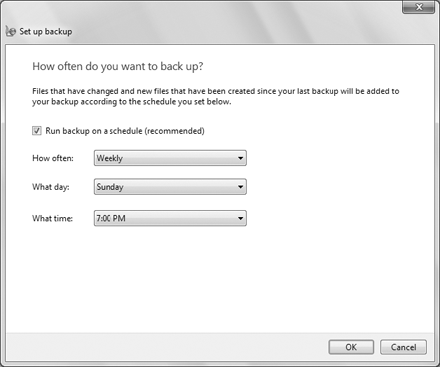
link to open the wizard page shown in Figure 4.
To perform a one-time backup, clear the Run Backup on a Schedule check
box. Otherwise, choose the backup schedule from the drop-down lists on
the page, and then click OK. When you're satisfied with the settings,
click Save Settings and Run Backup.
If you specified a recurring schedule, Windows 7
will automatically back up files according to whatever schedule you
specified. If you use an external hard drive for backups, you'll need
to remember to connect that drive before the scheduled time arrives.

As mentioned, the first backup may take a while. But
subsequent backups will copy only files that have changed since the
last backup, so they'll go more quickly. Also, you won't have to answer
all the same questions again. Subsequent backups will assume you want
to keep the same settings.
If you back up to an external hard drive, the backup
files will be in a folder that has the same name as the computer you
backed up. If you delete the folder, you lose the backup. Exploring
that folder won't reveal files in their original form. The backed up
files are combined and compressed to minimize storage requirements. To
restore from backups, use the method described in the next section.
|
If you encounter a problem while trying to do
subsequent backups, the reason might be because you inserted the wrong
disk to back up to, or you deleted the folder or files that contain the
previous backups. (Backups don't do you any good if you lose the backup
disk or erase the backed up data.)
If you get in a jam where Windows encounters a
problem on subsequent backups, use the Change Settings link in Backup
and Restore Center to start a new backup from scratch. When you get
toward the end of the wizard, watch for the option to do a complete
backup and select (check) its check box. That will keep Windows from
trying to limit the backup to files that have changed since the last
backup and prevent the error message from returning.
|

