1. | Make sure your building is still selected and then choose the Rectangle tool again if necessary.
|
2. | Change
the Compound Shape tool attribute to Subtract/Punch and draw a
rectangle that is 20 × 40 pixels. When you release the mouse, a hole is
punched through the main rectangle. Remember you can always adjust the
dimensions in the Properties panel.
Note
The act of punching one vector through another can
also be done using the Path panel or the Modify menu, but doing so
requires multiple steps and is a destructive process. Punching one
vector through another is normally a three-step operation: draw the
punching shape, select both shapes, and then use the Path panel or
Modify menu to perform the action. This workflow permanently changes the
vectors by combining them into a single composite path. You did the
same thing in just two steps, and the objects remain unique and
editable!
|
3. | Using
the Subselection tool, position the rectangle about 13 pixels from the
left edge and 26 pixels from the top edge of the main rectangle.
|
4. | Press Ctrl+Shift+D (Windows) or Command+Shift+D (Mac) to create a clone of the window.
|
5. | While holding down Shift, press the Down arrow key five times.
|
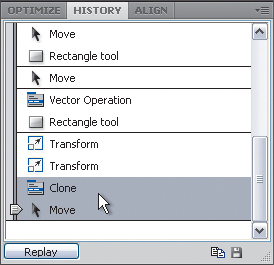
6. | Open the History panel (choose Window > History) and locate the last two steps, Clone and Move.
|
7. | Hold down the Shift key and click on Clone and Move to select them both.


|
8. | Press the Replay button six times to create your first column of windows.
|
9. | Choose the Subselection tool, and while holding down Shift, click on all of the windows to select them.
|
10. | Clone the selected group of windows.
|
11. | Hold down Shift and press the Right Arrow key three times.
|
12. | Repeat steps 10 and 11 using the new column of windows.
|
13. | Select
the Pointer tool and drag your new building until the bottom lines up
with the bottoms of the other buildings. Again, Smart Guides display a
horizontal dashed line when the building matches up with the others.
|
14. | One
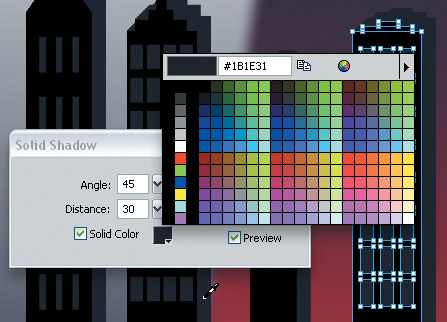
last step is to apply the solid shadow to this new building. Make sure
the object is selected with the Pointer tool, and then choose Shadow And
Glow > Solid Shadow from the Live Filters menu in the Properties
panel.
|
15. | Leave the Angle and Distance settings as they are, but enable the Solid Color option.
|
16. | To
make sure the new shadow has the same color as the others, click on the
Color fill box and then place your cursor over one of the other shadows
and click to sample that color exactly. Until you add the correct solid
color, the whole object turns black.

|
17. | Click OK.
Your skyline is complete!
|
18. | Unhide the foreground layer and save your file.
This has been a big lesson, but vectors are a large part of the creative
toolset in Fireworks and it’s important that you get comfortable with
the tools. Although we did not work with the Auto Shapes panel, we
recommend you have a look at the panel and check out the prebuilt vector
shapes that are included with Fireworks. |