IT tutorials
 
Office
 

Microsoft Excel 2010 : Printing in Excel - Working in Page Break Preview Mode & Printing a Worksheet on One Page

- Free product key for windows 10
- Free Product Key for Microsoft office 365
- Product Key Free : Microsoft Office 2019 – Serial Number
1/30/2012 5:41:46 PM

Working in Page Break Preview Mode


Page Break Preview mode displays the area you have selected for your set print area. It also enables you to click and drag where your page breaks are instead of using the Insert, Page Break command. You can also edit the text and data just as you can in Normal view.
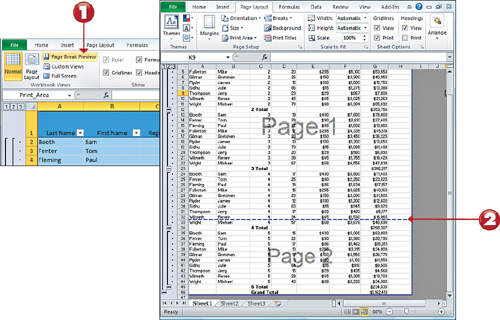


1. Click Page Break Preview from the View tab on the ribbon. If a print area has been set, it is displayed; if not, the entire worksheet is displayed.

2. Move through the worksheet to find page breaks (if any). Naturally occurring page breaks appear as blue dashed lines, and inserted page breaks appear as solid blue lines.

Note: Clearing the Print Area

If you need to set only the print area to print a portion of data in your worksheet once, you probably want to clear the print area after you print. Go to the Page Layout tab, click the Print Area command, and select Clear Print Area.


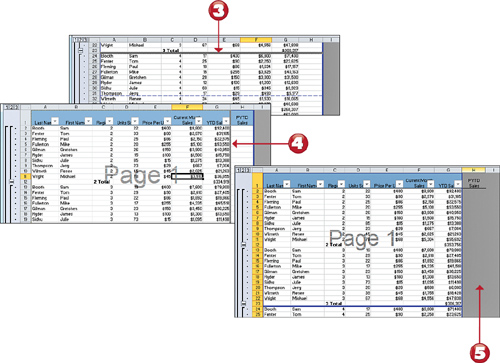
3. To move a page break that is poorly placed, click and drag it to a better location. (Moving a natural page break changes it to an inserted break—solid-blue.)

4. To exclude a column or data to the right of your set print area, click and drag the vertical page break.

5. The excluded column outside the print area is grayed out.


Tip: Removing a Page Break

To remove a page break in Page Break Preview mode, click and drag the page break line off to the right/left/top/bottom of the worksheet.


Printing a Worksheet on One Page

By default, Excel prints your worksheet at a scale of 100%. You can decrease this percentage if you want to fit more data on a page, or increase it to fit less data on a page. In addition, you can have Excel fit your entire worksheet on one page. (If your worksheet is large, the data might become too tiny to read when scaled down.)
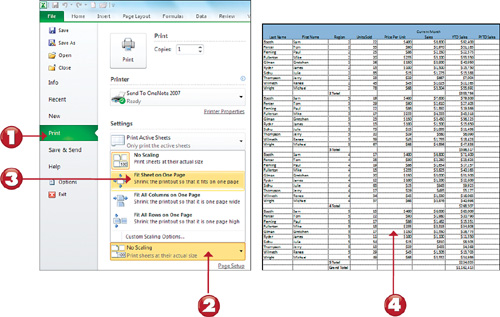


1. Go the File tab and click Print.

2. Click the Zoom and Scaling drop-down.

3. Select the Fit Sheet on One Page option.

4. Your worksheet appears in Print Preview mode, all on one page.


Tip: Changing from Letter to Legal

To choose a different paper size for your printout, click the Paper Size dropdown on the Print pane of the Backstage View. There, you can select Legal. The scaling setting automatically adjusts to the selected paper size.


Note: Returning to the Default Scale

When you want to return the preview of your worksheet to the default scale, return the Scaling dropdown to the No Scaling option.


Others
 
- Microsoft Access 2010 : Viewing a Sample Database & Creating a New Database
- Microsoft Access 2010 : Designing a Database
- Microsoft Outlook 2010 : Sending Text Messages from Outlook & Sending Mobile Alerts from Outlook
- Microsoft Outlook 2010 : Using Alerts and Mobile Features - Setting Up a Text Messaging Service
- Microsoft OneNote 2010 : Upgrading from a Previous Version
- Microsoft Word 2010 : Customizing Word - Changing Advanced Document Properties & Changing Research Options
- Microsoft Word 2010 : Customizing Word - Setting Advanced General Options & Setting Compatibility Options
- Microsoft Project 2010 : Setting Up Resources - Adjusting Working Time for Individual Resources
- Microsoft Project 2010 : Setting Up Resources - Entering Resource Pay Rates
- Microsoft Visio 2010 : Displaying the rule for a selected issue
 
 
Top 10
 
- Microsoft Visio 2013 : Adding Structure to Your Diagrams - Finding containers and lists in Visio (part 2) - Wireframes,Legends
- Microsoft Visio 2013 : Adding Structure to Your Diagrams - Finding containers and lists in Visio (part 1) - Swimlanes
- Microsoft Visio 2013 : Adding Structure to Your Diagrams - Formatting and sizing lists
- Microsoft Visio 2013 : Adding Structure to Your Diagrams - Adding shapes to lists
- Microsoft Visio 2013 : Adding Structure to Your Diagrams - Sizing containers
- Microsoft Access 2010 : Control Properties and Why to Use Them (part 3) - The Other Properties of a Control
- Microsoft Access 2010 : Control Properties and Why to Use Them (part 2) - The Data Properties of a Control
- Microsoft Access 2010 : Control Properties and Why to Use Them (part 1) - The Format Properties of a Control
- Microsoft Access 2010 : Form Properties and Why Should You Use Them - Working with the Properties Window
- Microsoft Visio 2013 : Using the Organization Chart Wizard with new data
Technology FAQ
- Is possible to just to use a wireless router to extend wireless access to wireless access points?
- Ruby - Insert Struct to MySql
- how to find my Symantec pcAnywhere serial number
- About direct X / Open GL issue
- How to determine eclipse version?
- What SAN cert Exchange 2010 for UM, OA?
- How do I populate a SQL Express table from Excel file?
- code for express check out with Paypal.
- Problem with Templated User Control
- ShellExecute SW_HIDE
programming4us programming4us