Setting the Print Area
Worksheets
can include several rows and columns; setting the print area enables
you to specify which rows and columns to print. If you don’t set a print
area, all cells that contain data will print. The worksheet in this
task contains four tables that span seven pages. By default, all will
print unless you set a print area.

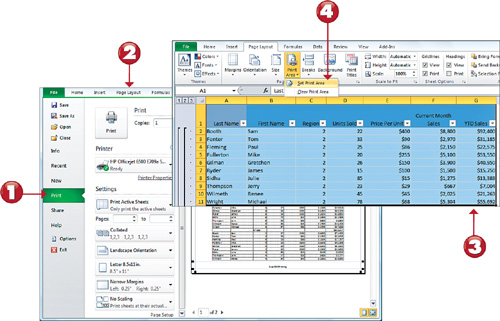
1. Click the File tab, then select Print to see a Print Preview of your worksheet.
2. Should your print area need adjusting, click on the Page Layout menu option to return to Normal view.
3. Select the exact cells you want to print (in this example, all the cells in the first two tables in this worksheet).
4. Click the Print Area command on the ribbon, and select Set Print Area. This will store the print area as part of the worksheet. Now, only the cells in the print area will print.
Tip: Another Way to Choose the Print Area
You can
also Set the Print Area from the traditional Page Setup dialog box. To
get there, go to the Page Layout tab and click the Page Setup dialog
launcher. Once the Page Setup dialog box activates, you can click on the
Sheet tab. There, you can set the Print Area input to the cell range
you want to print. |

5.
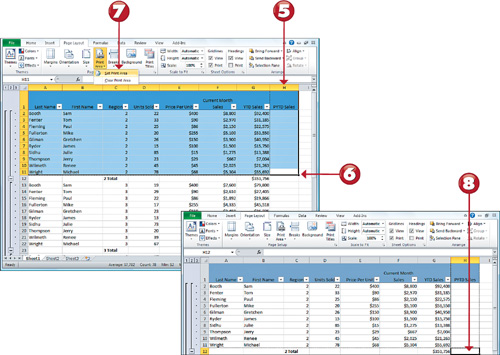
Insert a row or column into your worksheet (PYTD Sales, for example).
Parts of the table now fall outside the current print area.
6. Select the exact cells you want to print (now including the extra column).
7. To reset the print area to include the new row or column, choose Print Area from the Page Layout Tab, and select Set Print Area.
8. Your new print area is stored as part of this worksheet. If the new print area falls outside the margins, see the next task.
Note: Long and Short Dashes
The long
dashed lines in your worksheet indicate the print area, and the smaller
dashed lines indicate the current page margins. If your print area data
falls outside the current page margins, you need to alter the page
margins. |