Choosing a Handwriting Mode
When you use the handwriting features in OneNote
2010, it allows for the creation of both handwriting and drawings at the
same time. If necessary, you can override this
default setting to a more specific selection. For example, on a
particular page, you could restrict your handwriting to only create
drawings so that OneNote will know not to attempt to convert these
drawings to text later on.
To choose a handwriting mode, follow these steps:
1. | On
the Draw tab, in the Tools group, click the More drop-down arrow in the
lower-right corner of the box showing the pens and highlighters (see Figure 5.12).
|
2. | Click or tap the Pen Mode command and then click or tap any of the three options you want.
|
If you’re not sure what mode to use, leave the default setting Create Both Handwriting and Drawings.
|
There’s a fourth option available on the Pen Mode
that can prove to be quite convenient: the Use Pen as Pointer option.
Selecting this mode lets you use your selected pen like a mouse pointer
so you can interact with certain elements on your screen by clicking or
tapping them without constantly having to toggle Select & Type mode.
For example, with a pen active, tapping the To Do note tag on a page
would just draw around it. However, with the Use Pen as Pointer option
selected, you’re able to place a check mark in the To Do box, just like
you would be able to do with your mouse pointer. When you’re done using
the pen as a pointer, click the Use Pen as Pointer command once more to
toggle it off.
|
Selecting Handwriting or a Drawing on a Page
Once you’ve handwritten or drawn something on a
OneNote page, it appears as digital ink, which can appear free-form on
the page canvas or within note containers.
You can select digital ink strokes in much the same way as you would select typed text on a page.
To select handwriting or a drawing on a page, follow these steps:
1. | On the Draw tab, make sure that the Select & Type tool is selected (it will appear orange).
|
2. | On
the page, click any part of your handwritten text or drawing. OneNote
will automatically include neighboring strokes that were created at the
same time as the part of the handwriting you’re clicking.
|
3. | While
selected, eight control handles will surround the handwriting object to
let you know you can now interact with the ink selection (see Figure 4). You can click and drag any of the handles to enlarge, shrink, stretch, or squeeze the selection as many times as you like.

|
|
To quickly select all objects on a page, including
handwriting and drawings, use the Ctrl+A keyboard shortcut. This command
works incrementally, so depending on where your cursor is located when
you do this, you might need to press Ctrl+A up to three times in a row
to include everything in your selection.
|
Creating a Custom Selection from Handwriting or from a Drawing
On occasion, OneNote’s best guess about which ink
strokes belong together to form a selection might not be to your liking.
In these cases, you can easily create a custom selection by using the
Lasso Select tool.
To create a custom selection from handwriting or from a drawing, follow these steps:
1. | On the Draw tab, click the Lasso Select tool.
|
2. | Click and drag a circle around only those ink strokes that you want to include in your selection (see Figure 5). For example, you might select only a single handwritten word or character in a line of text.

|
3. | When
you release the mouse button, OneNote selects only the ink strokes that
were included in the selection circle you drew (see Figure 6).

|
Once handwritten text or the ink strokes of a drawing
are selected in the way you want, you can apply formatting to the
selection or cut or copy and then paste the selection to another
location. You can also have OneNote convert handwritten notes and
handwritten mathematical expressions to text.
Changing the Formatting of Handwriting or a Drawing
To change the color and thickness of your selected ink strokes, follow these steps:
1. | Select the parts of your handwriting or drawing that you want to format.
|
2. | On the Draw tab, in the Insert Shapes group, click the Color & Thickness button.
|
3. | In
the Color & Thickness dialog box that opens, change the thickness
or color (or both) and then click OK to apply the changes to your
selection.
|
|
For
a quicker way to format a selection of handwriting, right-click the
handwriting selection and then click the Color & Thickness button in
the upper-right corner of the shortcut menu that appears.
|
Converting Handwriting to Text
The built-in handwriting recognition in OneNote 2010
can convert a selection of handwriting to standard text. This is useful
whenever you want to send a copy of your handwritten notes to colleagues
or classmates in a more legible and reusable text format.
To convert handwriting to text, follow these steps:
1. | Select the parts of your handwriting that you want to convert.
|
2. | On the Draw tab, in the Convert group, click the Ink to Text button.
|
Text recognition depends on the quality and
legibility of the selected handwritten text. If you repeatedly have
trouble getting OneNote to recognize your handwriting, try again with
larger and more legible writing.
|
For a quicker way to convert a handwriting selection
to text, right-click the selection, and then click Ink to Text on the
shortcut menu. To convert only a single word to text, first deselect all
handwriting on the page and then right-click a single handwritten word.
Near the top of the shortcut menu, click one of the conversion
suggestions to change that particular word to the text you want.
|
If the Ink to Text command is not available on the
ribbon or on the shortcut menu, you most likely selected Create Drawings
Only mode.
|
If you write out mathematical expressions in your own
handwriting, you can convert these just as easily by clicking the Ink
to Math button on the ribbon or on the shortcut menu that appears when
right-clicking a selected expression.
|
Erasing Specific Parts of Handwriting or a Drawing
Although you can easily erase handwriting on most
Tablet PCs by moving the back of your pen or stylus over your digital
ink strokes, OneNote offers several built-in eraser options for greater
control.
To erase specific parts of handwriting or a drawing, follow these steps:
1. | On the Draw tab, click the small arrow under the Eraser button.
|
2. | On
the menu that appears, select the Small, Medium, or Large Eraser. The
icon on the button will change to remind you of your selection, and
moving the mouse pointer over the button will display the name of the
eraser you have chosen.
|
3. | Move
the mouse pointer over the page containing handwriting or a drawing.
Click and drag the eraser mouse pointer over the parts you want to
erase.
|
If you make a mistake, remember to click the Undo command on the Quick Access Toolbar or press the Ctrl+Z keyboard shortcut.
|
For even more precision, choose the Stroke Eraser on
the Eraser menu. In this mode, you can use the mouse, the pen, or even
your finger to erase entire strokes at a time, including those in
drawings and shapes. This is most useful when you want to replace a
particular stroke without destroying the ink surrounding it.
|
In addition to the Eraser options, OneNote 2010 also
recognizes the scratch-out gesture built in to Tablet PCs to delete
unwanted handwriting or drawings. Using your Tablet PC pen or stylus,
quickly scratch out existing handwriting on the page—the same way you
would rapidly scribble lines of ink back and forth over text on a piece
of paper. Using the scratch-out gesture will cause the crossed-out text
on your page to disappear.
Erasing an Entire Selection of Handwriting or a Drawing
To quickly erase a large amount of handwriting or a large drawing on your notes page, do the following:
1. | Using
the mouse or the Lasso Select tool on the Draw tab, select the parts of
your handwriting or drawing that you want to erase.
|
2. | On the Draw tab, in the Edit group, click Delete.
|
|
For a slightly faster way to delete a large selection
of handwriting, right-click your selection and then click Delete on the
shortcut menu.
|
Scrolling Through Ink Selections on a Page
Normally, the horizontal and vertical scrollbars that
appear in OneNote will suffice for getting around on a page. However,
because handwriting and drawing objects are typically larger than typed
text objects, scrolling can take more time and increase the chance of
deselecting a complex selection of ink strokes that you want to bring
into view.
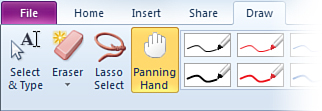
To quickly scroll through the page without using the scrollbars, follow these steps:
1. | On the Draw tab, in the Tools group, click the Panning Hand button (see Figure 7).
|
2. | In this mode, the mouse pointer will change to the panning hand icon when you move it over the page.
|
3. | Click and drag the panning hand in any direction to quickly bring other parts of the page into view.
|
4. | When
you release the mouse button, you’re left on the position of the page
that you were last looking at and all selected objects on the page will
remain selected.
|