When you develop a presentation on the computer from which
you’ll be delivering it, you’ll have all the fonts, linked
objects, and other components of the presentation available when the lights go
down and you launch your first slide. However, if you’ll deliver your
presentation from a different computer, you need to ensure that the fonts,
linked objects, and any other necessary items will all be available when you
need them.
With PowerPoint 2010, you can use the updated Package For CD feature to help
you gather all the presentation components and save them to a CD or other type
of removable media so that they can be transported to a different computer.
Linked and embedded items, such as fonts, sounds, videos, and any other files
used by the presentation are included in the presentation package by default.
You also have the option of assigning a password to open or modify the
presentation, and of using the Document Inspector to remove any personal or
confidential information from the packaged file.
Tip:
Tip
PowerPoint 2010 does not support the direct burning of content to a DVD.
If you prefer to burn to a DVD rather than a CD, first use the Package For
CD feature to create a presentation package in a folder on your computer,
and then use DVD-burning software to copy the package to the DVD.
You can add more than one presentation to the same presentation package, and
you can include files not specifically related to the presentation. If you add
more than one presentation, you can specify the order in which the presentations
should run. PowerPoint assembles all the files, adds an autorun file, and
creates a folder of supporting files.
To run a packaged presentation from CD on a computer that does not have
PowerPoint 2010 installed, you need the Microsoft PowerPoint Viewer. With
previous versions of PowerPoint, the PowerPoint Viewer was automatically
included with the packaged presentation. However, the Viewer cannot run
presentations saved in the new PowerPoint 2010 format from a CD; it must be
installed on the computer. So before you can use PowerPoint Viewer, you need to
download and install it from the Microsoft Download Center Web site.
Tip:
Tip
When you insert the presentation CD into your CD/DVD drive, the AutoPlay
dialog box opens so that you can indicate whether you want to display an
HTML introductory screen (called a splash screen) for
the presentation. This screen provides a link for downloading the Viewer.
After the Viewer is installed, clicking the name of the presentation on the
HTML splash screen theoretically runs the presentation. However, at the time
of writing, the Viewer downloaded by following this process does not work
with presentations in PowerPoint 2010 format.
In this exercise, you’ll use Package For CD to create a presentation
package on a CD.
Display the Save & Send
page of the Backstage view, click Package
Presentation for CD, and then click Package for
CD.
The Package For CD dialog box opens.
You can add files or remove files from the Files To Be
Copied list.
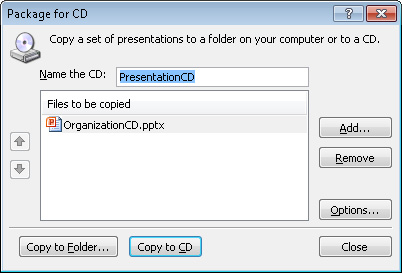
In the Name the CD box, type
Organization.
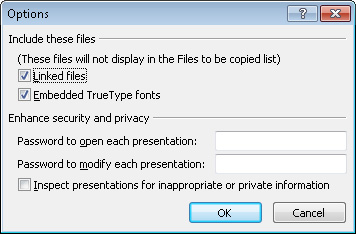
Click Options.
The Options dialog box opens.
By default, the presentation’s linked files,
and embedded TrueType fonts will be included in the
presentation package.
Tip:
Tip
Be sure to leave the Embedded TrueType Fonts check box
selected if the presentation includes fonts that don’t
come with the version of Windows running on the presentation
computer or with the Microsoft Office 2010 programs. Then the
presentation will look the same on a computer on which the fonts
aren’t installed as it does on your computer. You can
embed fonts when you package a presentation, or you can do it when
you first save the presentation. (Only TrueType and OpenType fonts
can be embedded.) In the Save As dialog box, click Tools, click Save
Options, and on the Save page, select the Embed Fonts In The File
check box. Then click Embed Only The Characters Used In The
Presentation to embed only the characters in the font set that are
actually used, or click Embed All Characters to embed the entire
font set.
Select the Inspect presentations for
inappropriate or private information check box, and then
click OK.
Insert a blank CD in your CD/DVD burner, and if the AutoPlay dialog box opens, close it.
In the Package for CD dialog box,
click Copy to CD.
Note:
If your computer does not have a CD/DVD burner, click Copy To
Folder instead. Then in the Copy To Folder dialog box, specify the
folder in which you want to store the package, clear the Open Folder
When Complete check box, and click OK.
When PowerPoint asks you to verify that you want to include linked
content, click Yes.
The Document Inspector opens so that you can inspect the presentation
file for personal or confidential information.
Click Inspect. When the inspection
results are displayed, click Remove
All to the right of Document
Properties and Personal information. Then click Close.
PowerPoint copies the files required for the OrganizationCD
presentation to CD and then ejects the disk.
This message tells you that the packaging operation
was successful.
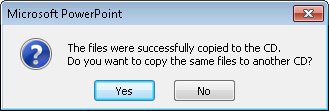
Click No to indicate that
you don’t want to copy the same package to another CD.
Click Close to close the Package for CD dialog box.
If you have access to a different computer, you should now test
whether you can run the presentation from the CD. If the other computer
does not have PowerPoint 2010 installed on it, you might want to
download and install the 2010 version of the PowerPoint Viewer.