Rather than using an external application to take screenshots, PowerPoint 2010 offers its own screen capture tool.
Inserting Screenshots
To take a screenshot and insert it into your presentation, follow these steps:
1. | Open
the application from which you want to take a screenshot. For example,
you might want to capture something from another Office application or
from an external website.
|
2. | Return to your PowerPoint presentation.
|
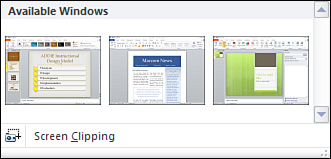
3. | On the Insert tab, click the Screenshot button. A list of available windows appears, as shown in Figure 3.

|
4. | If
you want to take a screenshot of the entire window and insert it into
your PowerPoint presentation, select that window from the list.
|
5. | If you want to select a specific area for your screenshot, select the Screen Clipping option on the menu.
|
6. | If
you’re taking a screenshot, select the area you want to include in your
presentation using your mouse pointer (which now appears as a
crosshair).
|
PowerPoint inserts the screenshot into your presentation. You can resize, reposition, and modify this image as you like.
Working with Photo Albums
With its Photo Album feature,
PowerPoint enables you to automatically create a presentation composed
of a series of images available on your computer or on an external site.
For example, you can create a travel presentation consisting of a
series of photos taken on a trip.
Creating a Presentation from a Photo Album
To create a presentation based on a photo album, follow these steps:
1. | On
the Insert tab, click the Photo Album button, and select New Photo
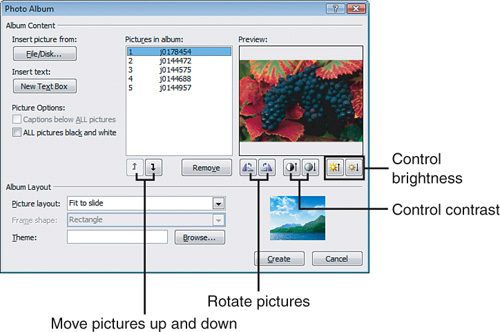
Album from the menu. The Photo Album dialog box opens, as shown in Figure 4.

|
2. | Click the File/Disk button to open the Insert New Pictures dialog box.
|
3. | Navigate
to the folder that contains the images you want to include in your
album. To select all images, press Ctrl+A. Alternatively, press the Ctrl
button on your keyboard and select individual images.
|
4. | Click
the Insert button to return to the Photo Album dialog box. PowerPoint
lists the selected images in the Pictures in Album section.
|
5. | Modify your photo album to suit your needs. For example, you can
- Insert a text box slide by clicking the New Text Box button.
When you return to your presentation, you can enter text on this slide.
- Choose to display captions below all pictures or convert all pictures to black and white.
- Change the order of your images by clicking the Up and Down buttons (designated by arrows).
- Select an image and click the Remove button to delete it from the album.
- Adjust the appearance of an image using the Rotate, Brightness, and Contrast buttons (the small buttons below the image).
- Select a layout from the Picture Layout drop-down list, such as 1, 2, or 4 picture per page, with or without a title.
- Apply a Frame Shape such as a rectangle (the default), rounded rectangle, simple frame, or soft edge rectangle.
- Browse for a theme to apply to your presentation.
When you finish setting up your photo album, click the Create button.
|
PowerPoint inserts the images into your presentation. You can resize, reposition, and modify the images as you like.
To
edit your photo album, go to the Insert tab, click the Photo Album
button, and select Edit Photo Album from the menu. The Edit Photo Album
dialog box opens, which is nearly identical to the original Photo Album
dialog box you used to create your album. Make any changes, and click
the Update button.