SOMETIMES WORKING WITH
a long document can feel a bit overwhelming. Fortunately, Word contains
many features designed to assist you, such as those that allow you to
set the page size and layout, mixing and matching them as needed.
Setting Margins
Margins are the space between the edges of the paper
and where the text actually begins to appear. Word allows you to set
margins for any of the four sides of the document and also allows you to
mix and match margins for different pages. Word sets the default
margins as 1 inch on each of the top, bottom, left, and right sides. You
can set the document margins before you begin entering text into a
document, after you’ve completed the entire document, or at any time in
between.
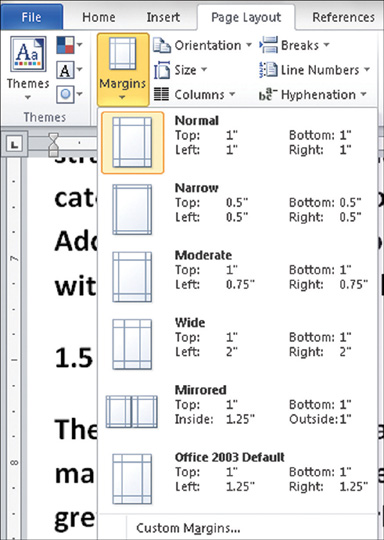
Choose Page Layout > Page Setup > Margins and select from the choices you see in Figure 1,
or click Custom Margins, which displays the Page Setup dialog box where
you can set your own choices. By default, Word applies the new settings
to the entire document.
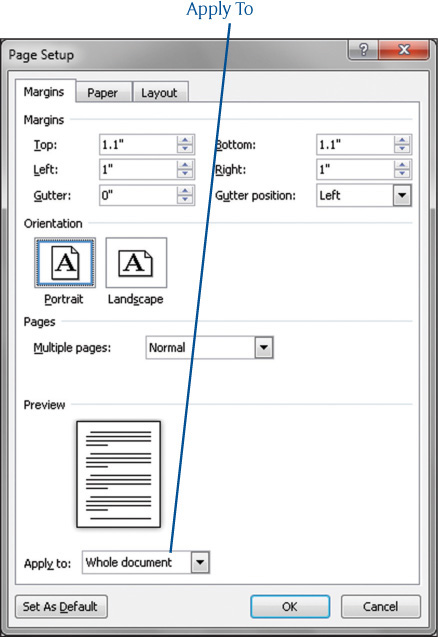
If you want to change margins for only part of the
document, select the portion you want to change. From Page Layout >
Page Setup > Margins, choose Custom Margins. Set the margins you want
and, from the Apply To drop-down list, choose Selected Text (see Figure 2). Word creates section breaks and applies the new margin settings.
Changing Document Orientation
Webster’s
dictionary describes orientation as a position in relation to a
specific place or object. In word processing, orientation refers to how
the text is positioned in relation to the top of a page. Two
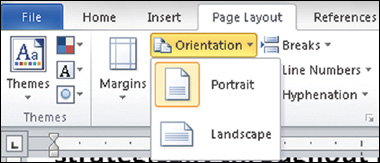
orientations exist: Portrait, the default orientation, prints the text
beginning along the short edge of the paper, and Landscape orientation
prints along the long edge of the page.
Choose Page Layout > Page Setup > Orientation and choose Portrait or Landscape, as shown in Figure 3.
|
Similar to margin settings, if you want to change the
orientation for only part of the document, select the portion you want
to change and, from the Page Setup dialog box, choose your orientation
and from the Apply To section, choose Selected Text. Word creates
section breaks and applies the new settings to the selected section.
|
Setting the Paper Size
Word assumes you want your document printed on
standard paper 8.5 inches wide by 11 inches long, but you may want some
or all of your document printed on a different paper size. Although Word
can work with many different sizes of paper, often the selections
available to you depend on the printer you have. In many situations, you
can even create your own custom paper size.
Word provides a number of different ways to manage document paper sizes:
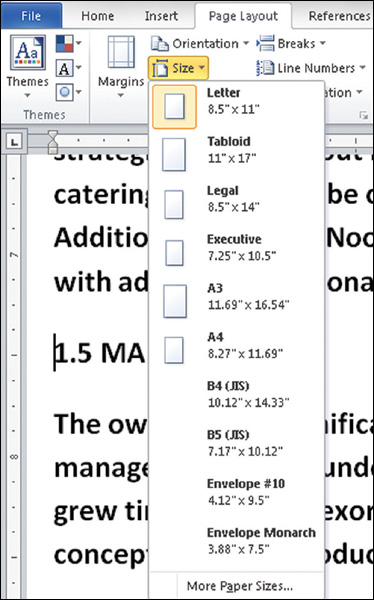
To change the paper size for the entire
document, choose Page Layout > Page Setup > Size and select a size
from the resulting drop-down list (see Figure 4).
To change the paper size
from a certain location through the rest of the document, position the
insertion point where you want the new paper size to take effect, and
then choose Page Layout > Page Setup > Size and select More Paper
Sizes. From the Paper tab of the Page Setup dialog box, select the paper
size you want and then, in the Apply To drop-down list, choose This
Point Forward.
To change the paper size
for a particular section, create the section breaks where needed and
click anywhere inside the section you want to change, or select the text
area. Choose Page Layout > Page Setup > Size and select More
Paper Sizes. From the Paper tab of the Page Setup dialog box, select the
paper size you want and then, from the Apply To drop-down list, choose
This Section or Selected Sections.
Adding Line Numbering
Sometimes, especially with legal documents, you need
to place line numbering. Word has a feature that can automatically count
the lines in a document and display the appropriate number beside each
line of text. Word gives you a number of different line numbering
options. For example, you can number every line in a document, number
every line in only a part of the document, or display line numbering at
specific intervals such as 2, 4, 6, 8 or 10, 20, 30, 40, and so forth.
Word also has a few rules about how it counts special items:
Blank lines are included. Paragraph spacing is not included.
A table counts as one line.
Graphics count as one line.
A
text box counts as one line if it is positioned in-line with the text
on the page. If text on the page wraps around the text box, the lines of
text on the page are counted. Lines of text inside a text box are not
counted.
Footnotes, endnotes, headers, and footers are not included.
To add line numbering, choose Page Layout > Page Setup > Line Numbers. You see the menu as shown in Figure 5.

|
If your document has sections, and you want to number
the entire document, before applying line numbering, you must select
the entire document by pressing Ctrl+A.
|
By default, Word numbers every line in a document as
1, 2, 3, 4, and so on. You can choose to number continuously through the
entire document, or you can have the numbers restart at each page or
section.
Line numbering does not
show up on your screen document. It appears only in the printed
document or in Word’s Print Preview window. To see how the line
numbering looks, click the File tab and choose Print. You see the
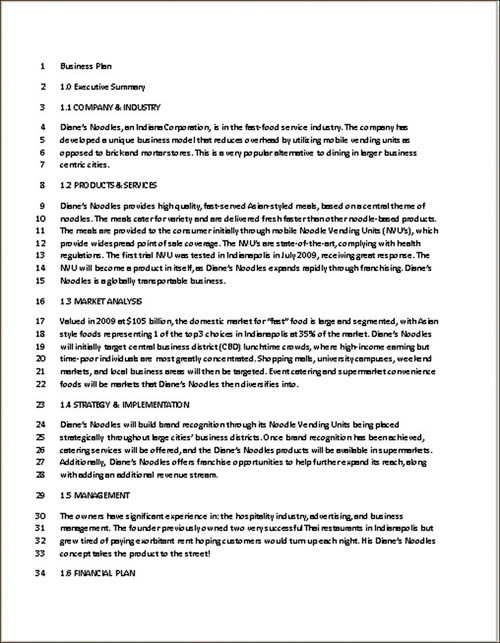
document with its line numbering on the left side of the screen. Figure 6 illustrates a document numbered continuously throughout the entire document.
If you want a different numbering scheme than the
default sequential 1, 2, 3, 4, choose Page Layout > Page Setup >
Line Numbers > Line Numbering Options. The Page Setup dialog box
appears. Click the Line Numbers button on the Page Setup dialog box. You
see the Line Numbers dialog box shown in Figure 7.
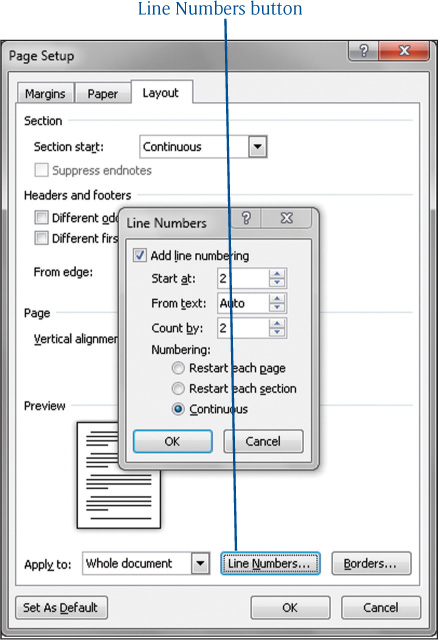
Check the Add Line Numbering option, and then select any other desired options. Click OK twice.
Tip
To remove line numbering, choose Page Layout > Page Setup > Line Numbers > None.