In this section, we'll look at
prerequisites. This includes those for Active Directory as well as the
server and its operating system. We'll start with Active Directory.
1. Active Directory Requirements
It's important to keep your test environment
isolated from your production environment. Exchange 2010 requires many
changes to Active Directory through schema updates. Exchange 2010
introduces new objects and adds many parameters to existing objects.
Additionally, Exchange 2010 has some other Active Directory
requirements:
Domain controllers and global catalogs in the same site are Windows Server 2003 Service Pack 2 (SP2) or higher.
Read
Only Domain Controllers and Read Only Global Catalogs in the same
Active Directory site are ignored by Exchange 2010. Because of this, a
conventional Domain Controller and Global Catalog must exist in the AD
site.
We also need to look at the domain and forest
functional levels. Active Directory forest and domain functionality
modes must be at least Windows Server 2003 to install Exchange 2010. To
verify, follow these steps:
Log on to a domain controller as a domain administrator.
Click Start => All Programs => Administrative Tools => Active Directory Domains And Trusts.
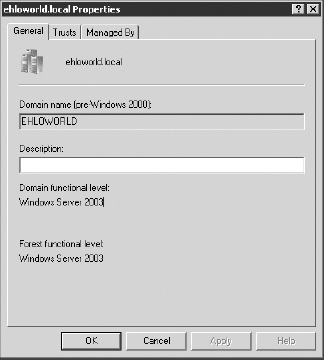
Right-click on the domain in the left pane and choose Properties.
On
the General tab of the properties dialog box, look for Domain
Functional Level and Forest Function Level; both appear in the lower
half of the screen, as shown in Figure 1.

If the forest or domain is not Windows Server 2003 or higher, it must be raised before Exchange can be installed.
Although installing Exchange Server 2010 on a domain
controller is a supported scenario, performance and security are
enhanced when Exchange Server 2010 is installed on a member server.
Once Exchange is installed, that server cannot be promoted to a domain
controller or demoted to a member server.
2. Operating System Prerequisites
Log onto the server as an administrator and install
the 2007 Office System Converter: Microsoft Filter Pack. With features
like transport rules, this filter pack adds support for inspection of
Office files. You may be familiar with transport rules from Exchange
2007; Exchange 2010 adds the ability to inspect files and take action
accordingly. An example is keyword matching. Files added for inspection
via the filter pack include those with the extensions .docx, .docm, .pptx, .pptm, .xlsx, .xlsm, .xlsb, .zip, .one, .vdx, .vsd, .vss, .vst, .vdx, .vsx, and .vtx. The filter pack is available for download at www.microsoft.com.
Later, after installing Exchange 2010, we'll register the file formats
for Exchange to index. We can now move on to operating system roles and
features within Windows Server 2008 R2.
An excellent component of Windows Server 2008 and
Windows Server 2008 R2 is Server Manager. Server Manager is a framework
that allows an administrator to add, review, or remove Windows features
and roles from a server. We will use some Server Manager features to
install our prerequisites. First, we must enable the commands. Doing
this is straightforward:
Open PowerShell by clicking on its icon in the taskbar.
Type Import-Module ServerManager and press Enter.
This enables the following PowerShell commands in Windows Server 2008 R2:
Add-WindowsFeature
Get-WindowsFeature
Remove-WindowsFeature
For Windows Server 2008 R2, only a few components
must be installed before you can install Exchange. These include
features such as the .NET Framework and IIS components.
There are several ways in which they can be installed. The first is to open the Server Manager GUI on the server via Start => All Programs => Administrative Tools => Server Manager and select the required check boxes. The next method is much faster. Simply use the PowerShell Add-WindowsFeature
cmdlet to install all the roles and features in one step. To do so,
return to the PowerShell window opened earlier and type the following:
Add-WindowsFeature NET-Framework,RSAT-ADDS,Web-Server,Web-Basic-Auth,
Web-Windows-Auth,Web-Metabase,Web-Net-Ext,Web-Lgcy-Mgmt-Console,
WAS-Process-Model,RSAT-Web-Server,Web-ISAPI-Ext,Web-Digest-Auth,
Web-Dyn-Compression,NET-HTTP-Activation,RPC-Over-HTTP-Proxy -Restart
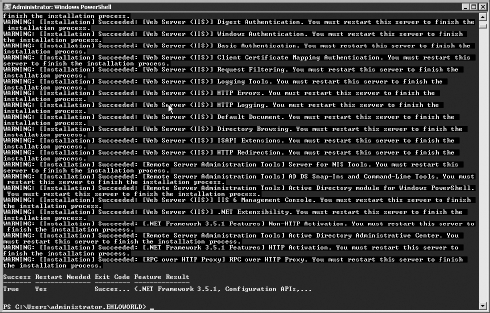
Once you press Enter, the server will install the
required roles and features, and then automatically restart. Note that
it is normal to see yellow warning text scroll by while this code is
running, as shown in Figure 2. These are merely warnings that a reboot is required.
But wait—there's an even faster method. Instead of
typing that long line of roles and features to be installed, Microsoft
included a method that uses XML files to specify which roles and
features to install. This method uses the ServerManagerCmd.exe
program, which was first introduced in Windows Server 2008. While it is
deprecated in Windows Server 2008 R2, it still works fine.
ServerManagerCmd.exe has an optional switch, -ip, which can be used to take action based on XML configuration files. The command syntax looks like this: ServerManagerCmd -ip <name of XML file>. An additional switch, -restart, will force the server to restart upon completion, if a restart is required.
Microsoft has included Exchange Server 2010 prerequisite configuration files on the Exchange DVD. Located in the \scripts folder, are some XML files, among others. The XML configuration files appear in Table 1.

Table 1. Exchange 2010 XML Configuration Files
| Configuration File | Purpose |
|---|
| exchange-all.xml | All server roles |
| exchange-base.xml | Base installation for any role |
| exchange.cadb.xml | CentralAdmin database |
| exchange-cas.xml | Client Access Server role |
| exchange-eca.xml | CentralAdmin |
| exchange-edge.xml | Edge Transport Server role |
| exchange-hub.xml | Hub Transport Server role |
| exchange-mbx.xml | Mailbox Server role |
| exchange-typical.xml | Mailbox/Client Access/Hub Transport Server roles |
| exchange-um.xml | Unified Messaging Server role |
For our typical Exchange 2010 server, we'll use the exchange-typical.xml
file. To use this method, return to the PowerShell window and navigate
to the location of your Exchange Server 2010 files, and then to the \scripts subfolder. For example, if your Exchange DVD is drive D:, navigate to D:\Scripts and type ServerManagerCmd -ip Exchange-Typical.xml -restart. Entering this command will install all necessary roles and features defined in Exchange-Typical.xml and then automatically restart the computer.
Regardless of which method you use, once you reboot
the server you can verify the installation of the various roles and
features by opening a command prompt or PowerShell window and typing ServerManagerCmd -q. This will list all roles and features available in Windows Server 2008 R2, and indicate in green which are installed.
There is one more setting that needs to be completed
before we start the actual installation program for Exchange. The
Client Access Server role requires the Net TCP Port Sharing service be
set to start automatically. We can do this quickly within PowerShell.
Log on to the server as an administrative user.
Open PowerShell once again and type Set-Service NetTcpPortSharing -StartupType Automatic.