IT tutorials
 
Technology
 

InfoPath with SharePoint 2010 : Document Information Panel Content Type - Create the Document Library, Add Columns to Your DIP

9/20/2013 7:48:06 PM
- Free product key for windows 10
- Free Product Key for Microsoft office 365
- Malwarebytes Premium 3.7.1 Serial Keys (LifeTime) 2019

1. Create the Document Library

Scenario/Problem:You need to create a library to store Office documents that can use the DIP.

Solution:In SharePoint, create a new document library that uses a Microsoft Office document template.

Before you modify a DIP for your documents, you need a document library that stores the documents. The document template for the library needs to be one of the Microsoft Office document templates (Excel, PowerPoint, or Word), as shown in Figure 1.
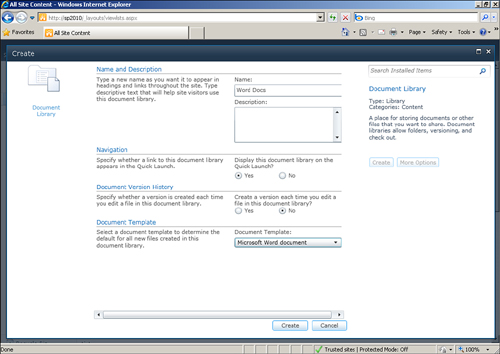
Figure 1. Selecting a Microsoft Office template allows a DIP to be applied.


2. Add Columns to Your DIP

Scenario/Problem:You need to add the additional columns to be used in your DIP.

Solution:Modify the document library in SharePoint and add the additional columns.

Because the DIP is used to display/enter the additional data you want to capture with the documents, you need to have columns in your library to store those values.

To add these columns to your library, follow these steps:

1.
Navigate to your document library in SharePoint.

2.
Click Library Settings on the Library ribbon bar, as shown in Figure 2, to manage the library’s settings.
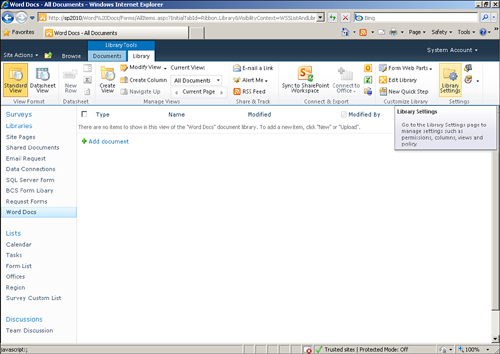


Figure 2. Clicking Library Settings allows you to manage the library’s settings.

3.
On the List Information page, scroll down and click Create Column, as shown in Figure 3, to add a new column to the library.
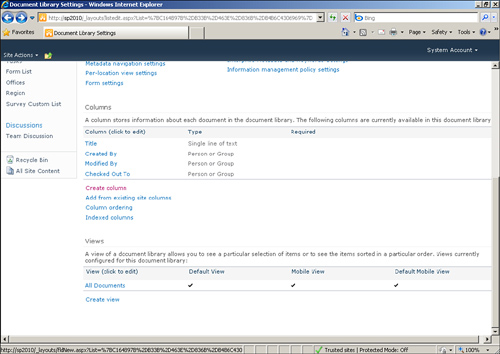
Figure 3. Clicking Create Column allows you to add new columns to your document library.

4.
Enter a name for the column and select the type of information. Click OK.

5.
Repeat steps 1 and 2 for additional columns.

6.
Navigate back to the document library.

7.
From the Documents ribbon bar, select New Document, as shown in Figure 4, to launch the Microsoft Office application associated to the document library document type.
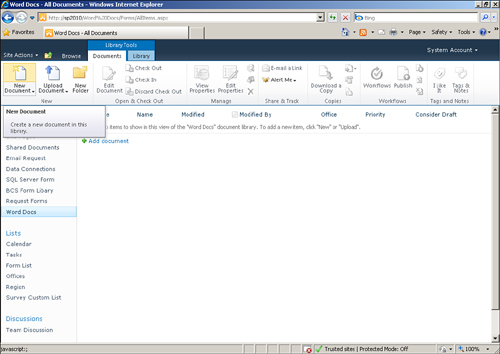


Figure 4. Clicking New Document launches the Office application associated to the document library

The Office application launches and displays a blank new document. The system-generated DIP appears at the top of the document, as shown in Figure 5. Verify that the DIP contains the additional columns you added to the library.
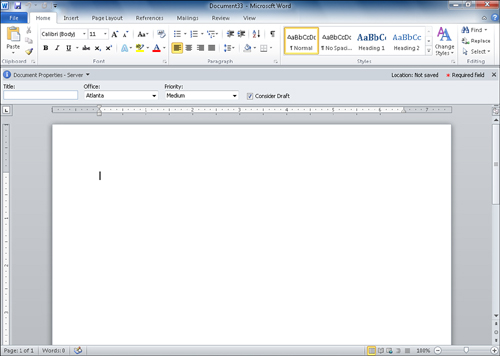
Figure 5. Creating a new document verifies that the added columns appear in the DIP.

Tip

If your DIP does not show by default, go to File | Info and click the Form Template Properties button on the far right. In the properties dialog click Show Document Panel.


Note

Any multiple-choice columns are displayed as drop-downs regardless of the selection in SharePoint, but you may modify the control inside the DIP to use different interfaces.

 
Others
 
- Windows Small Business Server 2011 : Working with Users (part 4) - Creating User Roles
- Windows Small Business Server 2011 : Working with Users (part 3) - Managing User Properties
- Windows Small Business Server 2011 : Working with Users (part 2) - Creating Multiple User Accounts
- Windows Small Business Server 2011 : Working with Users (part 1) - Creating a User Account
- Active Directory 2008 : Managing Operations Masters (part 3) - Seizing Operations Master Roles, Returning a Role to Its Original Holder
- Active Directory 2008 : Managing Operations Masters (part 2) - Optimizing the Placement of Operations Masters, Transferring Operations Master Roles
- Active Directory 2008 : Managing Operations Masters (part 1) - Domain-Wide Operations Master Roles
- SQL Server 2012 : Physical and Virtual Memory (part 2) - NUMA
- SQL Server 2012 : Physical and Virtual Memory (part 1) - Virtual Memory - Virtual Memory Manager
- SQL Server 2012 : Demystifying Hardware - Choosing and Configuring Hardware for Redundancy, Hardware Comparison Tools
 
 
Top 10
 
- Microsoft Visio 2013 : Adding Structure to Your Diagrams - Finding containers and lists in Visio (part 2) - Wireframes,Legends
- Microsoft Visio 2013 : Adding Structure to Your Diagrams - Finding containers and lists in Visio (part 1) - Swimlanes
- Microsoft Visio 2013 : Adding Structure to Your Diagrams - Formatting and sizing lists
- Microsoft Visio 2013 : Adding Structure to Your Diagrams - Adding shapes to lists
- Microsoft Visio 2013 : Adding Structure to Your Diagrams - Sizing containers
- Microsoft Access 2010 : Control Properties and Why to Use Them (part 3) - The Other Properties of a Control
- Microsoft Access 2010 : Control Properties and Why to Use Them (part 2) - The Data Properties of a Control
- Microsoft Access 2010 : Control Properties and Why to Use Them (part 1) - The Format Properties of a Control
- Microsoft Access 2010 : Form Properties and Why Should You Use Them - Working with the Properties Window
- Microsoft Visio 2013 : Using the Organization Chart Wizard with new data
Technology FAQ
- Is possible to just to use a wireless router to extend wireless access to wireless access points?
- Ruby - Insert Struct to MySql
- how to find my Symantec pcAnywhere serial number
- About direct X / Open GL issue
- How to determine eclipse version?
- What SAN cert Exchange 2010 for UM, OA?
- How do I populate a SQL Express table from Excel file?
- code for express check out with Paypal.
- Problem with Templated User Control
- ShellExecute SW_HIDE
programming4us programming4us