The SharePoint 2010 Search Center results
page contains a new section called the refinement panel. This panel is
located on the left portion of the screen and provides a summary of
search results which, when used, act as filters on the returned data.
Out of the box, there are three main categories:
New custom refinement categories can be configured,
these are based on managed properties. Managed properties are the
metadata stored with items in SharePoint. There are many more
properties than the three that are shown out of the box.
This recipe consists of two parts:
Adding a managed property, which takes place in the Central Administration.
Modifying the refinement menu to include a new category based on the managed property, which will be done at the site level.
Getting ready
Ensure that you are a Site Collection Administrator.
In the site, you are going to modify a custom list and create a new column called Finance, using the property named Single Line of Text.&;
Upload a couple of documents into the library and assign a value to
Finance for each one. Use something as simple as 1 or 2 as the value.
Create an Enterprise Search Center Site. This is available with the enterprise edition. Call it SearchCenter.
Modify the Search Settings under Site Collection Administration (found under Site Actions) so that the site you are testing against points to /SearchCenter/Pages/results.aspx.
You must have farm-level administrative permissions to the Central Administration site.
How to do it...
Part 1: Creating Managed Property
Open the Central Administration site and click Application Management.
The third section is Service Applications. Under this section, click Manage service applications.
Find the Search Service Application
option and click on it (this is the name SharePoint assigns by default
if not modified when creating the Search Service). The ribbon will
light up. Click Manage.
On the left-hand navigation, under the section marked Queries and Results, click Metadata Properties.
Click New Managed Property. A new form appears.
In the Name textbox, type Finance.
Under Mappings to crawled properties, click Add Mapping.
The following pop-up screen appears:
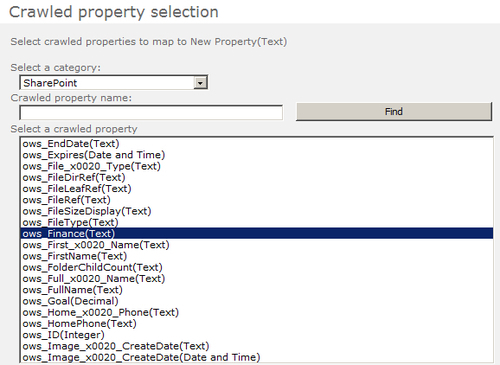
In the Select a category listbox, select SharePoint.
Navigate to the Finance property.
Click OK.
On the New Managed Property page, check the box for Use in Scopes. Click OK.
Initiate a full crawl on the Local SharePoint sites (under Content Sources).
Part 2: Creating Custom Refiner
Navigate to the Search Center page, for example, servername/SearchCenter/Pages/results.aspx.
Perform a search. Click Site Actions, Edit Page.
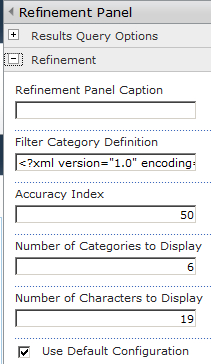
In the web part marked Refinement Panel, select Edit Web Part from the drop-down list.
Under the section Refinement, there is the Filter Category Definition. Click the ... box to the right of this.
You are presented with a text editor of the contents. Select all of the text (Ctrl+A) and copy and paste the contents into Notepad.
Run a search query on Author. Copy the author's category tag. It will contain the following:
<Category Title="Author" Description="Use this filter to restrict results authored by a specific author"
Type="Microsoft.Office.Server.Search.WebControls.ManagedPropertyFilterGenerator" MetadataThreshold="5"
NumberOfFiltersToDisplay="4" MaxNumberOfFilters="20" SortBy="Frequency" SortByForMoreFilters="Name"
SortDirection="Descending" SortDirectionForMoreFilters="Ascending" ShowMoreLink="True"
MappedProperty="Author" MoreLinkText="show more" LessLinkText="show fewer" />
Paste the copied tag right after the end of the original Author tag.
Make the following changes:
Change the Title to Finance.
Change the MetadataThreshold to 1.
Change MappedProperty to Finance.
Copy and paste the complete text from the Notepad (where we copied the text to in step 5) into the text editor. Click OK.
Ensure the Use Default Configuration option is unchecked.
Click Apply and then OK on the Web part properties dialog.
Check in and publish page.
Perform
a search by your name. Doing this makes the assumption that there are
documents with your name in them, about you, or created by you.
How it works...
The refiner panel is a web part on the Search
results page that contains properties to completely configure the way
it looks and behaves. In this recipe, we utilized the Refinement XML
configuration to add a new category.
Part 1 of our recipe creates the managed property. A
prerequisite of this recipe was to create a column that we could
consume. Once this was done and the content was crawled, the property
becomes available to define as a managed property. This part is done by
a Search Administrator or the Farm Administrator.
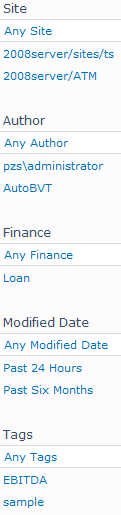
Part 2 of our recipe took that property and mapped
it to a category of our creation. We performed this in step 15. This is
done at the site level. The end result is a panel that looks like the
following screenshot:
There's more...
The property Metadata Threshold&;
is critical to have the category show up, as you expected, in the
refinement panel. The value of this property will be compared against
the count of metadata matches. If the number of matches is higher than
the value, the refiner category will show.
This gives you control over how many and what
refiners are shown in the panel. This can be used to prevent the panel
from becoming too crowded.
More info
In the preceding screenshot, there is a section
called Tags. When doing a search for information, the returned results
may be categorized by information found in the Managed Metadata Term
Store.