1. Disaster Recovery Planning
When
creating a disaster recovery (DR) plan, you need to determine what you
are trying to recover from. In other words, think of your disaster
recovery plan like “taking out insurance” for your SharePoint
environment. There are various levels of protection you may wish to set
in place. You may be using a DR plan to create a replica copy of your
environment to recover specific content (like the deletion of a site),
or you may wish to create a plan to create a new environment from
scratch (in the event of an actual disaster) that will quickly and
effectively replicate the current environment.
For example, on one end of the spectrum, you could
make things easy on your IT team and back up your data once every six
months or so, but then you run the risk of losing a lot of data if
something were to happen (a hard drive crashes, administrator or user
error, and so on). On the other end of the spectrum, you can do a full
backup of everything daily (or even more frequently—say hourly) to
ensure that you always have the latest of everything—but does that make
sense for your environment? You might ask, “Why would we not
do that?” The challenge with effective disaster recovery planning is
balancing the cost (actual dollars as well as resource time) against
the protection required that makes the most sense (in the short and
long term).
To properly capture these types of decisions, we recommend creating a disaster recovery operations document.
Creating a Disaster Recovery (DR) Operations Document
The following is a framework for a SharePoint
disaster recovery operations document. It is important to note that a
DR plan is only effective if it is both complete and accurate.
An effective SharePoint disaster recovery plan
should contain full documentation on how to re-create an entire
SharePoint environment from scratch.
This requires a process (and discipline) that is accurate and
well-maintained. Each and every time a SharePoint element (for example,
a Web Part, xml file, configuration setting, and so on) is altered or
added, the disaster recovery inventory document must be updated.
Here’s an example of information that should be captured:
Overview
Explanation of when to use this plan
Permissions required for executing the plan
SharePoint Backup/Restore
Step-by-step execution plan for your environment
Adding Web Parts
Location of all Web Part CAB or install files
Instructions for installation
Location of the latest Web.config file
Adding Additional Components (Features, Event Handlers, Workflows, and so on)
Instructions for file movement and/or installation
Testing
Instructions on how to test new portal environment
Smoke test (that is, a quick examination of the environment to inspect stability)
Validation of Web Part execution
Validation of security model
Miscellaneous
Comments collected from previous restorations
When you’ve got a document underway, you’ll
want to start filling in your company-specific recovery steps,
including your SharePoint backup and restore steps. To determine your
specific steps, you’ll need to decide on which SharePoint
backup/restore option best suits your needs. Let’s take a look at the
various SharePoint options.
2. Backup and Restore Options
There are several backup and restore options in SharePoint Server 2010, including:
SharePoint Central Administration backup and restore
PowerShell cmdlets command-line backup and restore
Two-stage Recycle Bin restore
SQL Server database backup and restore
The first two options (SharePoint Central
Administration and PowerShare cmdlets) provide out-of-the-box tools to
back up a full farm.
The two-stage Recycle Bin is a tool used to recover
individual files. It is not designed to support full-site or Site
Collection recovery.
The SQL Server’s backup and restore utilities are
available only if you have a full version of SQL Server. SQL Express
does not include a GUI for backup, but you can write a script to
automate the backup.
Each of these options provides a different level of
recoverability and usability—we discuss the options in the following
sections, including when to use each.
2.1 Central Administration Backup and Restore Tool
For those familiar with the backup/restore
functionality in SharePoint Office Server 2007, one of the first things
you will notice is that the Data Backup and Restore interface in
SharePoint Server 2010 is much more robust in terms of the granularity
of backup that can be enacted.
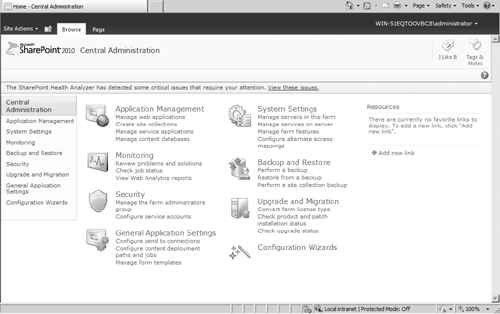
The Backup and Restore tools are still contained within SharePoint Central Administration. In the interface (see Figure 1), there is a link on the left for Backup and Restore.

The main features of the Backup and Restore tool within SharePoint Central Administration include
The ability to select specific farm components for backup.
This includes the selection of an entire farm or specific components
within a farm such as the configuration database, Web application
setup, content databases, service applications, and user profiles.
An improved interface for managing backups and restores. The interface is well-organized with clear instructions on expected parameters and intended outcome.
The ability to do full or differential backups.
Full backup backs up the selected content with full history. A
differential backup backs up all changes to the selected content since
the last full backup.
The ability to restore a site or list.
Backup process statistics.
The Backup and Restore tool also provides information about overall disk space usage, status, and errors.