1. Hierarchical File Plans and Folder-Based Retention
The reality is that usually the amount of content
and categories of content generated in a typical organization will
require a better manageability of retention policies. For instance, the
policies would sound something like this: "If this e-mail is more than
six months old, go ahead and archive it, but if the CEO sent it, don't
archive it." This sounds very much like the ability to set retention
policies and then be able to override certain retention policies under
special conditions.
So think of it this way: if you were managing
e-mail or documents, then based on sender or creator of the document,
the content could be routed to an appropriate document library. Even
better, if you had a centralized place for managing all records, the
document could be routed to an appropriate folder. Thus, there could be
a folder called Documents that are Records, but if the CEO created such
a document, you could have a subfolder called CEO's Documents. Then by
using appropriate content organizer rules, you could theoretically
route the documents to the appropriate location. This is the beginning
of the formation of your hierarchical file plan!
Now, wouldn't it be nice if in this file plan you
could apply hierarchical retention policies? And that you can! Usually
you would take such an approach in a records center or centralized
records management, but nothing stops you from using this feature right
inside your site collections. Simply activate the Library and Folder
Based Retention feature at the site collection level and then visit the
MyDox document library you created earlier. Under MyDox, create a
folder called Child, put some documents in it, and create a folder called GrandChild
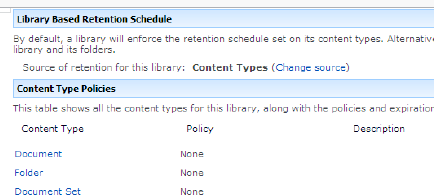
and put some documents in it, too. Now, go into the information
management policy settings of the MyDox document library, and you
should see Library Based Retention Schedule option. This can be seen in
Figure 1.

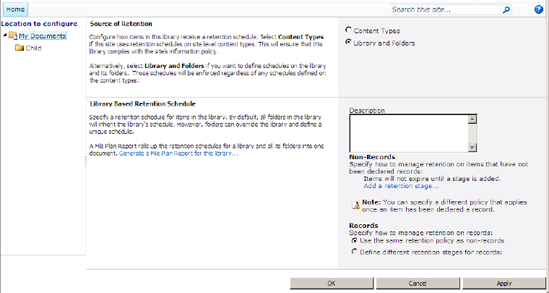
On this screen, choose to change source for the
retention for this document library. You will be able to change the
retention policy source from content types to library and folders. By
changing the retention source to Library and Folders, you will now be
able to add retention stages at the library level. Go ahead and add a
retention schedule specifying that if a document has a created date
> 1 year, it is moved to the Recycle bin (see Figure 2).

Now, I'd like to draw your attention to the left
side of the preceding figure You can see the folder structure shown as
a tree view! Hmm, I wonder what happens if I click the Child folder?
The UI changes to that shown in Figure 3.

By default, child folders inherit from the parent's
retention policies, but you have the ability to configure retention
stages at the child level different from the parent. This is referred
to as a hierarchical file plan and retention policies specified in your
hierarchical file plan.
One final thing I'd like to mention before
I shift my focus to the Records Center is the availability of a list
definition called Records Library that has automatic records
declaration and such relevant features preconfigured for you. Go ahead
and create a list based on the Records Library and examine its
facilities. You will find that it is simply a document library with
automatic declaration of records turned on, among other things.
2. Records Center
The Records Center is a site that puts together all
the features I described previously as a single site. It is available
to create as a child site or as a site collection. But in order to be
able to create the Records Center as a child site, you must activate
the content organizer features first. Whether
you create the Records Center as a site or as a site collection, the
feature set is the same. But what creating the Records Center as its
own site collection does give you is the ability to segregate that site
collection as its own content database and thus be able to use RBS
capabilities of SharePoint to store all those documents in an alternate
storage. Believe me, you will need it.
Through central administration, create a site
collection based on the Records Center template called Records at
/sites/Records. When you create the Records Center you will notice the
following:
This is a site collection with the content
organizer turned on. There is a Drop Off Library and you can set up
various content organizer rules to route the documents accordingly.
There is a records library created for you.
There
is a facility to submit new records or to query for an existing record
using the unique document ID facilities in SharePoint.
You will find a custom action under site settings called Manage Records Center that takes you to a page at http://sp2010/sites/Records/rcconsole.aspx.
This page puts together all the convenient facilities in a SharePoint
records center ,
activated as individual features.
The Records Center is intended to be that
gargantuan centralized location where all records for the organization
are ingested. There is another site definition called the Document
Center.