A Windows 2008 server installed with the
NPS role implements system health checks against Windows systems on the
network. Those systems failing these health checks are subject to
various actions, including the following:
The
Network Access Protection (NAP) functionality included in ConfigMgr
2007 extends the NAP functionality built in to Windows Server 2008,
implementing a system health check based on the mandatory software
updates configured in ConfigMgr. The next sections discuss this process.
NAP Prerequisites
ConfigMgr
implements NAP using a new site system role—the System Health Validator
(SHV) point. Install this new role on a Windows Server 2008 system that
has the NPS role already installed. Perform the following steps on this system to install the SHV:
1. | In the ConfigMgr console, navigate to Site Database -> Site Management -> <Site Code> <Site Name> -> Site Settings -> Site Systems.
If
the system running NAP is not currently a site system, right-click Site
Systems and then choose New -> Server to launch the New Site System
Server Wizard. Enter the name of the site system and the
intranet-accessible FQDN of the NAP server. If
the NAP server already is a ConfigMgr site system, right-click the
server and choose New Roles from the context menu. This launches the
New Site Role Wizard, which looks and acts exactly like the New Site
System Server Wizard, except the wizard has already filled in the site
system name and intranet FQDN for you.
|
2. | For either wizard, choose Next and then choose System Health Validator Point from the list of available site roles.
|
3. | Click Next on each subsequent wizard page. There are no configuration options inside ConfigMgr itself.
|
Additionally, you must extend Active Directory for ConfigMgr . Extending AD is
required because NAP uses the System container to store Health State
References. The site server publishes Health State References used
during client evaluation to ensure the most current policies are used.
On
the client side, NAP only works with Windows Vista, Windows Server
2008, and Windows XP SP 3 (and above) clients. This is because only
these operating systems include the NPS agent. Unfortunately, no
download is available to make any other version of Windows work with
NPS or NAP.
Agent Settings
By default, the NPS Client agent is disabled in a ConfigMgr site and must be enabled. Perform the following steps:
1. | In the ConfigMgr console, navigate to Site Database -> Site Management -> <Site Code> <Site Name> -> Site Settings -> Client Agents.
|
2. | Right-click Network Access Protection Client Agent and then select Properties.
The first page of the Network Access Protection Client Agent Properties
dialog box has a single check box allowing you to enable (or disable)
the agent.
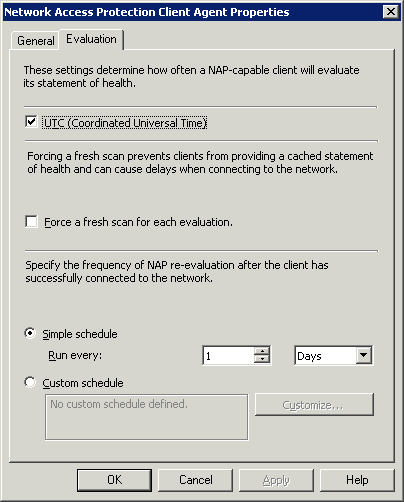
On the Evaluation tab, displayed in Figure 1, you can configure three settings:
- UTC (Coordinated Universal Time)—
This configures the client agent to assess computer system health
according to UTC time rather than client local time. This setting is
beneficial for those clients that roam between time zones, and ensures
reevaluations are performed on a fixed time scale rather than a
variable one caused by the client moving between the time zones.
- Force a fresh scan for each evaluation—
This option ensures cached evaluation results are not used when a
client reconnects to a network in between configured evaluation times.
Forcing an additional scan can cause delays in connecting to the
network, which can adversely affect mobile systems.
- Schedule— This section of the page lets you set either a simple or a detailed schedule of when you want to perform a system health check.
|

Similar
to other ConfigMgr Client agents, the NPS Client agent settings are
sitewide without a direct way to override them for individual systems.