4. Miscellaneous GUI Tips
Windows
7 offers many new features and capabilities. But you don’t have to
settle for the out-of-the-box defaults; you can customize to your
heart’s content. In the following sections, we provide you with several
tips to help you soup up your Windows 7 installation.
If
you find that you accidentally run programs or open documents when you
are certain that you didn’t double-click anything, you probably have
Single-Click selection turned on. As a result, one click (or tap, if
you’re using a touchpad) runs the program or opens the document that is
highlighted. Change to Double-Click selection mode by opening a folder
window; choosing Organize, Folder and Search Options; and selecting
Double Click to Open an Item. |
|
Fonts Preview Trick
If
you’ve ever tried to see what a font looks like before you printed it,
you know how frustrating it can be. But, getting a preview of a font is
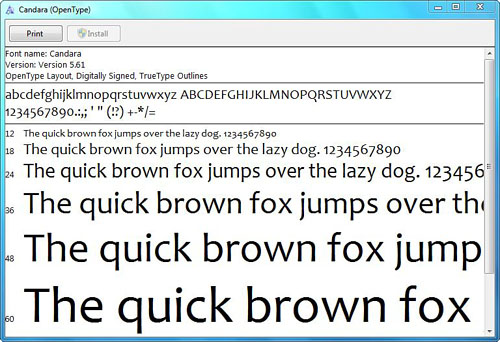
now easier than ever before. Just open the Fonts applet through Control
Panel, Appearance and Personalization, click any listed font, and click
Preview. A font sampling window opens, displaying details about the
font, a sample of most characters, and several sizes of characters (see
Figure 13).

Which Windows Are You Using?
If
you’re dual- or multibooting between Windows 7 (using the Windows
Classic theme) and other Windows products, you may sometimes wonder
which OS you’re running at any given time because the GUIs of the
post-Windows 95 OSs are often quite similar. Yes, you’ll see a few
giveaways, such as Computer versus My Computer, but if you’re using the
Windows Classic theme, the clues can be subtle.
To determine what’s running, use these techniques to remind yourself:
Execute winver
from the Run command or from the Command Prompt window to open a dialog
box that displays the OS name, version and build, and applied Service
Packs.
Click Start and right-click
Computer. From the menu that appears, click Properties. The first set
of information in the System applet indicates the version of Windows
you’re currently using. You can also access the System applet from
Control Panel, System and Security.
Limiting Flip 3D
If
your computer does not have a high video performance rating and you
have Aero turned on, using Flip 3D might be a bit slow if you have many
apps and documents open at once. This can be particularly true if your
windows have active video running because that consumes significant
video display chip bandwidth.
One solution is to limit the number of mini-pages that Flip 3D displays when you press Ctrl+Windows+Tab.
1. | Ensure
you have Windows Aero enabled already. If you have Windows Classic or
another non-Aero theme running, right-click the desktop, select
Personalize, and then change to the Windows 7 (Aero) theme.
|
2. | Go to Start, All Programs, Accessories, Command Prompt.
|
3. | Type regedit and click OK.
|
4. | Navigate your way to HKEY_CURRENT_USER\Software\Microsoft\Windows\DWM.
|
5. | In the right pane, right-click an empty area, point to New, and select DWORD (32-bit) Value. Name it Max3DWindows.
Right-click Max3DWindows and select Modify. Depending on your type of
graphics card, your best bet is to base the value of this DWORD on the
Windows Experience Index .
If your computer has a rating of 1 to 2, set the Registry value as 3.
If your rating is set to 3, you can have your Registry value set to 5.
If your computer has a rating of 4 or 5, you can have anything over 10
as the Registry value and it will still run smoothly.
Note To
access the Windows Experience Index, click Start, right-click Computer,
select Properties, and choose Windows Experience Index (or choose
System Rating Is Not Available and then click Rate This Computer). |
|
6. | Set the value and then click OK. Close the Registry Editor.
|
7. | Restart your computer for the changes to take effect.
|
More Visual Effects
There
is another hidden location for Windows 7 GUI settings somewhat akin to
those provided by Tweak UI, a utility that gives you access to hidden
Windows settings. For this semisecret list, follow these steps:
1. | Open Control Panel.
|
2. | Choose System and Security, System.
|
3. | Click Performance Information and Tools in the Tasks list.
|
4. | Click Advanced Tools in the Tasks list.
|
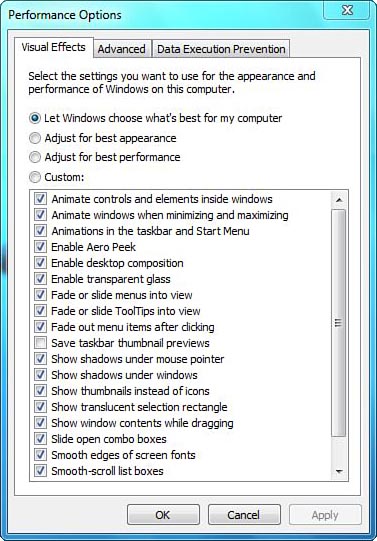
5. | Click Adjust the Appearance and Performance of Windows. (The UAC dialog box might appear.)
|
You will see the Performance Options dialog box shown in Figure 14.

Have
a ball making changes. Use care when adjusting the performance settings
(processor scheduling and virtual memory). You don’t want to slow down
your foreground processing unless you don’t mind waiting for response
from your apps and input devices (keyboard and mouse). Letting Windows
7 handle stuff like virtual memory paging size (Advanced tab) and DEP
(Data Execution Prevention tab) is generally the best way to go.
Administrator Tools Not Showing Up
Windows
7 is designed as an end-user OS. Thus, most of the system-level
management tools are not made readily accessible by being placed in
plain sight on the Start menu. Instead, they are contained within a
subfolder of the Control Panel known as Administrative Tools. Open
Control Panel, click System and Security, Administrative Tools to open
a folder containing these management tools.
To
gain access to Administrative Tools from the Start menu, right-click
the Start menu and select Properties. In the Taskbar and Start Menu
Properties dialog box, click Customize on the Start Menu tab. Scroll
down to the bottom of the list, and in the System Administrative Tools
section, select the Display on the All Programs Menu and the Start Menu
radio button. Click OK.
Cascading Elements from the Start Menu
Cascading is the ability to expand certain folders right off the Start menu. These expanded menus are also called flyout menus.
The native Windows 7 interface can be configured to add cascading menus
to the Computer, Control Panel, Documents, Downloads, Games, Music,
Personal Folder, Pictures, Recorded TV, and Videos items on the Start
menu.
The process is simple:
1. | Right-click the Start button and select Properties from the pop-up menu to open the Properties for the Start menu.
|
2. | Select the Start Menu tab and click Customize.
|
3. | Scroll down the list of Start menu items and change the settings for the desired items to Display as a Menu.
|
The
menu item(s) now have a right-facing arrow by their names in the Start
menu. When you click the menu item, a flyout menu appears.
5. Configuring the Recycle Bin
The Recycle Bin holds recently deleted files to provide you with a reasonable opportunity to recover them. The Recycle Bin holds the last
deleted files that fit within its size restriction. That restriction,
by default, is 10% for drives up to 40GB; for larger drives, the
maximum is 4GB plus 5% of the capacity. However, you can customize the
Recycle Bin for your specific needs.
The
Recycle Bin’s Properties dialog box (accessed by right-clicking over
the icon and then selecting Properties) displays available space for
each partition/volume on the system. If you’ve never deleted a file by
mistake and don’t think you ever will, you can elect to delete files
immediately without storing them in the Recycle Bin. It’s better,
however, to allow the Recycle Bin to catch your deleted files, even if
that means lowering the maximum amount of allocated disk space. A final
control in this dialog box enables a deletion confirmation dialog
box—it’s recommended you leave this enabled as a safety measure.
Keep
in mind that files moved to the Recycle Bin are not actually deleted.
Instead, their path information is removed from the normal interfaces
and moved into the Recycle Bin. Deleted files still remain on the drive
exactly where they were before the deletion operation. This means they
take up space on the drive. So, if you leave the default percentage
setting on a 160GB hard drive, you can have up to 12GB of deleted files
still sitting on the drive, slowing down the drive’s seek time.