Mapping Drive Letters
If you frequently use the same shared network folder, you can make it a “permanent houseguest” of your computer by mapping the network folder to an unused drive letter on your computer—one of the letters after your hard drive’s usual C: and the CD-ROM drive’s usual D:. You can give the shared folder \\server\shared the drive letter X:, for example, so that it appears that your computer has a new disk drive X:, whose contents are those of the shared folder.
Mapping gives you several benefits:
The
mapped drive appears along with your computer’s other real, physical
drives in the Computer view for quick browsing, opening, and saving of
files.
Access to the shared folder is faster because Windows maintains an open connection to the sharing computer.
MS-DOS
applications can use the shared folder through its assigned letter.
Most legacy DOS applications can’t accept UNC-formatted names such as \\server\shared\subfolder\file, but they can use a path such as I:\subfolder\file.
If
you need to, you can map a shared folder using an alternative username
and password to gain access rights that you might not have with your
current Windows login name.
To map a drive, follow these steps:
1. | Open any Windows Explorer window. Press and release the Alt key to display the menu. Then click Tools, Map Network Drive.
|
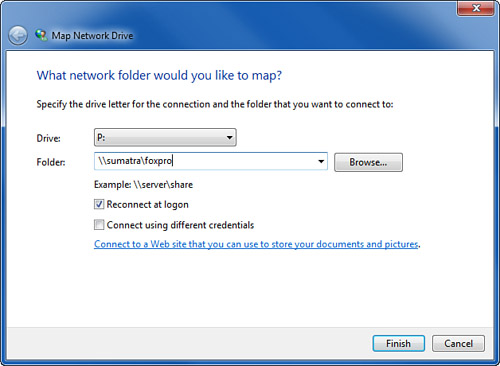
2. | Select an unused drive letter from the drop-down list, as shown in Figure 1.
If possible, pick a drive letter that has some association for you with
the resource you’ll be using: E for Editorial, S for Sales—whatever
makes sense to you.

|
3. | Select
the name of the shared folder you want to assign to the drive letter.
You can type the UNC-formatted name, if you know it already—for
example, \\servername\sharename.
Alternatively, you
can click Browse to poke through your network’s resources and select
the shared folder. Find and
select the desired shared folder, then click OK.
|
4. | You have two options:
If
you want this mapping to reappear every time you log in, check
Reconnect at Logon. If you don’t check this box, the mapping will
disappear when you log off. If your
current Windows username and password don’t give you sufficient
permissions to use the shared resource, or if your username won’t be
recognized at the other computer because your account name is different
there, select Connect Using a Different Username. (This works only if
usernames are actually used on the networked computer. If it always
grants access via the Guest account, it doesn’t matter what account information you supply.)
Note You must use the same username for all
connections to a given computer. If you have other drive letters
already mapped to the other computer with your original username, you
have to unmap those drives before you can make a drive mapping with a
different username. |
|
5. | |
6. | If
you selected Connect Using a Different Username, Windows will display a
prompt for a username and password. Enter them, then click OK.
|
After
you map a drive letter, the drive appears in your Computer list along
with your local disk drives. You might notice a couple of funny things
with these drives:
If you haven’t
accessed the network drive for 20 minutes or so, it might turn gray,
indicating that the network connection to the remote computer has been
disconnected. When you use the drive again, it will reconnect and turn
black.
If the remote computer (or you) really goes offline, a red X appears through the drive.
Tip
If
you’re using Windows 7 Professional, Enterprise, or Ultimate editions,
you can make the drive’s contents available even when you’re
disconnected from the network.
|
Mapping a Drive to a Subfolder
When
you’re setting up a mapped drive and you browse to find a shared
folder, you may notice that Windows lets you delve into the shared
folders themselves. If you drill down into a subfolder and select it as
the location to use in mapping a drive letter, you’ll find that the
mapped drive starts at the subfolder. That is, the subfolder becomes
the mapped drive’s “root directory,” and you can’t explore upward into
the shared folder that contains it. You can map a drive letter to a
subfolder using the GUI method described in the preceding section, or
using the net use command-line utility described later.
Tip
This
feature is most useful for administrators in setting up scripts to map
drives based on a user’s login name. For example, mail might be stored
in subfolders of \\server\mail according to username. Mapping drive M: to the folder \\server\mail\%username%
would let users get at their mail (directly) via drive M: and
discourage users from poking around in other people’s mail folders. Once
administrators have configured the drive mapping, users can configure
their mail programs to get mail from drive M:, and the same
configuration will work for everyone. |
Mapping
a subfolder can be a good thing because it makes any program that uses
the mapped drive letter see just that subfolder as the drive’s root
directory.