Windows Home Server runs the
client backups each night starting around midnight. This is usually
ideal because it’s late enough that you or anyone in your family won’t
be working on a client machine, but early enough that the server has
sufficient time to complete all the client backups (which it performs
one client at a time). So it’s important that the time is set up
correctly on Windows Home Server.
The
server’s internal date is important, too, because Windows Home Server
uses the date to organize backups. If you need to restore a file or
folder, you need the date to be accurate so you can tell which version
of the file or folder to restore.
Setting the Current Date and Time
If the Windows Home Server date or time is off, follow these steps to make a correction:
1. | Launch the Windows Home Server Dashboard.
|
2. | Click Server Settings to open the Server Settings dialog box.
|
3. | Click the General tab.
|
4. | In the Date and Time section, click Change to display the Date and Time dialog box.
|
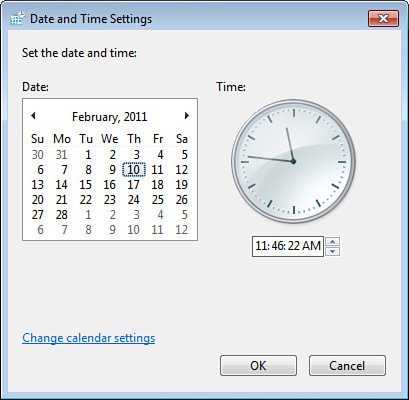
5. | Click Change Date and Time section to display the Date and Time Settings dialog box, shown in Figure 1.

Tip
If you’re logged in to the
server, a faster way to display the Date and Time dialog box is to
right-click the time in the taskbar’s notification area, and then click
Adjust Date/Time. Alternatively, select Start, Control Panel, Date and
Time.
|
6. | Use the Date calendar to select the current month and day.
|
7. | Use
the spin box in the Time group to specify the current hour, minute,
second, and AM or PM. These four items are separate “sections” within
the text box. Either edit each section directly, or click within a
section and use the up and down arrows to increase or decrease the
section value.
|
8. | Click OK to return to the Date and Time dialog box.
|
9. | To
specify a different time zone, click Change Time Zone to open the Time
Zone Settings dialog box, and then use the list to select your time
zone.
|
10. | If
you want Windows Home Server to adjust the time during daylight saving
time changeovers, leave the Automatically Adjust Clock for Daylight
Saving Time check box activated. (Note that you only see this check box
if your time zone uses daylight saving time.)
|
11. | Click OK to put the new settings into effect.
|
Tip
If you’re working with a client machine and you just want to know the current time on the server, use the NET TIME
command. Start a command prompt session on the client machine (select
Start, All Programs, Accessories, Command Prompt), type the following,
and press Enter:
Replace server with the name of your Windows Home Server.
Synchronizing the Date and Time with a Time Server
If you want to ensure that
Windows Home Server always has the accurate time, you can configure the
system to synchronize with an Internet-based time server. Here are the
steps to follow:
1. | Launch the Windows Home Server Dashboard.
|
2. | Click Server Settings to open the Server Settings dialog box.
|
3. | Click the General tab.
|
4. | In the Date and Time section, click Change to display the Date and Time dialog box.
|
5. | Click the Internet Time tab.
|
6. | Click Change Settings to open the Internet Time Settings dialog box.
|
7. | Make sure the Synchronize with an Internet Time Server check box is activated.
|
8. | Use the Server list to choose a time server (you can also type in a different server).
|
9. | Click Update Now to synchronize the time manually. (Windows Home Server schedules the next synchronization for a week later.)
|
10. | Click OK in each open dialog box to put the new settings into effect.
|
Unfortunately, the time
synchronization in Windows Home Server (and, indeed, in all versions of
Windows that support this feature) isn’t very reliable. On my Windows
machines, I usually have to configure a different time server by hand
either by using a command prompt session or by modifying the list of
servers in the Internet Time tab. I most often use one of the time
servers that the U.S. Navy operates:
tick.usno.navy.mil
tock.usno.navy.mil
Specifying the Time Server at the Command Prompt
To configure a time server via the command prompt, follow these steps:
1. | In Windows Home Server, select Start, All Programs, Accessories, Command Prompt.
|
2. | Enter the following command to specify the time server you want to use. (Replace TimeServer with the domain name of the time server.)
w32tm /config /manualpeerlist:TimeServer,0x1
|
3. | Stop the Windows Time service by entering the following command:
|
4. | Restart the Windows Time service by entering the following command:
|
When you restart the Time service, it automatically synchronizes with the time server you specified.
Customizing the Synchronization Interval
By default, Windows
Home Server synchronizes with the default time server every 15 minutes.
If you’d prefer that Windows Home Server synchronize less often—for
example, once a day—you can follow these steps to customize the
synchronization interval:
1. | Select Start, Run (or press Windows Logo+R) to open the Run dialog box, type regedit, and click OK to open the Registry Editor .
|
2. | Display the following key:
HKLM\SYSTEM\CurrentControlSet\Services\W32Time\TimeProviders\NtpClient
|
3. | Double-click the SpecialPollInterval setting to open the Edit DWORD Value setting.
|
4. | Click the Decimal option.
|
5. | In
the Value Data text box, type the number of seconds you want to use as
the synchronization interval. For example, to synchronize every 24
hours, type 86400.
|
6. | Click OK.
|
7. | Exit the Registry Editor.
|
To put the new setting into effect, you have two choices:
- Stop and then restart the Windows Time service. One way to do this is to use the net stop w32time and net start w32time commands I mentioned earlier.
- Select
Start, Administrative Tools, Services to open the Services snap-in.
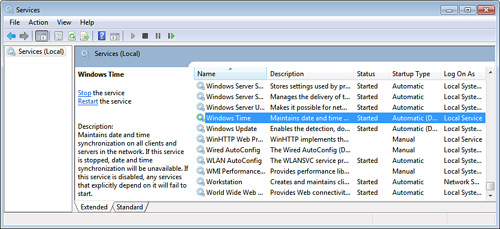
Click the Windows Time service, click the Stop link (see Figure 2), and then click the Start link.
