People loved Drive Extender
because of its seamlessness and set-it-and-forget-it nature. It was and
remains the easiest drive maintenance tool that Microsoft (or, really,
anyone) has ever built. There are plenty of
good reasons to use Windows Home Server 2011, and there are plenty of
tools that you can wield to implement most of what Drive Extender could
do. The next few sections show you how to use those tools.
Creating a Storage Pool Using a Spanned Volume
One of the best features of
Drive Extender (indeed, one of the best features in all of Windows Home
Server version 1) was the dynamic storage pool.
If you installed a new hard drive on the server, you could then add
that drive to the existing drives and instantly get a larger storage
pool for client backups and shared folder data.
Alas, Drive Extender now resides in the trash bin of
technology history, so you have to deal with fixed disk sizes in Windows
Home Server 2011. This can be a particular problem with client backups
because they tend to take up a lot of disk space, and if the server
drive that stores the backups gets full, subsequent backups will fail.
That is, to say the least, not good, so you’re forced
to look for other solutions. Fortunately, one such solution sits right
under your nose as a feature of Windows Server 2008 R2: a spanned drive.
This is a kind of virtual drive—or volume,
as Windows Server calls it—that combines two or more physical hard
drives into a single storage area with two main characteristics:
The new volume is dynamic
because if you install more drives on the server, you can add those
drives to the volume to instantly increase the storage area without
losing any existing data.
The new volume is spanned
because data is seamlessly stored on all the physical hard drives
without your having to worry about where the data is stored. If one of
the hard drives fills up, Windows Server automatically writes new data
to one of the other drives in the volume.
In other words, a dynamic, spanned volume is a
reasonable facsimile of the storage pool feature of Drive Extender. Is
there a downside to using spanned volumes? Yes, unfortunately, there are
two:
If one of the hard drives dies, you lose all
the data stored in the spanned volume, even data that resides on the
remaining functional drives.
If the total
size of the spanned volume exceeds 2TB, you won’t be able to back up
the volume using the Server Backup feature of Windows Home Server 2011
(because Server Backup has a 2TB maximum for any volume).
In
other words, if you go this route, I strongly recommend that you come
up with some other way to back up the spanned volume to prevent data
loss (for example, by installing a third-party backup program on the
server).
Converting Hard Drives to Dynamic Disks
To get started, your first chore is to take the hard
drives that you want to use for the spanned volume and convert them to
dynamic disks:
1. | Log on to the Windows Home Server machine.
|
2. | In the taskbar, click Server Manager to open the Server Manager window.
|
3. | Select Storage, Disk Management to display the Disk Management snap-in.
|
4. | In
the list of hard drives in the lower half of the Disk Management pane,
right-click one of the drives you want to convert to a dynamic volume.
Be sure to right-click on the left side of the drive display (where you
see the disk designations, such as Disk 1, Disk 2, and so on).
|
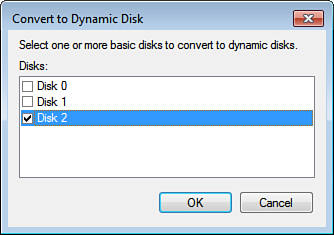
5. | Click Convert to Dynamic Disk. Disk Management displays the Convert to Dynamic Disk dialog box.
|
6. | Make sure the check box beside the disk is activated, as shown in Figure 1, and then click OK. Disk Management displays the Disks to Convert dialog box.

|
7. | Click Convert. Disk Management asks you to confirm.
|
8. | Click Yes. Disk Management converts the drive to a dynamic disk.
|
9. | Repeat steps 4–8 to convert any other drives you want to include in the spanned volume.
|
Combing Dynamic Disks into a Spanned Volume
With your dynamic disks converted, you can now combine them into a spanned volume by following these steps:
1. | Log on to the Windows Home Server machine.
|
2. | In the taskbar, click Server Manager to open the Server Manager window.
|
3. | Select Storage, Disk Management to display the Disk Management snap-in.
|
4. | In
the list of hard drives in the lower half of the Disk Management pane,
right-click one of the drives you want to include in the spanned volume.
Be sure to right-click on the left side of the drive display (where you
see the disk designations, such as Disk 1, Disk 2, and so on).
|
5. | Click New Spanned Volume. Disk Management runs the New Spanned Volume Wizard.
|
6. | Click Next. The Select Disks dialog box appears.
|
7. | In the Available list, click a dynamic disk you want to include in the volume, and then click Add.
Note
You don’t have to include the entire dynamic disk in
the spanned volume. For example, you might want to set aside a portion
of the dynamic disk for other storage uses. In that case, click the disk
in the Selected list, and then use the Select the Amount of Space in MB
spin box to set the amount of space you want to assign to the spanned
volume.
|
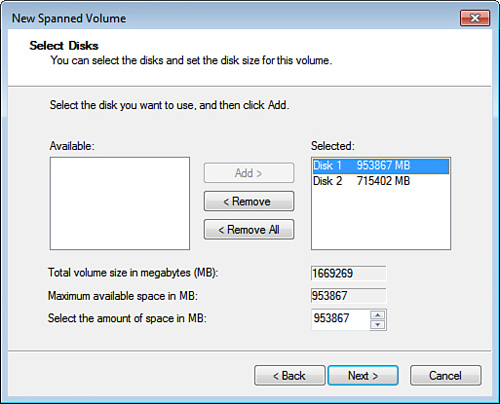
8. | Repeat step 7 to add any other drives you want to include in the volume. Figure 2 shows a spanned volume with two dynamic disks added.

|
9. | Click Next. The Assign Drive Letter or Path dialog box appears.
|
10. | Choose
a drive letter (the default will probably be D:, which is fine), and
then click Next. The Format Volume dialog box appears.
|
11. | Assign a Volume Label, if needed, leave the other options as is, and then click Next. The last wizard dialog box appears.
|
12. | Click Finish. Disk Management creates the spanned volume.
|
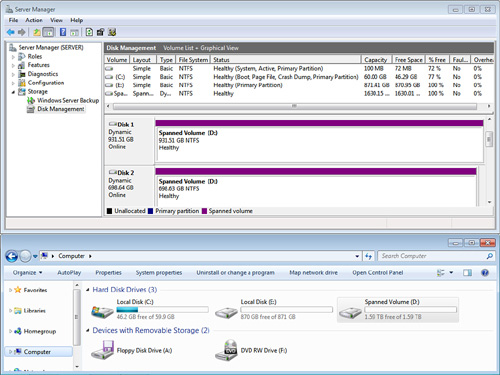
Figure 3
shows how the new spanned volume (drive D:, in this case) appears in
Disk Management (the top window) and in the Computer folder (bottom
window).

With your spanned volume at the ready, you can move
Windows Home Server’s Client Computer Backups folder from its default
location to the spanned volume.
Adding another Dynamic Disk to the Spanned Volume
If you install a new hard drive on the server, you
can add that drive to the spanned volume. Open the Disk Management
snap-in and convert the new drive to a dynamic disk, as I described
earlier. Now follow these steps to add the new dynamic disk to the
spanned volume:
1. | In
the list of hard drives in the lower half of the Disk Management pane,
right-click one of the disks in your current spanned volume. Be sure to
right-click on the right of the drive display (where you see the spanned
volume drive letter).
|
2. | Click Extend Volume. Disk Management runs the Extend Volume Wizard.
|
3. | Click Next. The Select Disks dialog box appears.
|
4. | In the Available list, click the new dynamic disk, and then click Add.
|
5. | Click Next. The last wizard dialog box appears.
|
6. | Click Finish. Disk Management adds the dynamic disk to the spanned volume. |