Mounting a Windows Home Server Shared Folder
You can use the Mac version
of Launchpad that’s now installed to access the Windows Home Server
shared folders.
However, it’s also possible
to access the server’s shares directly through Finder. Before you get
started, check that your Mac can see the Windows Home Server computer.
Open Finder and then select Go, Network (or press Shift+Command+K). In
the Network folder that appears, you see an icon for each network
computer that your Mac can see (see Figure 4).

How you proceed depends on whether you see your Windows Home Server computer:
- If you see your Windows Home Server machine—Double-click the icon to open the server, and then click Connect As.
- If you don’t see your Windows Home Server box—Select
Go, Connect to Server (or press Command+K) to open the Connect to
Server dialog box. In the Server Address text box, type smb://server, where server is the name or the IP address of your Windows Home Server, and then click Connect.
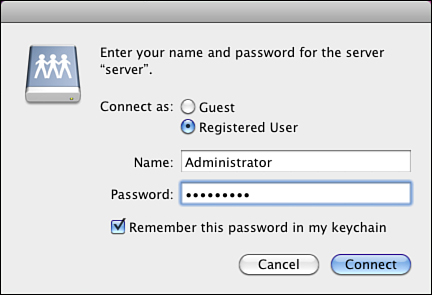
Either way, Mac OS X displays the logon dialog box shown in Figure 5.

Here are the steps to follow from here:
1. | Make sure the Registered User option is selected.
|
2. | Type Administrator in the Name text box.
|
3. | Type your Administrator account password in the Password text box.
|
4. | If you want OS X to remember your credentials, activate the Remember This Password in My Keychain check box.
|
5. | Click Connect. OS X asks you to select which shared volume you want to connect to.
|
6. | In the list, select the Windows Home Server share you want to access (Music, Photos, and so on).
|
7. | Click OK. OS X mounts the share and displays the folder’s contents, as shown in Figure 6.

|
8. | Work
with the folder contents using the OS X tools. In the Music share, for
instance, you could play compatible music files using iTunes.
|
Using a Mac to Make a Remote Desktop Connection to Windows Home Server
To do this, you need to install
on your Mac the Remote Desktop Connection Client for Mac, which is
available from Microsoft. First, shut down Launchpad if it’s still
running. Go to www.microsoft.com/downloads and search for Remote Desktop Mac. (Note that as I write this, the latest version of the Remote Desktop Connection Client for Mac is 2.0.1.)
After you have the Remote Desktop Connection Client installed on your Mac, mount it and then follow these steps:
1. | Ensure that the Windows PC to which you’ll be connecting is configured to accept Remote Desktop connections. |
2. | In Finder, open the Applications folder, and then launch the Remote Desktop Connection icon.
|
3. | In the Computer text box, type the name or IP address of the host computer.
|
4. | If
you don’t want to customize Remote Desktop, skip to step 7. Otherwise,
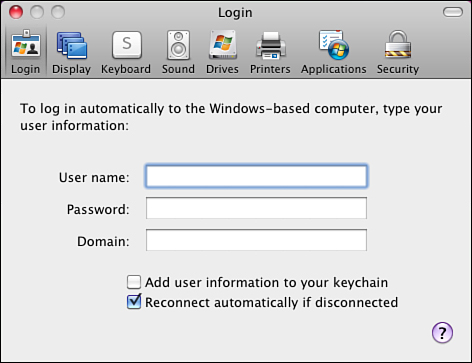
select RDC, Preferences to open the Remote Desktop Connection
preferences dialog box, shown in Figure 7.

|
5. | The Login tab offers the following options:
- User Name— This is the username you want to use to log in to the host computer.
- Password— This is the password to use to log on to the host computer.
- Domain— Leave this text box blank.
- Add User Information to Your Keychain— Activate this check box to have OS X remember your logon data.
- Reconnect Automatically if Disconnected— Leave this check box activated to enable automatic reconnections.
|
6. | Fill
in the options in the Display, Keyboard, Sound, Drives, Printers,
Applications, and Security tabs, as required, and then close the
preferences dialog box.
Tip
The default number of
colors that Remote Desktop Connection Client for Mac uses is Thousands,
which can make most Windows screens look hideous. In the Display tab,
use the Colors list to select Millions.
|
7. | Click
Connect. Remote Desktop Connection Client for Mac connects to the
Windows PC and prompts you for your login credentials, if you didn’t add
them to the Login tab. Figure 8 shows OS X with a connection to a Windows Home Server computer.

|
When
you’re done, select RDC, Quit RDC, and then click OK when the program
warns you that you’re about to disconnect from the Windows PC.