2. Working with the AT Utility
The AT command line
utility is an older utility that many longtime Windows users are
comfortable using to create tasks. The advantage of this utility is that it's very
easy to use. In addition, because this utility has been around since
Windows NT, you'll find many scripts already written to use it. Use the
AT utility alone to display a list of tasks that you've created using
the AT utility (the AT utility won't display any tasks created using the
graphical tools). This utility uses the following syntax:
Remove a Task:
AT [\\Computer] [[<Id>] [/DELETE] [/YES]]
Add a Task:
AT [\\Computer] <Time> [/INTERACTIVE] [/EVERY:<Dates> | /NEXT:<Dates>] <Command>
Query the Task List:
AT
The following list describes each of the command line arguments.
\\Computer
Specifies the name of a remote computer used to run the AT utility.
Id
Specifies the identifying number of the job. The AT command begins at 1 and increments the count as needed. Every job must have a unique identifier.
/DELETE
Removes a job from the list. If you omit the Id argument, AT
removes all jobs that it created from the list. This command doesn't
affect jobs that you create using the graphical utilities. AT requests confirmation before it deletes a job unless you specify the /YES switch.
/YES
Prevents AT from asking whether it should delete each job in the list.
Time
Determines the starting time of the job.
/INTERACTIVE
Determines whether the
user can interact with the job (and vice versa). The default setting
runs the job in the background without any interaction.
/EVERY:
DatesRuns the job during
the specified day of the week or month. The valid values for days of the
week include Monday, Tuesday, Wednesday, Thursday, Friday, Saturday,
and Sunday. The month values are a number between 1 and 31. Adding more
than one entry runs the job on multiple days of the week or month. If
you omit the date argument, AT assumes you
want to run the job monthly during the current day of the month. Vista
doesn't allow you to use abbreviations for this argument.
/NEXT:
DatesRuns the job during
the next occurrence of the day of the week or month. The valid values
for days of the week include Monday, Tuesday, Wednesday, Thursday,
Friday, Saturday, and Sunday. The month values are a number between 1
and 31. Adding multiple dates runs the job during each of the specified
dates. If you omit the date argument, AT assumes you want to run the job during the current day. Server Core doesn't allow you to use abbreviations for this argument.
Command
Specifies the
command that you want to run. This entry must include the path of the
command you want to run and any command line switches. You must enclose
the command in quotes.
3. Working with the WMIC Job Alias
The WMIC Job alias
works much the same as any other WMIC command. You have access to a
number of verbs and use those verbs to perform specific tasks, such as
creating a new Task Scheduler job, deleting a job, or simply checking on
the status of an existing job.This utility uses the following syntax:
WMIC Job ASSOC [<format specifier>]
WMIC Job CALL <method name> [<actual param list>]
WMIC Job CREATE <assign list>
WMIC Job DELETE
WMIC Job GET [<property list>] [<get switches>]
WMIC Job LIST [<list format>] [<list switches>]
WMIC does have a
significant oddity in this case—it doesn't appear to support jobs
created using the SchTasks utility. The only jobs that appear on the
list are the ones that you create using WMIC or the AT utility.
Listing jobs is as easy as typing WMIC Job
and pressing Enter. You'll see all of the jobs created using the AT
utility. Of course, this output is a little unreadable. If you want to
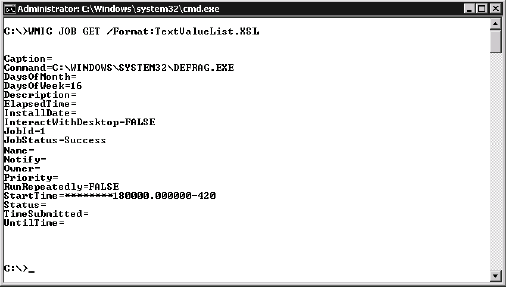
see the output in readable form, use the GET or LIST verbs instead.You'll find a number of these files in the \WINDOWS\system32\wbem directory of your system. For example, if you type WMIC JOB GET /Format:TextValueList.XSL
and press Enter, you'll see a listing where each property and value
pair appears on a single line—making it much easier to determine which
property has what value. Figure 1 shows an example of the output.

Creating a new job is an
interesting task with WMIC because you have to know several bits of
information to do it. First, all of the input arguments are required,
even if you don't need them for the job. Consequently, you'll need to
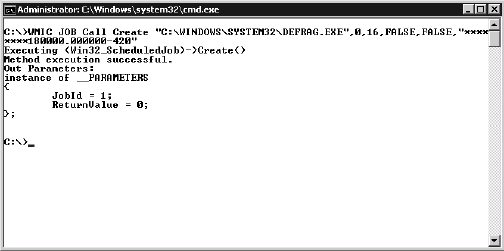
type something like WMIC JOB Call Create "C:\WINDOWS\SYSTEM32\DEFRAG.EXE",0,16,FALSE,FALSE", ********180000.000000-420" and press Enter to create a job that defragments the hard drive at 6 P.M. every Friday. The list of create arguments includes:
Command
DaysOfMonth
DaysOfWeek
InteractWithDesktop
RunRepeatedly
StartTime
Several of these values are easy to obtain. The Command
argument is a simple string that defines the command you want Task
Scheduler to execute. Make sure you include the full path to the
executable to ensure the Task Scheduler can locate it on the hard drive.
The InteractWithDesktop(determines whether the job only executes in the background) and RunRepeatedly (the job only executes once when set to false) arguments are Boolean (true/false) values.
The DaysOfMonth and DaysOfWeek
arguments are positional. These arguments determine when to run the
job. They use binary flags to set them. If you set the value to 0, then
the task isn't scheduled for that time frame. When working with DaysOfMonth,
you create a number based on the day's position in the calendar. The
value can become quite large. If you want the task to run each day of
the month (from days 1 through 31), then you use a value of 2147483647,
which is the maximum value allowed. Here's the list of numbers you use
with the day of the month listed first and the value for the call
second.
| Day of the month | Value | Day of the month | Value | Day of the month | Value | Day of the month | Value |
|---|
| 1 | 1 | 9 | 256 | 17 | 65536 | 25 | 16777216 |
| 2 | 2 | 10 | 512 | 18 | 131072 | 26 | 33554432 |
| 3 | 4 | 11 | 1024 | 19 | 262144 | 27 | 67108864 |
| 4 | 8 | 12 | 2048 | 20 | 524288 | 28 | 134217728 |
| 5 | 16 | 13 | 4096 | 21 | 1048576 | 29 | 268435456 |
| 6 | 32 | 14 | 8192 | 22 | 2097152 | 30 | 536870912 |
| 7 | 64 | 15 | 16384 | 23 | 4194304 | 31 | 1073741824 |
| 8 | 128 | 16 | 32768 | 24 | 8388608 | | |
Using this table, if you
want to perform a particular task on day 1 (a value of 1), 5 (a value of
16), and 7 (a value of 64) of each month, then you would use a value of
81. When working with DaysOfWeek, you create a number based on the day of the week's position. These numbers include:
| Day of the Week | Value |
|---|
| Monday | 1 |
| Tuesday | 2 |
| Wednesday | 4 |
| Thursday | 8 |
| Friday | 16 |
| Saturday | 32 |
| Sunday | 64 |
Consequently, if you want to
run a task Monday, Wednesday, and Friday, you'd add 1 (for Monday), 4
(for Wednesday), and 16 (for Friday) for a total of 21. Setting the DaysOfWeek value to 0 means that the job won't run on a particular day of the week. You must include either a DaysOfMonth or DaysOfWeek as part of the input or the call will fail.
The StartTime variable is as a DATETIME
data type and it determines when the job will begin running the first
time. This data type relies on the Universal Time Coordinated (UTC)
time. In most cases, you'll simply want a time value, so you'll display
the date values as eight asterisks (*) as shown in the example. The
hours, minutes, and seconds come next. In the case of the example,
you're looking at a value of 6 P.M.
If you want to include
the date in your start time, it appears in year, month, and day format.
For example, 20080130073001.100000-420 would indicate January 1, 2008,
7:30:01.1 A.M. The −420 is the bias for the time—it indicates the
difference between local time and UTC time in minutes. To set this value
correctly, check the time zone information for your area. For example,
the Eastern United States is at the GMT −05:00 time zone according to
the Windows time zone properties. Multiply −05 * 60 to obtain a value of
−300 for the bias. Of course, you have to take daylight savings time
into account when you perform your calculation. California has a bias of
−420 in the summer, but −480 in the winter.
The output of the call, as shown in Figure 2, is a JobId
value. You can't assign this value, the Task Scheduler assigns it for
you. When you view the WMIC job in the Task Scheduler, it appears the
same as a job you create using the AT utility. The JobId value is unique, so you can use it to access any job you create.

Removing a job you no longer need is relatively simple. All you need is the JobId value, which you can obtain by listing the jobs. The JobId
value is unique, so it guarantees that you remove the correct job. Once
you have this number, you can use the DELETE verb to remove the job.
For example, if you want to remove job 3, you'd type WMIC JOB Where JobID=3 DELETE and press Enter.