4. Combining the AT Utility with Batch Files
Before you can begin
using the AT utility within a batch file, you need to know how to use it
at the command line. Creating a job with AT
is relatively easy. Imagine that you want to defragment your hard
drive. You could create a defragmenter job that runs at 6 P.M. every
Friday, immediately after you leave work to go home for the weekend. You
can create the job using the following command line.
AT 6pm /Every:FRIDAY "C:\WINDOWS\SYSTEM32\DEFRAG.EXE"
The same job using the SchTasks utility would require a longer command line, as shown here.
SchTasks /Create /RU SYSTEM /SC WEEKLY /D FRI /TN "ST Defrag Hard
   Drive" /TR "C:\WINDOWS\SYSTEM32\DEFRAG.EXE" /ST 18:00:00
Of course, you can also create the same job using WMIC, as shown here.
WMIC JOB Call Create "C:\WINDOWS\SYSTEM32\DEFRAG.EXE",
   0,16,FALSE,FALSE,"********180000.000000-420"
NOTE
Server Core
doesn't let you abbreviate day or month names. Previous versions of
Windows would let you use an abbreviation such as FRI for Friday. In
some cases, you'll find that this change breaks macros in Server Core
that work fine in other Windows versions.
You don't obtain the same level of configuration features using AT
that you would using the graphical or SchTasks method. Many of the
special configuration features that the graphical utility supports are
unavailable (they're available when you use the SchTasks utility).
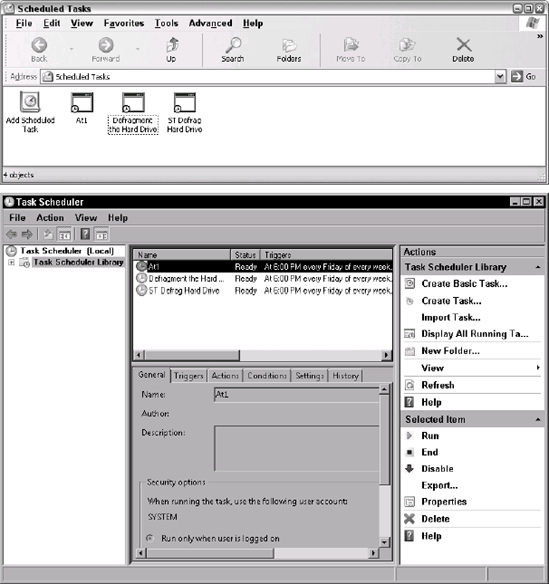
The Scheduled Tasks window tracks jobs created using both the graphical and the command line method. AT only tracks jobs that it creates. If you type AT at the command prompt and press Enter, all you'll see are the AT jobs (including those created using the WMIC command). Figure 3 shows a typical example of the same jobs created using the graphical utility, SchTask, and AT.
(The graphical utility only works with the versions of Windows with a
graphical interface, not with Server Core.) Notice that the AT
job name has "At" plus the number of the job. The top screenshot shows
the Windows XP/Windows 2003 version of Task Scheduler, while the bottom
screenshot shows the Vista/Windows Server 2008 version. The entries are
essentially the same in both views, but the Windows XP/Windows 2003 view
is simpler, while the Vista/Windows Server 2008 view provides more
details.

As you can see,
from a Scheduled Tasks window perspective, all three jobs are the same.
The only two differences are the job name and the creator name. Unless
you change the default setting, the system creates all AT jobs. Any job created using the Scheduled Tasks window appears under the user's name.
The limitations of the AT
utility do bring up one additional useful feature for batch files. You
can schedule a number of temporary tasks using one batch file, and
remove all of those tasks from the Scheduled Tasks window using another,
all without disturbing the original scheduled tasks. Because the AT
utility only operates on the tasks that it creates, you can use it to
create temporary tasks and simplify the method required to remove those
tasks later.
|
The AT utility is
still useful, but many would say that it's outdated. If you're working
at the command prompt, the AT utility probably is outdated; the SchTasks
utility provides more functionality. However, the AT utility still
provides good functionality for other purposes. One of the main reasons
to use the AT utility is that there are already a wealth of scripts on
the Internet for using it.
Another reason to use the
AT utility is that it's compatible with WMIC, which is more of an
advantage than many administrators realize, especially when working with
Server Core. Using WMIC provides additional flexibility over remote
connections that you don't realize when working with the SchTasks
utility.
Sometimes you don't
require complexity to get the job done at the command line. The AT
utility tends to be simpler to use than the SchTasks utility. Sure, all
you can do is query, add, and delete tasks, but sometimes that's all you
really need to do. You don't want all of the details; a simple task
scheduling will do just fine. Even though the AT utility might look
outdated, it really does have some very useful features that make it a
worthwhile utility to consider.
|
5. Creating Script-Based Scheduler Activities
You might wonder how you
can use the Task Scheduler to improve productivity without expending a
lot of energy. Some of the best Task Scheduler tasks are those that you
normally perform manually or using a batch file, but don't perform
consistently. For example, everyone knows that your hard drive
eventually fills up with garbage if you don't remove all of those
temporary files. However, many people don't get the job done because it
simply isn't convenient, ever.
If you've ever tried to
locate all of the temporary files on your hard drive, you know that it's
a time-consuming task. In fact, I would go so far as to say that some
people would rather hear fingernails screeching across a chalkboard or
walk barefooted across broken glass than have to locate all of their
temporary files. Fortunately, you don't have to go to such extreme
measures because you can tell the computer to do all of the work for
you. You can't perform this task easily using Windows Explorer because
it won't find all of the files for you (many people have tried).
However, the Dir command always tells the truth, you just need to put it to work. The batch file shown in Listing 1 will remove all of your temporary files. It's fully configurable and you'll find that it's quite reliable.
Example 1. Deleting Temporary Files Using a Batch File
@ECHO OFF

REM Verify that the file specifications file exists.
IF NOT EXIST DelFiles.TXT GOTO :NoFileError
GOTO :GetFiles

REM Display an error message that shows how to correct the problem.
:NoFileError
@ECHO This utility depends on the presence of a file named Delfiles.TXT
@ECHO that contains all of the file specifications you want to delete.
@ECHO All the file need contain is a list of entries such as *.BAK.
@ECHO Place each entry on a separate line.
GOTO :EOF

:GetFiles
REM Remove any existing list of temporary files.
REM This file is retained after the previous cleaning so you have
REM a record of the deletions.
@ECHO Removing old DeleteMe.TXT.
IF EXIST DeleteMe.TXT Del DeleteMe.TXT

REM Locate all of the temporary files on your hard drive.
@ECHO Locating temporary files to delete.
FOR /F %%F IN (DelFiles.TXT) DO Dir %%F /B /S >> DeleteMe.TXT

REM Delete the temporary files.
@ECHO Removing the temporary files.
FOR /F "delims==" %%D IN (DeleteMe.TXT) DO Del "%%D" /Q > Errors.TXT

@ECHO Deletion of Temporary Files Completed!
@ECHO ON
|
This batch file uses
three basic steps. First, it ensures that you've defined a file that
contains the file extension specifications to delete. Second, it uses
these file specifications to locate the files you want to delete. Third,
it deletes the file using the accumulated list of files. Notice that
the batch file automatically erases any old file lists before it begins
generating the new one.
The trickiest piece of code in this example is the second FOR command. Notice the "delims==" entry. Because the DeleteMe.TXT file contains filenames with spaces, you need to use this option. Otherwise, the FOR
command only outputs the filenames up to the first space and the
deletion will fail. The batch file outputs any files that failed to
delete to Errors.TXT, so you can check on them later.
Once you create and fully
test this batch file, you can create a second batch file for installing
it as a scheduled task on every machine on the network. Of course, you
want to do all this without working with each machine individually, so
it's just as well that you can tell the batch file to generate the list
of machines for you. Listing 2 shows how to create such a list as batch file. All of the FOR commands must appear on a single line.
Example 2. Defining Tasks on Every Machine on a Network
@ECHO OFF

REM Obtain a list of machines from the system.
Net View > Temp.TXT

REM Remove any existing list of machines.
@ECHO Removing old Machines.TXT.
IF EXIST Machines.TXT Del Machines.TXT

REM Make the list usable by removing extraneous material.
@ECHO Generating a New Machine List
FOR /F "skip=3" %%M in (Temp.TXT) DO IF %%M NEQ The @ECHO %%M >> Machines.TXT

REM Copy the required files to each machine.
@ECHO Copying the File Specification and Deletion Batch Files
FOR /F %%M in (Machines.TXT) DO Copy DelFiles.TXT "%%M\Drive_D" /Y
FOR /F %%M in (Machines.TXT) DO Copy MyBatch.BAT "%%M\Drive_D" /Y

REM Schedule the task on each machine.
@ECHO Creating the Scheduled Task
FOR /F %%M in (Machines.TXT) DO SchTasks /Create /S %%M /RU SYSTEM
   /SC WEEKLY /D FRI /TN "Remove Temporary Files"
   /TR "D:\MyBatch.BAT" /ST 18:00:00

@ECHO ON
|
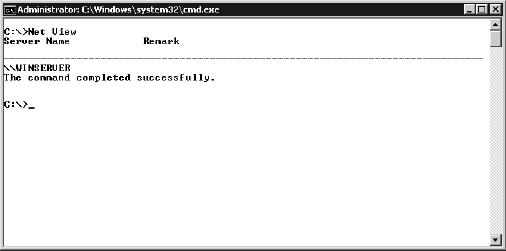
The example begins by
using the Net View utility to create a list of machines. Unfortunately,
the output from this utility isn't very useful for a batch file, as
shown in Figure 4.
The first three lines contain a header that you can't get rid of and
the output ends with "The command completed successfully." In addition,
some machines in the list contain a comment.

The first FOR command gets rid of this extraneous material using three techniques. First, it relies on the "skip=3" option to remove the top three lines from the file. The FOR command doesn't even process these lines. At this point, the FOR
command does process the three lines with machine names. Because
there's a space after each machine name, the result only contains the
machine name and not the comment. This is one case where the natural FOR command behavior works in your favor. The FOR command passes the file output to an IF command. Remember that the first word of the last line of the file is "The." By using the code IF %%M NEQ The, you can remove the offending line. The final step copies only the good input to a new file named Machines.TXT by redirecting the output of the ECHO command.
The batch file shown in Listing 1
requires two files. The first is a text file containing a list of file
specifications. The second is the batch file itself. The next two FOR
commands copy these two files to every machine on the network. Because
the file could already exist (this could be an update), you use the /Y command line switch with the Copy utility.
The final step creates the required scheduled task on every machine. Notice the use of the /S command line switch to access each machine in turn. The resulting task runs every Friday at 6 P.M. using the system account.