The File Server Resource Manager (FSRM) is installed as a role service of the File Services Role and is made up of three tools:
These tools allow administrators of Windows Server 2008 file
servers to keep track of storage growth and usage, as well as create
hard or soft policies limiting the amount and type of files that users
can save in specific folders.
Note:
In the SBS Console, you can set the size of individual users’
shared folders. Other quotas you might want to set would be on
public folders or central company resource folders.
1. Scheduling Storage Reports
FSRM supports reporting in Dynamic Hypertext Markup Language (DHTML), HTML, Extended Markup Language (XML), Comma-Separated Values (CSV) text, or plain text,
making it easy to view reports or process them using scripts,
Microsoft Office Excel, or other applications.
FSRM can search and report on the following files and
events. Additional reports can be defined and included in the
list.
File Server Resource Manager is automatically installed when
you install Windows SBS 2011. To use it, you need only open Server
Manager from the Administrative Tools menu and then follow these
steps:
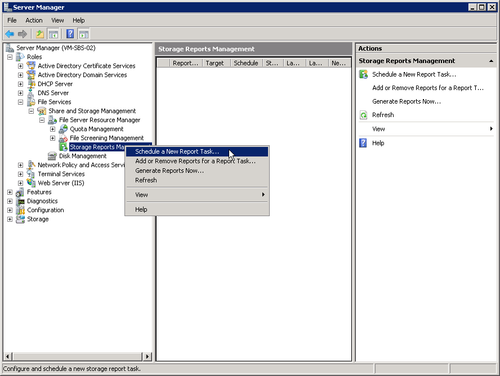
In the left pane, expand Roles, then File Services, then
Share And Storage Management, and then File Server Resource
Manager.
Right-click Storage Reports Management and select Schedule A
New Report Task (shown in Figure 1).

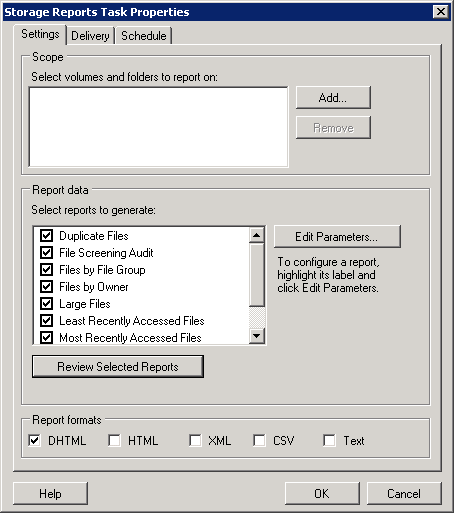
The Storage Reports Task Properties dialog box opens
(shown in Figure 2).

In the Scope section of the dialog box, click Add to
select the local folders that you want to monitor.
In the Report Data section of the dialog box, select the
reports that you want to generate. To view the settings for all
selected reports, click Review Selected Reports. To adjust the
settings for a report, select the report and then click Edit
Parameters.
In the Report Formats section of the dialog box, select
the formats in which you want to generate the reports.
Click the Delivery tab, select the Send Reports To The
Following Administrators check box, and type the email addresses
of the administrators who should receive the storage reports, using a semicolon to separate
addresses.
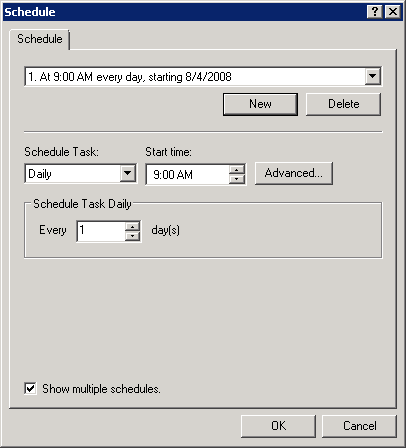
Click the Schedule tab and then click Create Schedule. In
the Schedule dialog box (shown in Figure 3), set the date and time
for the report to be generated.

When all three tab selections are made, click OK. The new
scheduled report task appears in the File Server Resource
Manager console.
To run the scheduled report immediately, right-click it and
choose Run Report Task Now. The Generate Storage Reports dialog box appears, asking whether you
want to view the reports immediately or whether File Server Resource
Manager should generate the reports in the background for viewing
later from the report storage folder.
|
To create a storage report, Windows creates a scheduled task
in the Task Scheduler library that uses the Volume Shadow Copy
Service to take a snapshot of the specified storage volumes, and
then creates the storage report from this snapshot using XML style
sheets stored in the
%WINDIR%\system32\srm\xslt folder. This
process minimizes the performance impact on the server, but does
degrade file server performance temporarily.
Schedule your storage reports during slack times to minimize the
impact on users, and combine reports whenever possible. Because
all storage reports in a storage report task use the same snapshot, you can
minimize the performance impact on a server by consolidating your
reports to minimize the number of snapshots required.
|
2. Using Directory Quotas
One way to slow the growth of storage on a network is to limit
the amount of disk space each user can use on a server. SBS 2011
provides two ways of doing this: disk quotas and directory quotas. Directory quotas allow you to manage storage
at a folder level. You can create quota templates and auto quotas that Windows automatically applies to
subfolders and newly created folders. Directory quotas, unlike
disk quotas, look at the actual amount of disk space
used by a file and provide powerful notification
capabilities.
Directory quotas apply to all users as a group; disk quotas
apply to individual users. Both directory quotas and disk quotas
apply to a single server. Quotas can use either hard limits, which
prevent users from exceeding their quotas, or soft limits, which
provide only a warning and notification.
Note:
Directory quotas are preferred in Windows SBS 2011. If you
choose to use disk quotas, you can set them by opening a disk’s
Properties dialog box and clicking the Quota tab.
2.1. Directory Quota Types
Directory quotas come in three varieties:
Quotas Sets the total
amount of disk space that a folder and all
subfolders can consume. For example, if you create
a quota that limits the \Users folder to 10 GB, the total
contents of this folder and all subfolders cannot exceed 10 GB
in size. If one user uses 9 GB of file space, all the other
users combined are limited to 1 GB.
Auto Quotas Sets the
amount of disk space that the first-level subfolders (child
folders) of a folder can consume. For example, if you create
an auto quota for the \Users folder and set the limit at 2 GB,
each first level of subfolder (for example, \Users\Charlie;
\Users\Wally) is limited to 2 GB in size. An auto quota does
not set a limit on the contents of the parent folder, only the
subfolders (child folders).
Quota Templates Standardizes and centralizes quota and auto
quota settings. When you change the settings of a quota
template, you can automatically apply the changes to all
quotas that use the quota template you change.
Note:
Directory quotas work only on fixed NTFS volumes;
you cannot use directory quotas on removable drives or FAT
volumes.