6. Screening Files
Administrators who use storage reports for the first time are
often surprised, and occasionally dismayed, at how many audio and
video files they find on file servers. In addition to the massive amounts of
disk space that audio and video files consume, organizations can be
exposed to legal liability if these files are obtained or shared
illegally.
To help administrators control what type of files users can
save on a file share, File Screening Management is part of the File Server
Resource Manager console. With File Screening Management,
administrators can block users from saving files with certain file
extensions to a specific file share, as discussed in the following
sections.
|
If you are serious about blocking personal audio and video
files on public file shares, you need two things:
An acceptable use policy that
clearly states what users can and cannot place on file
shares This policy should state that users cannot save
illegally obtained files of any type on company file servers,
including audio and video files for which the users have not
purchased a license. You might also want to state that users
can save only legally obtained audio and
video files to their home directory (on which you create a
directory quota, limiting users to a reasonable amount of disk
space). A file screen that implements this
policy The best way to get people to follow a company
policy is to make it hard for them to violate the policy. A
file screen makes it difficult for an average user to violate
an acceptable-use policy concerning audio and video files, and
it reduces legal liability by demonstrating that the
organization is taking active steps to prevent its employees
from violating its written policy.
Because file screens use a file-name mask and not a content mask to block
files, users can still save MP3 files by changing the file
extension of the file to something that isn’t blocked. However, if
you have a clear and unambiguous acceptable-use policy and a file
screen for that policy in place, this requires a willful violation
on the part of the user and a conscious attempt to cover up the
violation—something that most employees are unlikely to
risk.
|
6.1. Creating File Screens
To create a file screen, open the File Server Resource
Manager console and follow these steps:
Click the File Screening Management node.
Click the File Screens container, right-click File
Screens in the console tree, and choose Create File Screen.
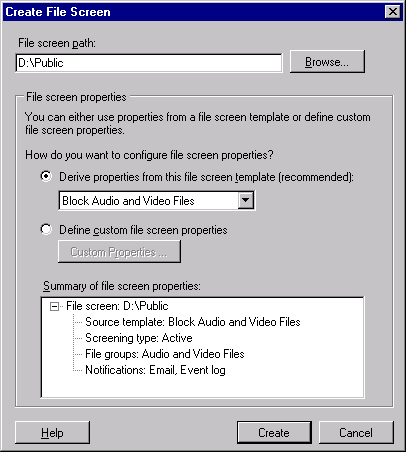
The Create File Screen dialog box opens, as shown in Figure 8.

Click Browse, select the folder to which you want to
apply the file screen, and then click OK.
Select the file screen template you want to apply, or
choose Define Custom File Screen Properties and then click
Custom Properties to create a custom file screen. Click OK
when you are finished.
If you chose to create a custom file screen, the Save
Custom Properties As A Template dialog box appears. Use this dialog box to save the custom file
screen as a file screen template, or choose Save The Custom
File Screen Without Creating A Template.
6.2. Creating Exceptions
To create an exception to a file screen, follow these
steps:
Click the File Screens container, right-click File Screens
in the console tree, and choose Create File Screen Exception.
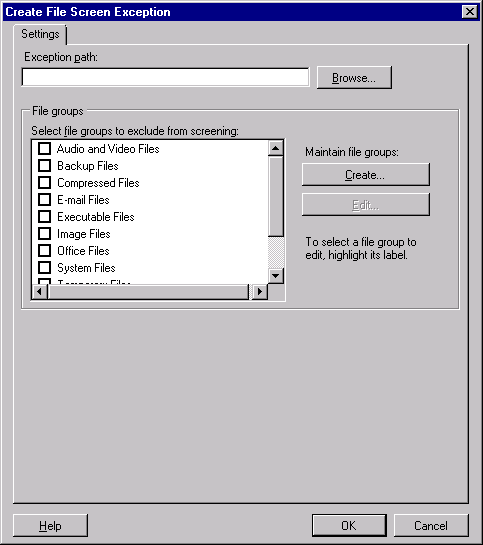
The Create File Screen Exception dialog box appears, as shown
in Figure 9.

Click Browse, select the folder to which you want to
apply the file screen exception, and then click OK. The folder
you select cannot already contain a file screen, but it can be
a subfolder of a folder that contains a file screen.
Select the groups that you want to allow, excluding them
from any file screens applied to parent folders. Click OK
when you are finished to return to the File Server Resource
Manager console.
6.3. Creating and Editing File Screen Templates
To create or edit a file screen template, follow these
steps:
In the File Server Resource Manager console, right-click
File Screen Templates and choose Create File Screen Template,
or right-click an existing template and choose Edit Template
Properties. To create a file screen template based on an
existing file screen, right-click the file screen and choose
Create A Template From File Screen.
To base the template on an existing template, in the
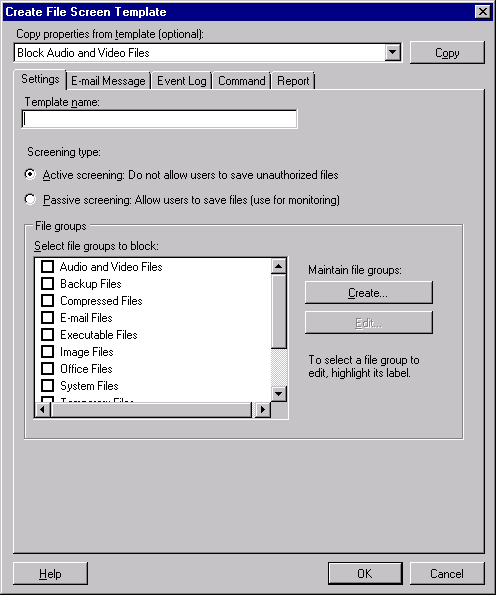
Create File Screen Template dialog box, choose a
template from the Copy Properties From Template box, as shown
in Figure 10.
Click Copy.

Type a name and label for the template in the Template
Name box.
Choose Active Screening to prevent users from saving files of
the type you specify, or choose Passive Screening to use the
file screen only for monitoring.
Select the file group or groups that you want to block.
To create a new file group, click Create; to edit an existing
file group, select the group and then click Edit.
Specify what actions to take when a user saves a
screened file type, and then click OK:
Use the E-Mail Message tab to send an email
notification to the user who saved a screened file type.
(You can also choose to send the notification to an
administrator.) Use the E-Mail Message section of the tab
to customize the message that Windows generates.
Use the Event Log tab to record a log entry on the
server when a user saves a screened file type.
Use the Command tab to run a command or script when
a user saves a screened file type.
Use the Report tab to generate a storage report when
a user saves a screened file type.
If you are editing an existing template, the Update
File Screens Derived From Template dialog box
appears. Choose one of the following options and then click
OK:
Apply Template Only To Derived
File Screens That Match The Original
Template Updates file screens based on the quota
template only if you have not customized them
Apply Template To All Derived
File Screens Updates all file screens based on
the quota template
Do Not Apply Template to
Derived File Screens Does not update any file
screens based on the template
6.4. Working with File Groups
A file group is a group of files with a common set of
characteristics in their file names. For example, the Audio and
Video file group includes audio files (with .mp3, .wma, and .aac
file extensions), and video files (with .wmv, .mpeg, and .mov file
extensions). Storage reports use file groups when reporting on the types of files
present on a file share, while file screening uses file groups to control which files to block. To
create or edit a file group, follow these steps:
In the File Server Resource Manager console, select File
Screening Management.
Right-click the File Groups container and choose Create
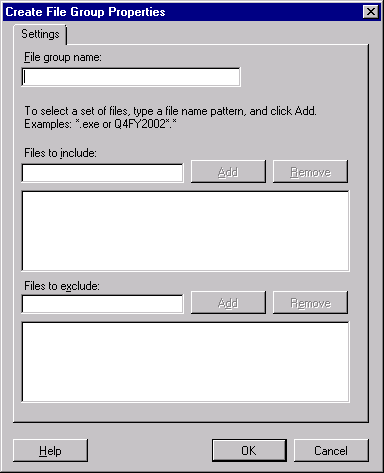
File Group. The Create File Group Properties dialog box opens,
as shown in Figure 11.

Type a name for the file group in the File Group Name box.
In the Files To Include box, type the file-name
criteria to include in the group. Use asterisks (*) as
wildcards and then click Add.
To exclude files from the file group, type the file-name
criteria to exclude from the file group in the Files To
Exclude box. Click OK.
File screening isn’t just for file extensions. It’s
actually based on pattern matching against the entire file name to
define the file group. This means you can have a file group that
matches all MP3 files by creating a file group that matches
“*.mp3”. But you could also have a file group that matched all
Company Policy files by matching “pol*.pdf” if all your company
policies are stored in files that start with “pol” and are Adobe
PDF files. Or, if monthly financial reports are consistently
stored as MMYYYY.XLS, you could create a file group that matched
all 2010 financials by using ??2010.XLS as
your pattern.
The usual tendency with file groups is to think of selecting files solely
by extension. But by using the entire file name in the pattern
match, you can use file groups more creatively and also do enhanced
reporting based on the file groups.