In this section, you’ll learn
how to work with Windows Vista’s existing file types. I’ll show you how
to change the file type description, modify the file type’s actions,
associate an extension with another file type, and disassociate a file
type and an extension. Note that previous versions of Windows had a
decent front-end for these types of hacks: the File Types tab in the
Folder Options dialog box. Alas, that tab is nowhere in sight in Windows
Vista, so you must use the Registry directly for some of what follows.
Setting the Default Action
Many file types have a
default action that Windows Vista runs when you double-click a document
of that file type. You can see the default action by right-clicking a
document and examining the shortcut menu for the command that appears in
bold type. You can edit the Registry to change the default action for a
file type. Why would you want to do this? Here are some examples:
For HTML documents (.htm or .html extension), the default action is Open,
which opens the document in Internet Explorer. If you hand-code HTML
pages, you might prefer the default action to be Edit so that you can
quickly load the documents in your text editor.
For images, the default action is Preview,
which opens images in the Photo Gallery Viewer. Again, if you work with
images frequently (creating them, cropping them, converting them, and
so on), you might prefer that Edit be the default action.
For Windows Scripting Host file types such as VBScript Script File (.vbs extension) and JScript Script File (.js extension), the default action is Open,
which runs the script. However, these scripts can contain malicious
code, so you can boost the security of your system by changing the
default action for these file types to Edit.
To change the default action for a file type, follow these steps:
1. | Open the Registry Editor.
|
2. | Navigate to the key associated with the file type you want to work with.
|
3. | Open the key and click the Shell branch.
|
4. | Double-click the Default value to open the Edit String dialog box.
|
5. | Type the name of the action that you want to be the default. For example, if you want the Edit action to be the default, type Edit.
|
6. | Click OK.
|
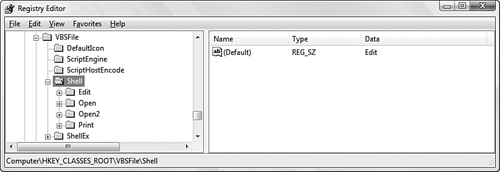
Figure 1 shows the VBSFile file type (VBScript Script File) with the Shell branch’s Default setting changed to Edit.

Tip
When you want to open a
folder window in the two-paned Explorer view, you have to right-click
the folder and then click Explore. To make the latter the default action
for a folder, edit the Folder file type, select explore in the Actions list, and then click Set Default.
Creating a New File Type Action
You’re not stuck with
just the actions that Windows Vista has defined for a file type. You can
add as many new actions that you can think of. For example, if you work
with HTML documents, you could keep the default Edit action as it is (this opens the file for editing in Notepad) and create a new action—called, for example, Open in HTML Editor—that
opens the file in an HTML editor that you have installed. When you
right-click an HTML file, the menu that appears will show both commands:
Edit (for Notepad) and Open in HTML
Editor (for the other editor; note that, for simplicity’s sake, I’m
assuming here that when you installed the HTML editor, it didn’t modify
the Edit action to point to itself).
To create a new action for an existing file type, follow these steps:
1. | Open the Registry Editor.
|
2. | Navigate to the key associated with the file type you want to work with.
|
3. | Open the key and click the Shell branch.
|
4. | Select Edit, New, Key, type the name of the new action, and press Enter.
|
5. | Select Edit, New, Key, type command, and press Enter.
|
6. | In the command branch, double-click the Default value to open the Edit String dialog box.
|
7. | Type the full pathname of the application you want to use for the action. Here are some notes to bear in mind:
If the pathname of the executable file contains a space, be sure to enclose the path in quotation marks, like so: "C:\Program Files\My Program\program.exe"
If you’ll be using documents that have spaces in their filenames, add the %1 parameter after the pathname: "C:\Program Files\My Program\program.exe" "%1"
The %1
part tells the application to load the specified file (such as a
filename you click), and the quotation marks ensure that no problems
occur with multiple-word filenames. If you’re adding a Print action, be sure to include the /p switch after the application’s pathname, like this: “C:\Program Files\My Program\program.exe” /p
Tip
You can define
an accelerator key for the new action. Click the branch that holds the
action name, and then double-click the Default value. In the Edit String
dialog box, type the action name and precede a letter with an ampersand
(&). That letter will be the menu accelerator key. For example,
entering Open in &HTML Editor
defines H as the accelerator key. When you right-click a file of this
type, you can then press H to select the command in the shortcut menu.
|
8. | Click OK.
|
Example: Opening the Command Prompt in the Current Folder
When
you’re working in Windows Explorer, you might find occasionally that
you need to do some work at the command prompt. For example, the current
folder might contain multiple files that need to be renamed—a task
that’s most easily done within a command-line session. Selecting Start,
All Programs, Accessories, Command Prompt starts the session in the
%USERPROFILE% folder, so you have to use one or more CD commands to get
to the folder you want to work in.
An easier way would be to
create a new action for the Folder file type that launches the command
prompt and automatically displays the current Windows Explorer folder.
To do this, follow these steps:
1. | Open the Registry Editor.
|
2. | Navigate to the Folder key.
|
3. | Open the key and click the shell branch.
|
4. | Select Edit, New, Key, type Open with Command Prompt, and press Enter.
|
5. | Select Edit, New, Key, type command, and press Enter.
|
6. | In the command branch, double-click the Default value to open the Edit String dialog box.
|
7. | Type the following:
Note
The cmd.exe file is the command prompt executable file. The /k switch tells Windows Vista to keep the command prompt window open after the CD (change directory) command completes. The %L placeholder represents the full pathname of the current folder.
|
8. | Click OK.
|
Figure 2 shows two windows. The top window is the Registry Editor showing the new Open with Command Prompt action added to the Folder\shell key; in the bottom window, I right-clicked a folder. Notice how the new action appears in the shortcut menu.

Hiding a File Type’s Extension
A shortcut is a file that points to another object: a document, folder, drive, printer, and so on. Shortcuts use the .lnk extension, which is associated with the lnkfile file type. Strangely, if you turn on file extensions, you still never see the .lnk
extension when you view a shortcut file. Presumably, Windows Vista
hides the extension because we’re not supposed to think of the shortcut
as an actual file, just a pointer to a file. That’s fine with me, but
how does Vista accomplish the trick of always hiding a shortcut’s file
extension?
The secret is that the Registry’s lnkfile (shortcut) key has an empty string setting named NeverShowExt. When Vista comes across this setting, it always hides the file type’s extension.
You might want to
duplicate this effect for another file type. If you have multiple users
on your computer, for example, you might want to turn on file
extensions, but hide the extensions of an important file type to ensure
that users can’t change it. Follow these steps to always hide a file
type’s extension:
1. | Open the Registry Editor.
|
2. | Navigate to the key of the file type you want to work with.
|
3. | Select Edit, New, String Value.
|
4. | Type NeverShowExt and press Enter.
|
Associating an Extension with a Different Application
There are many reasons
you might want to override Windows Vista’s default associations and use
a different program to open an extension. For example, you might prefer
to open text files in WordPad instead of Notepad. Similarly, you might
want to open HTML files in Notepad or some other text editor rather than
Internet Explorer.
In
those cases, you need to associate the extension with the application
you want to use instead of the Windows default association. In Windows
Vista, you use the Open With dialog box to change the associated
application, and Vista gives you many different ways to display this
dialog box:
| Right click | With
this method, right-click any file that uses the extension and then
click Open With. If the file type already has multiple programs
associated with it, you’ll see a menu of those programs. In this case,
click the Choose Default Program command from the menu that appears. |
| Task pane | When
you click a file, Windows Explorer’s Task pane displays a button that
represents the default action for the file type. For example, if you
click an image, a Preview button appears in the Task pane; if you click
an audio file, you see a Play button in the Task pane. In most cases,
this default action button also doubles as a drop-down list. Display the
list and click Choose Default Program. |
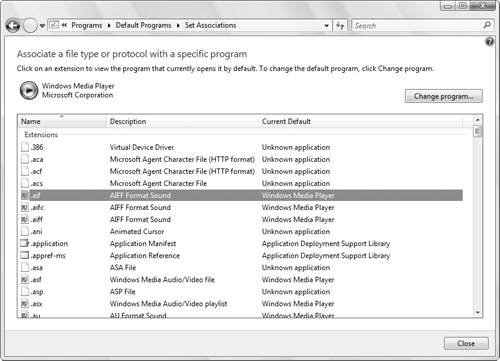
| Set Associations | Select
Start, Default Programs, Associate a File Type or Protocol With a
Program. This displays the Set Associations window, shown in Figure 3, which displays a list of file extensions. Click the file type you want to work with and then click Change Program. |

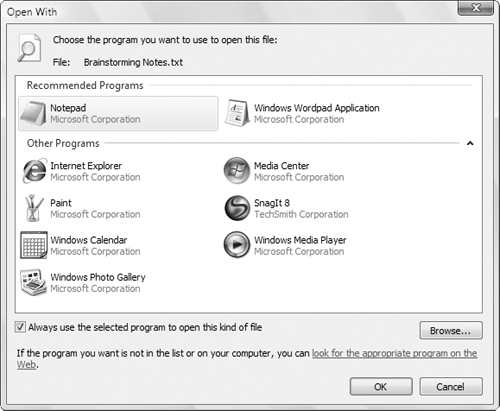
No matter which method you use, you end up in the Open With dialog box, shown in Figure 4. From here, you follow these steps:
1. | Select
the program you want to associate with the file type. (If you don’t see
the program, click Browse, use the new Open With dialog box to select
the program’s executable file, and then click Open.)
|
2. | Make
sure that the Always Use the Selected Program to Open This Kind of File
check box is activated. (If you arrived at the Open With dialog box via
the Set Associations window, this check box is always activated and
disabled.)
|
3. | Click OK.
|

Associating an Application with Multiple File Types
Many
applications can work with multiple file types. For example, Media
Player can play more than 30 file types, including Windows Media Audio (.wma), MP3 (.mp3), CD Audio Track (.cda), and AVI (.avi).
Windows Vista has a new Set Default Programs window that enables you
specify which file types are associated with a particular application.
Here’s how to use it:
1. | Select Start, Default Programs to display the Default Programs window.
|
2. | Select Set Your Program Defaults to display the Set Default Programs window.
|
3. | Use the Programs list to select the application you want to work with.
|
4. | You now have two choices:
If you want
to associate with the program all the file types that the program is
capable of handling, click the Set As Default button. If
you want to associate with the program only some of the file types that
it can handle, click Choose Defaults to display the Set Program
Associations window. Activate the check box for each file type you want
to associate with the program, and then click Save.
|
5. | Click OK. |